Default Excel vs Customized Excel: When Is Mapping Required ?
Learn when Excel to Tally mapping is required in Edocsmart, how Default and Customized Excel formats differ, and what to check before importing your records.
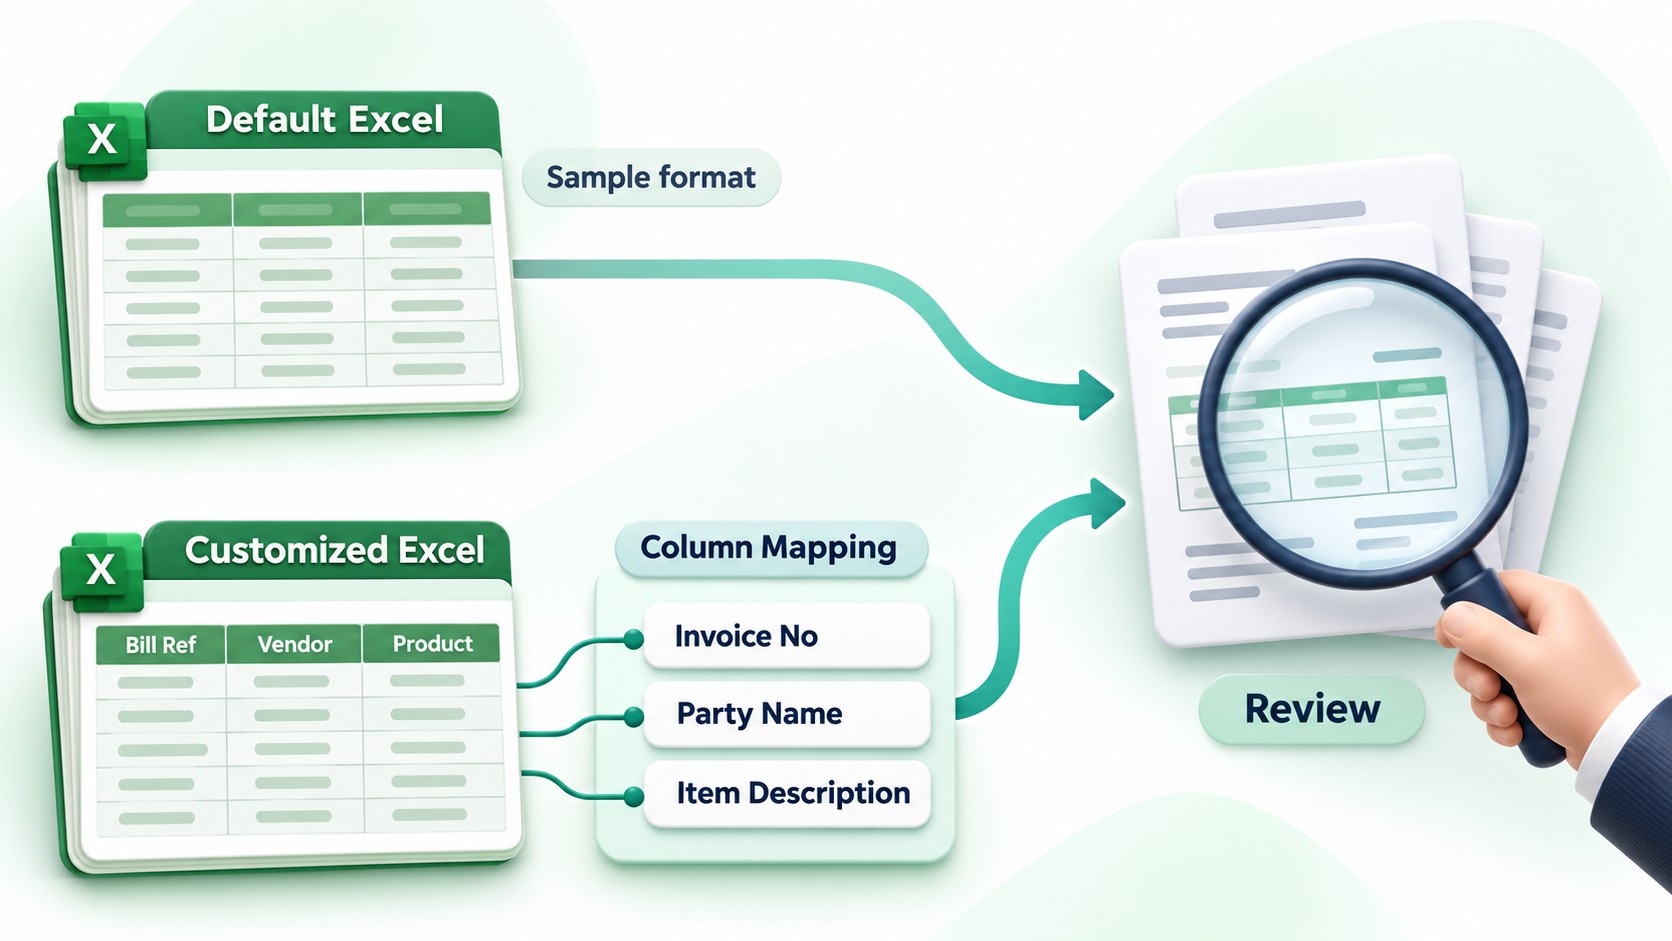
An accountant receives an Excel purchase report from a client. The information is ready, but the headings are different from the sample file he downloaded from Edocsmart. His report uses “Bill Ref,” “Vendor,” and “Product,” while the sample follows a standard structure.
He wonders whether he needs to copy everything into the sample file before uploading. With more reports arriving every month, that could become another repetitive task.
In Edocsmart, the choice depends on the file format. If he uses the Edocsmart sample Excel in its expected structure, he does not need to configure manual column mapping. If he wants to use his own supported Excel format, he needs to connect its columns with the appropriate system fields.
Understanding this difference makes Excel to Tally mapping easier to prepare and review.
Two Excel Formats in Edocsmart
Edocsmart provides Default Excel and Customized Excel options in its Excel mapping screen.
These options describe how the workbook is structured and how its columns are read.
| What to compare | Default Excel | Customized Excel |
|---|---|---|
| File format | Edocsmart’s sample format | Your own supported Excel format |
| Manual column mapping | Not required when the expected structure is followed | Required to connect your columns with system fields |
| Column headings | Retain the sample headings and layout | Select the appropriate source headings |
| Suitable for | Users comfortable preparing data in the sample | Users working with existing reports |
| Review before syncing | Required | Required |
When using Excel to Tally software, choosing the correct format is an important part of preparing the import.
Default Excel: Use the Edocsmart Sample
Default Excel is suitable when you prepare your records using Edocsmart’s sample workbook.
The sample already follows the structure expected by the default workflow. You fill in the relevant transaction information while keeping the required headings and layout.
You do not need to manually match each sample column with an Edocsmart system field.
However, the sample may contain several rows for one transaction, including item details and accounting allocations. Follow its structure carefully rather than assuming that every row represents a separate invoice.
Default Excel can be useful when you are starting a new reporting process or can prepare your data in the supplied format.
What Still Needs Checking?
Using the sample removes the manual column-mapping task. You still need to check the information and accounting settings.
Review invoice references, dates, parties, item details, amounts, and applicable tax information. Also check the relevant ledger defaults, voucher-number settings, and stock treatment.
Values shown in a sample file or screenshot should be replaced with information appropriate to your records.
Customized Excel: Work with Your Existing Report
Customized Excel is suitable when your workbook uses a different supported structure.
For example, your billing system may export a column called “Vendor,” while Edocsmart uses the system field PARTY NAME. Mapping tells the workflow where to find that information.
Here is an illustrative mapping:
| Your Excel heading | Edocsmart system field |
|---|---|
| Bill Ref | INVOICE NO |
| Bill Date | INVOICE DATE |
| Vendor | PARTY NAME |
| Product | ITEM DESCRIPTION |
| Line Value | AMOUNT |
| Bill Total | GRAND TOTAL |
Read the values beneath each heading before selecting it. “Line Value” could contain an item amount, while “Bill Total” could contain the complete invoice amount. Mapping them incorrectly can affect the prepared records.
With customized mapping, you can connect the relevant source columns without renaming every heading to match the sample.
How to Use Default Excel
1. Download the Relevant Sample
Open Transactions, select Sales or Purchase, and open the Excel workspace.
Use Download Sample to obtain the workbook appropriate to your records.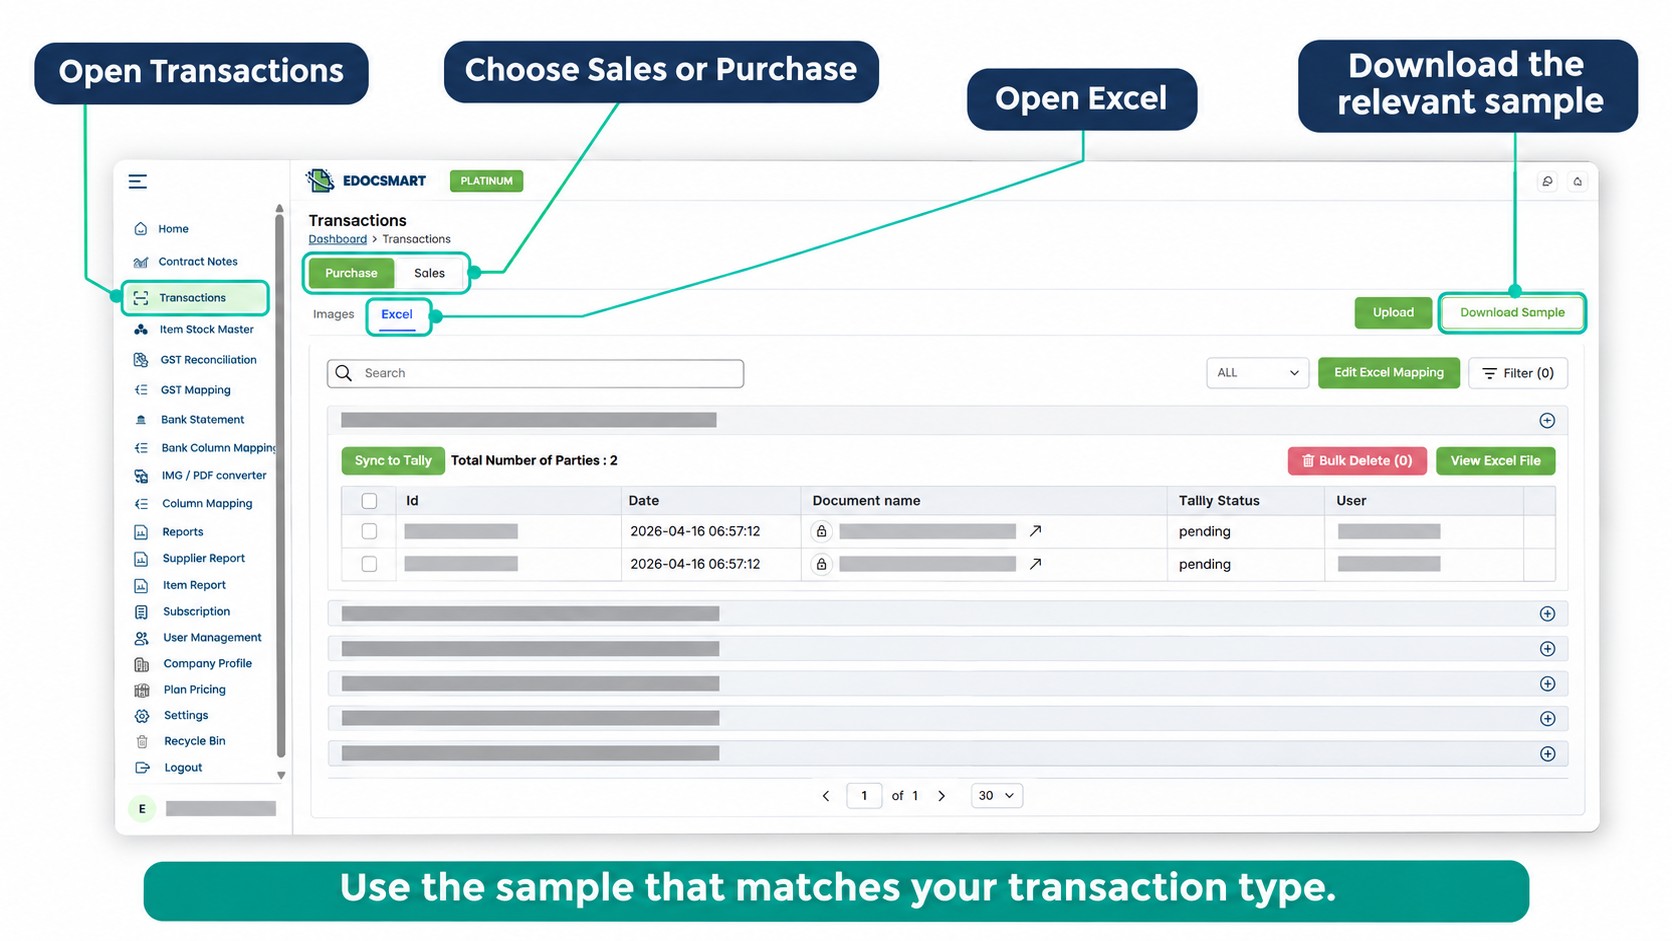
2. Prepare Your Data
Replace the sample information with your transaction details.
Retain the expected headings and structure. Follow the sample’s arrangement for parties, items, and other accounting rows where applicable.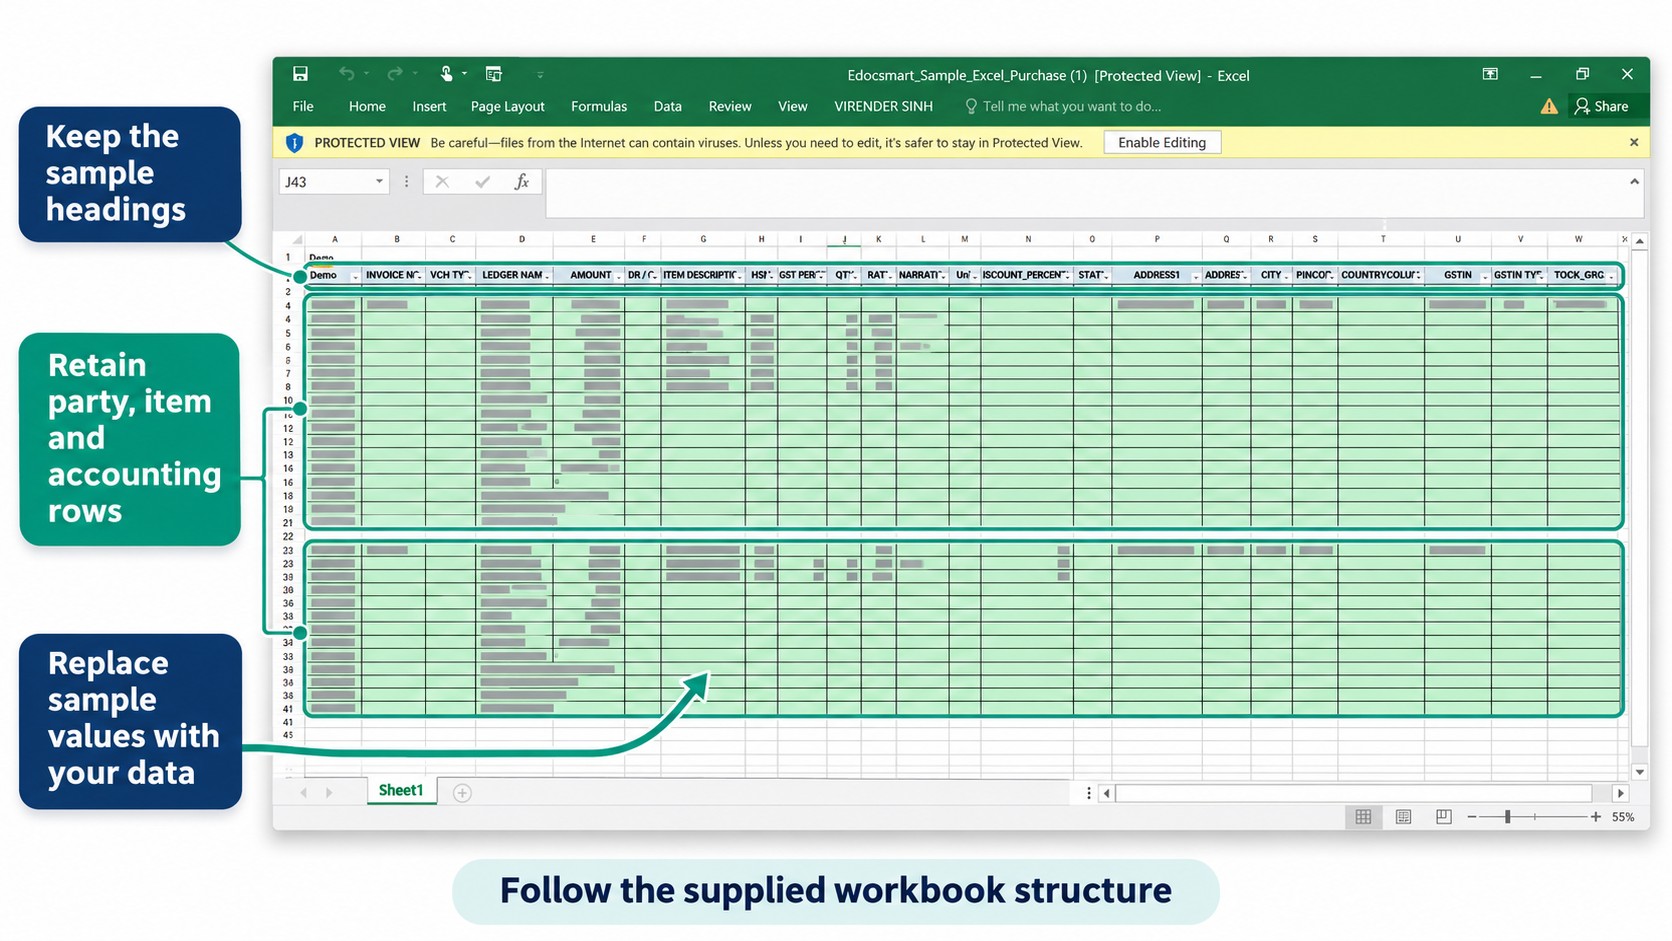
3. Select Default Excel
Open Edit Excel Mapping and select Default Excel.
Review the available accounting settings, including relevant ledger names, tax registration type, voucher-number settings, and Maintain Stock. Save the intended configuration.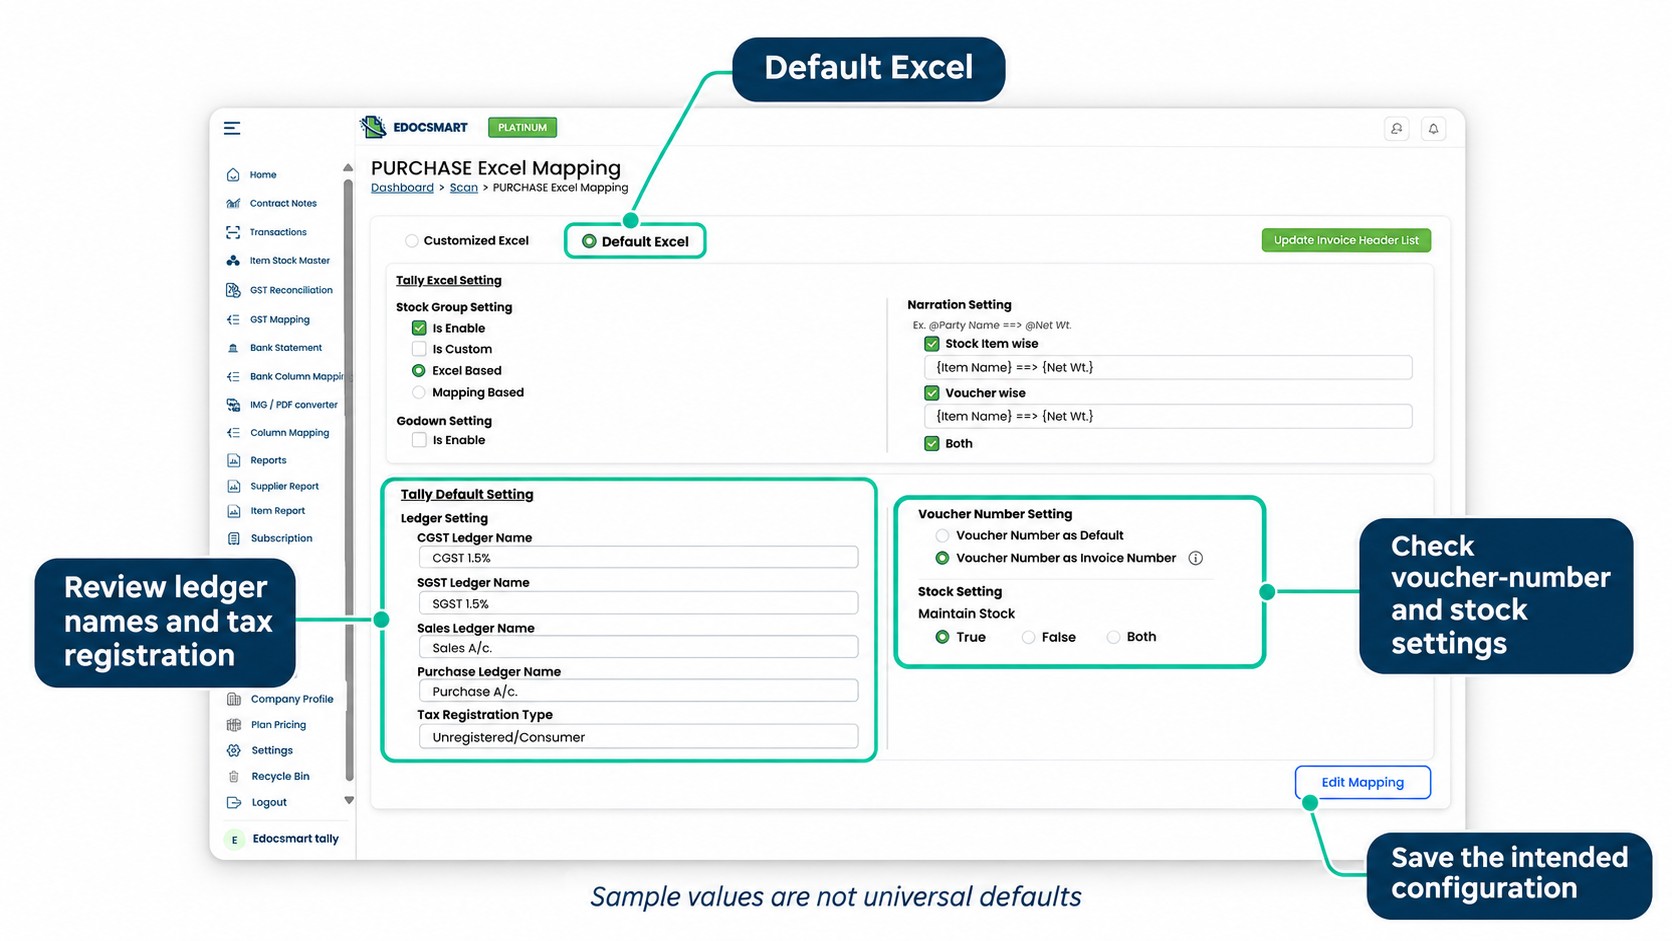
4. Upload and Review
Upload the prepared workbook and enter the actual Header Row Number when requested.
The header row contains the column labels. It may appear below a report title or other introductory information.
Review the prepared records against the workbook before approving them.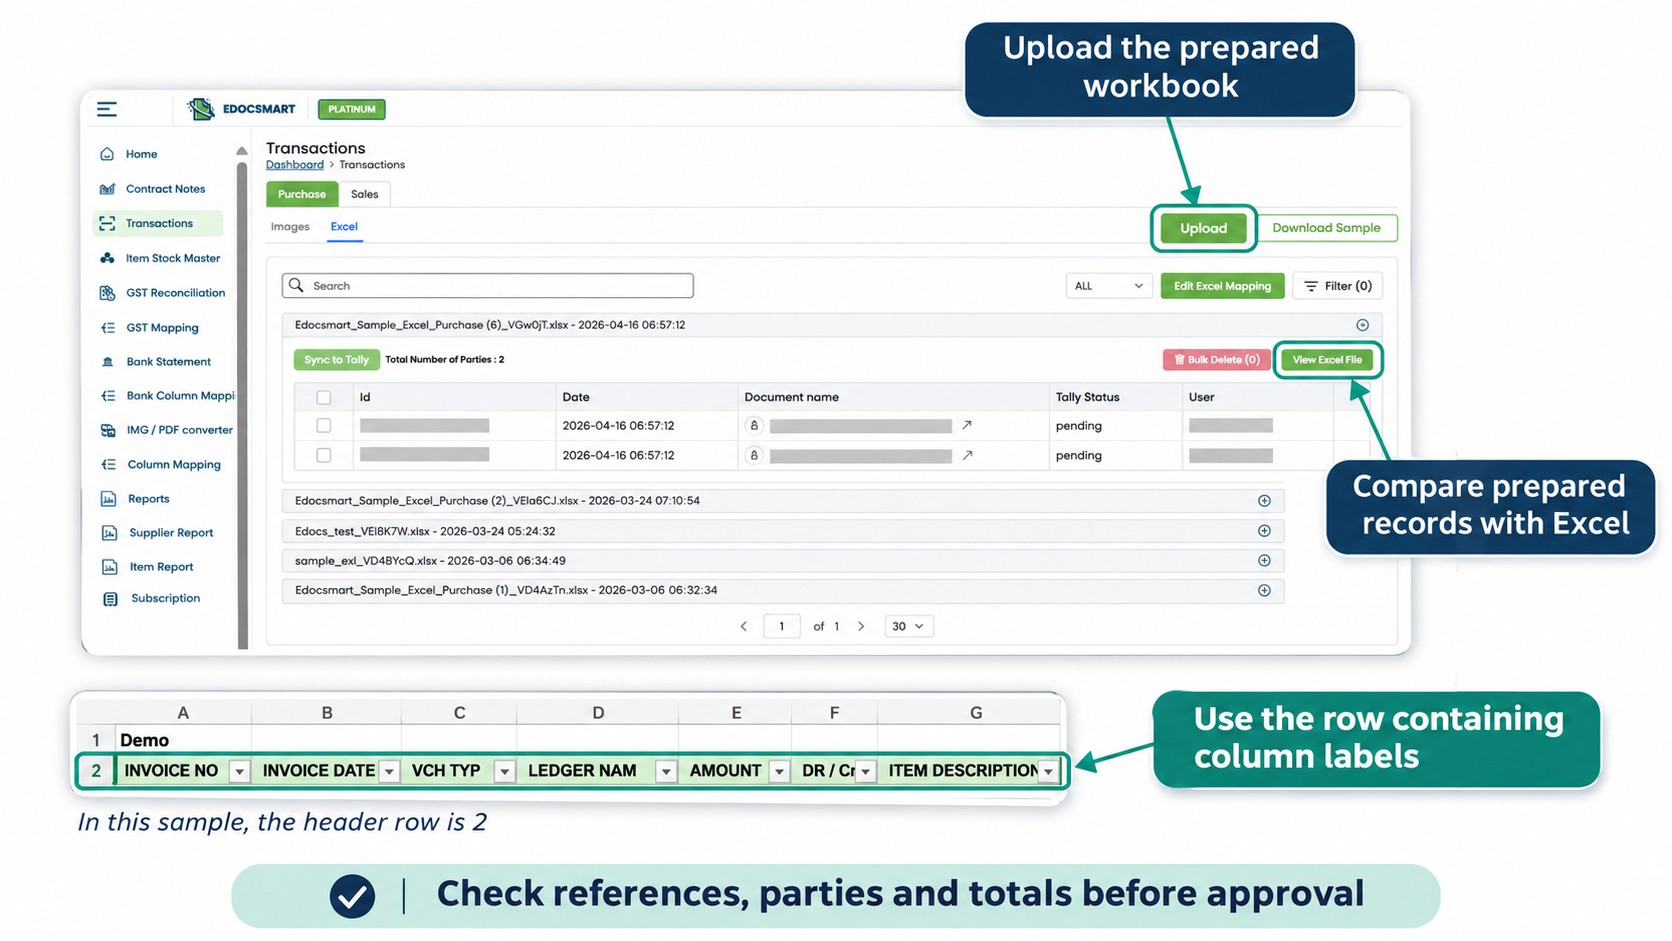
How to Use Customized Excel
1. Check Your Excel sheet
Keep the original file and prepare a working copy.
Identify the header row and confirm what each relevant column contains. Check how multiple item rows relate to the same invoice.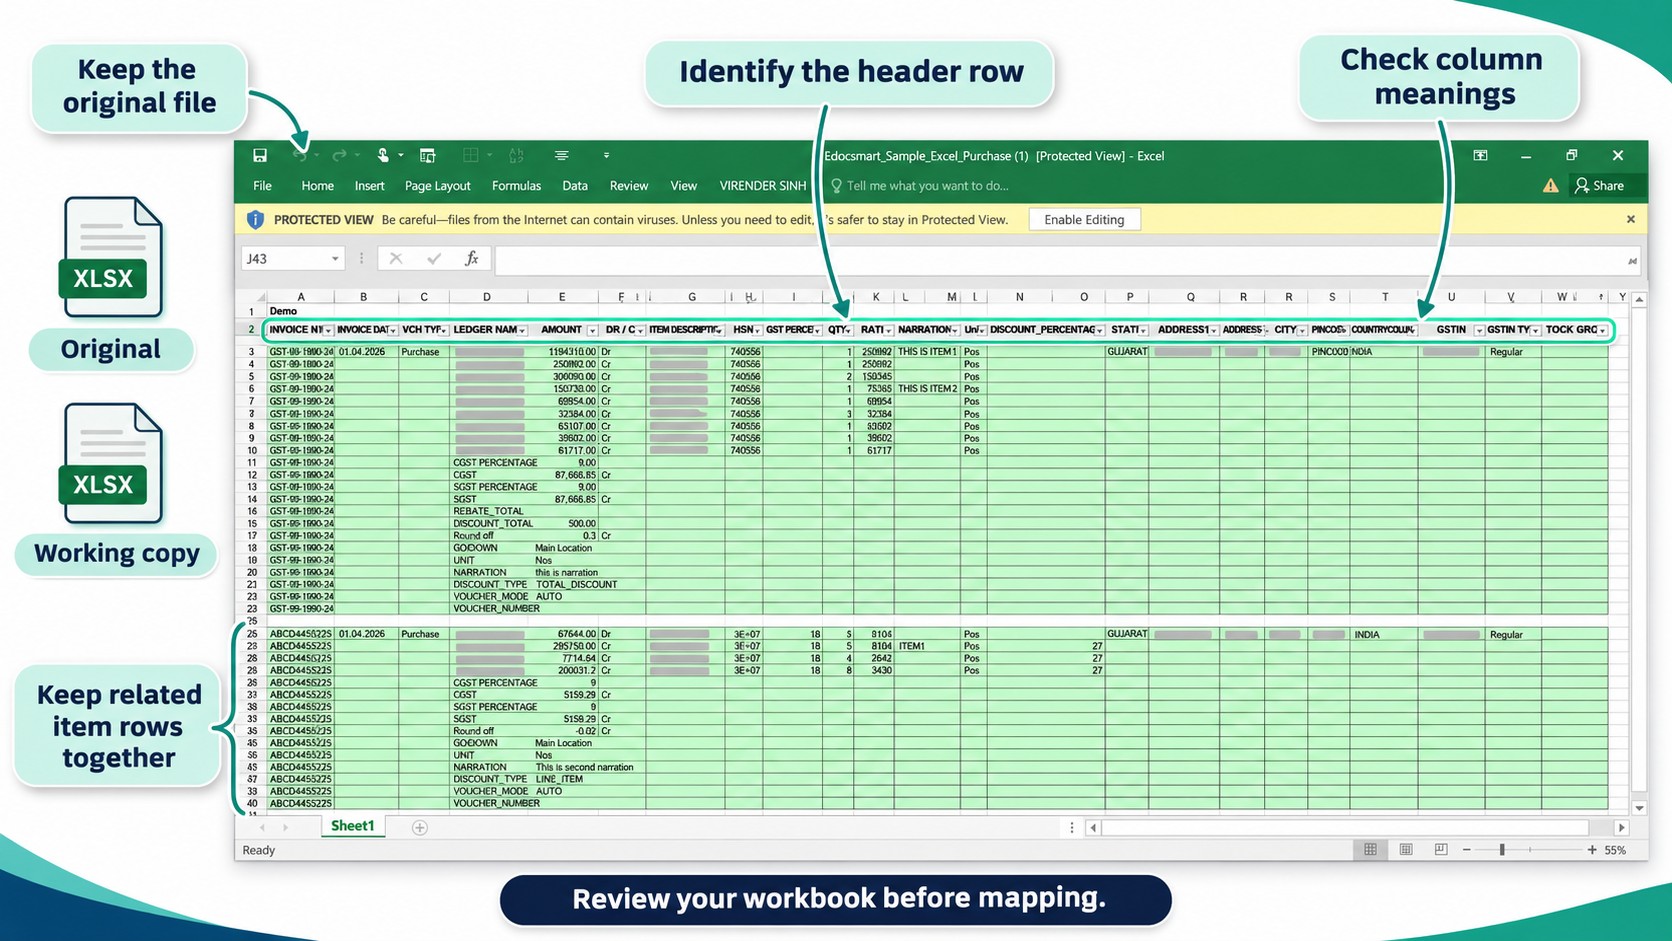
2. Configure the Source Columns
Open Edit Excel Mapping and select Customized Excel.
Match the required System Headers with the appropriate Invoice Header selections.
Check invoice references, dates, party names, item descriptions, quantities, units, rates, and amounts according to the workflow.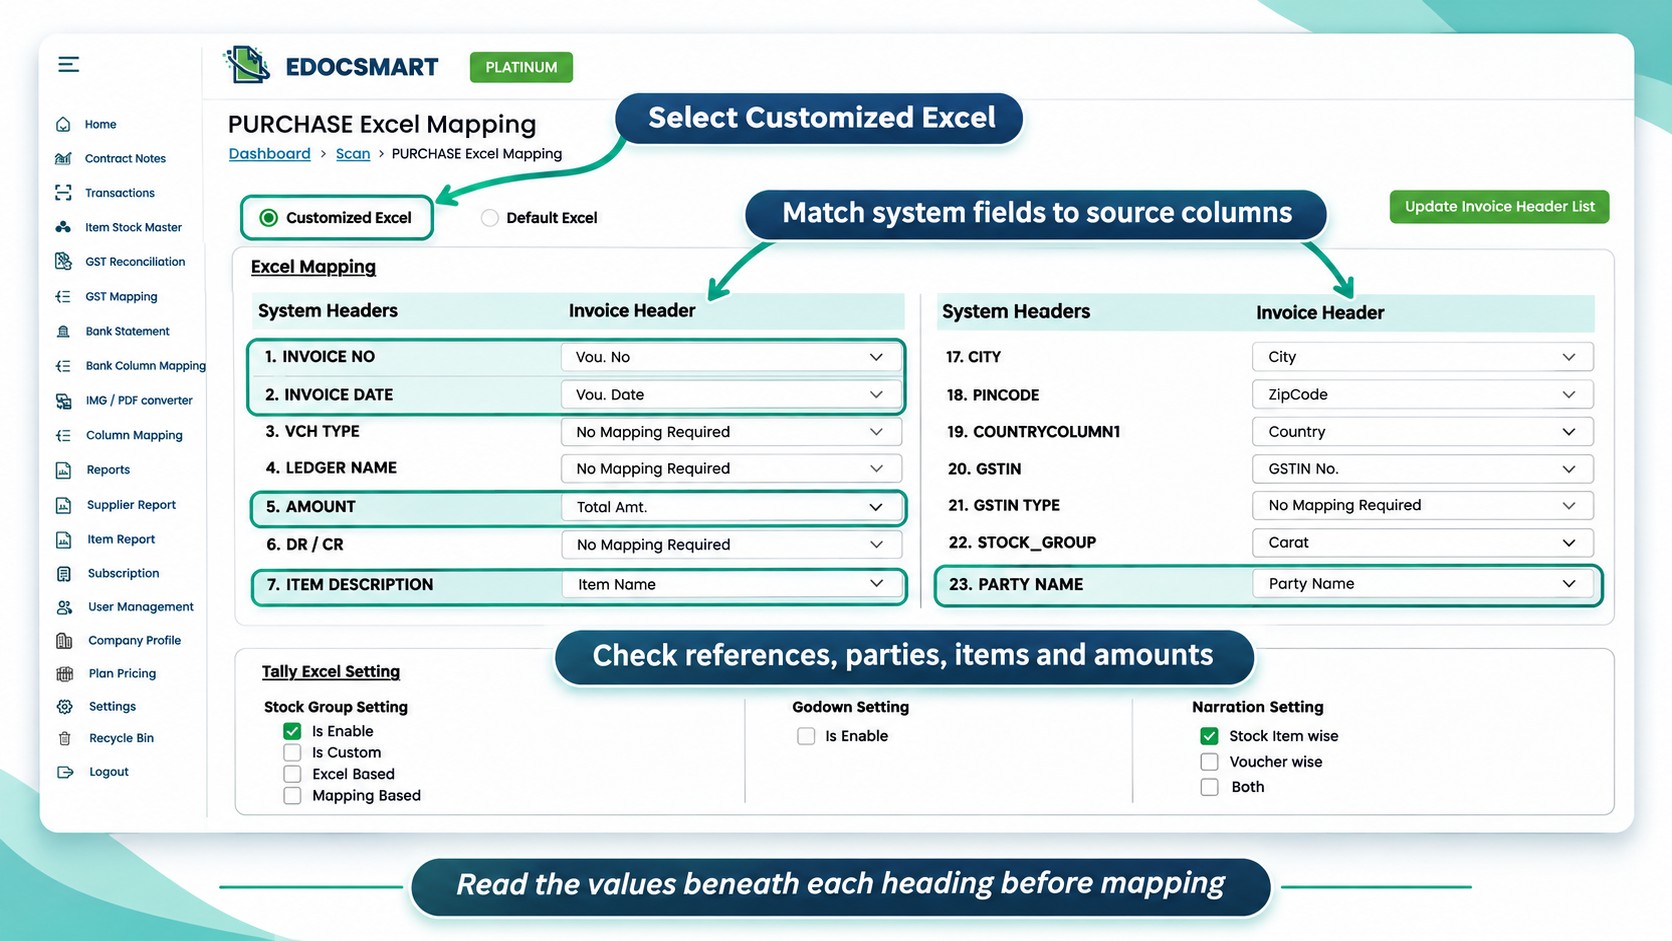
3. Review Accounting Settings
Column mapping identifies the source of a value. Accounting settings determine how the prepared transaction should use the available information.
Review the relevant ledger, voucher, stock, and other settings separately, then save the configuration.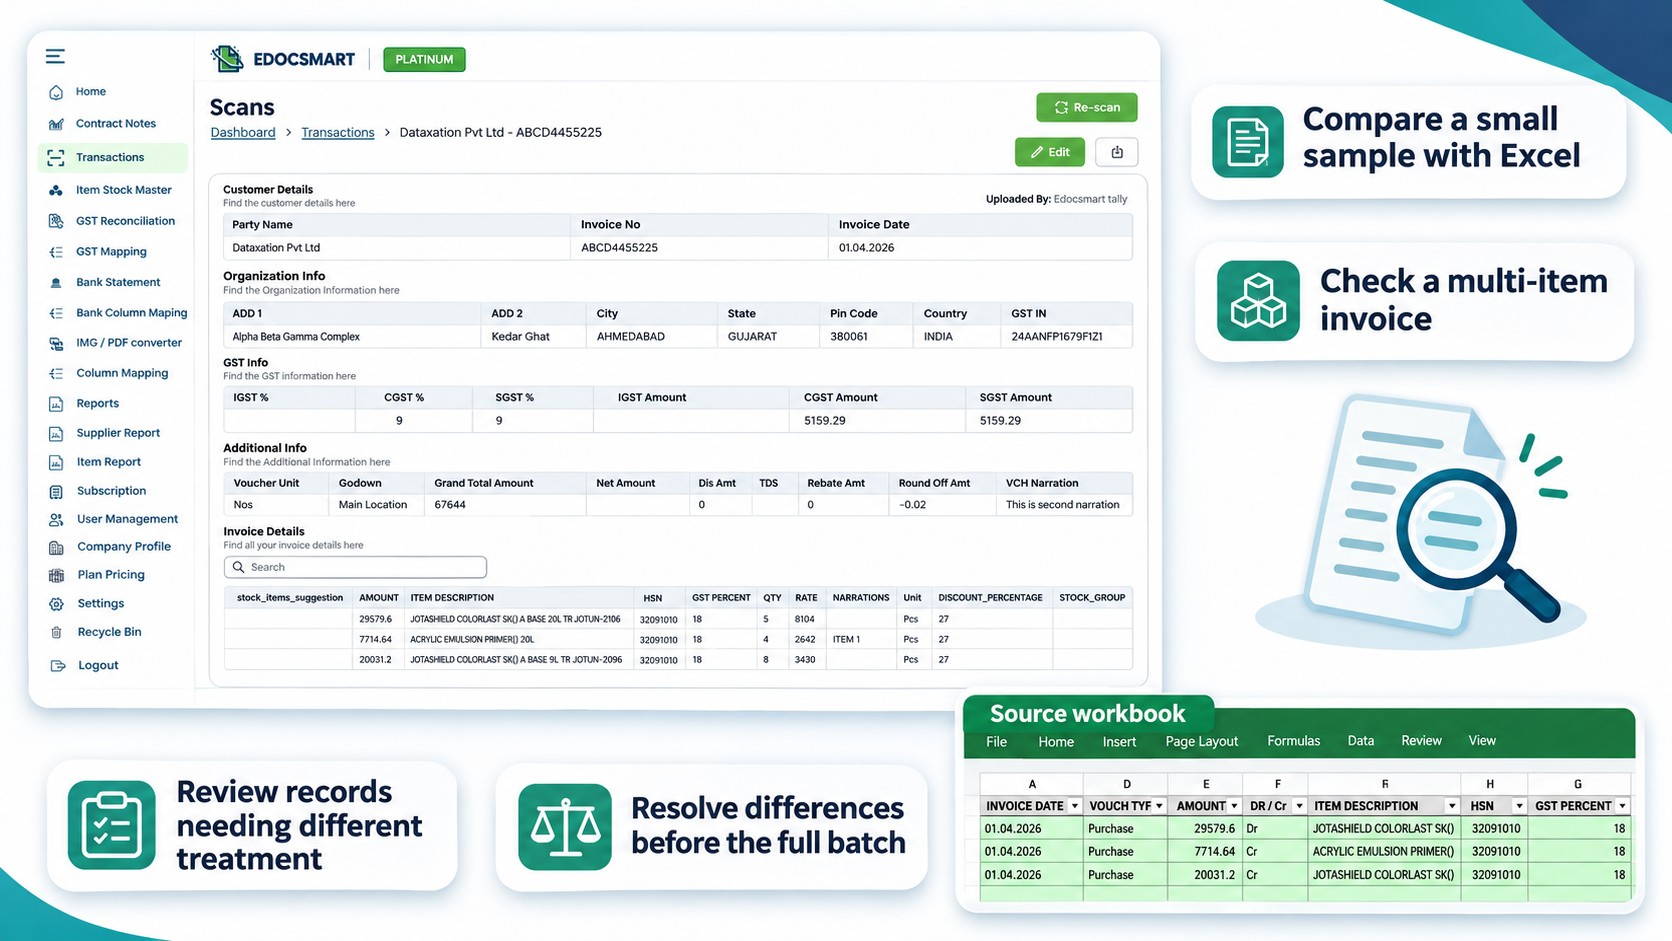
4. Process a Small Sample
Upload representative records and compare the prepared information with Excel.
Include a multi-item invoice and any records that need different treatment. Resolve mapping or configuration differences before processing the full batch.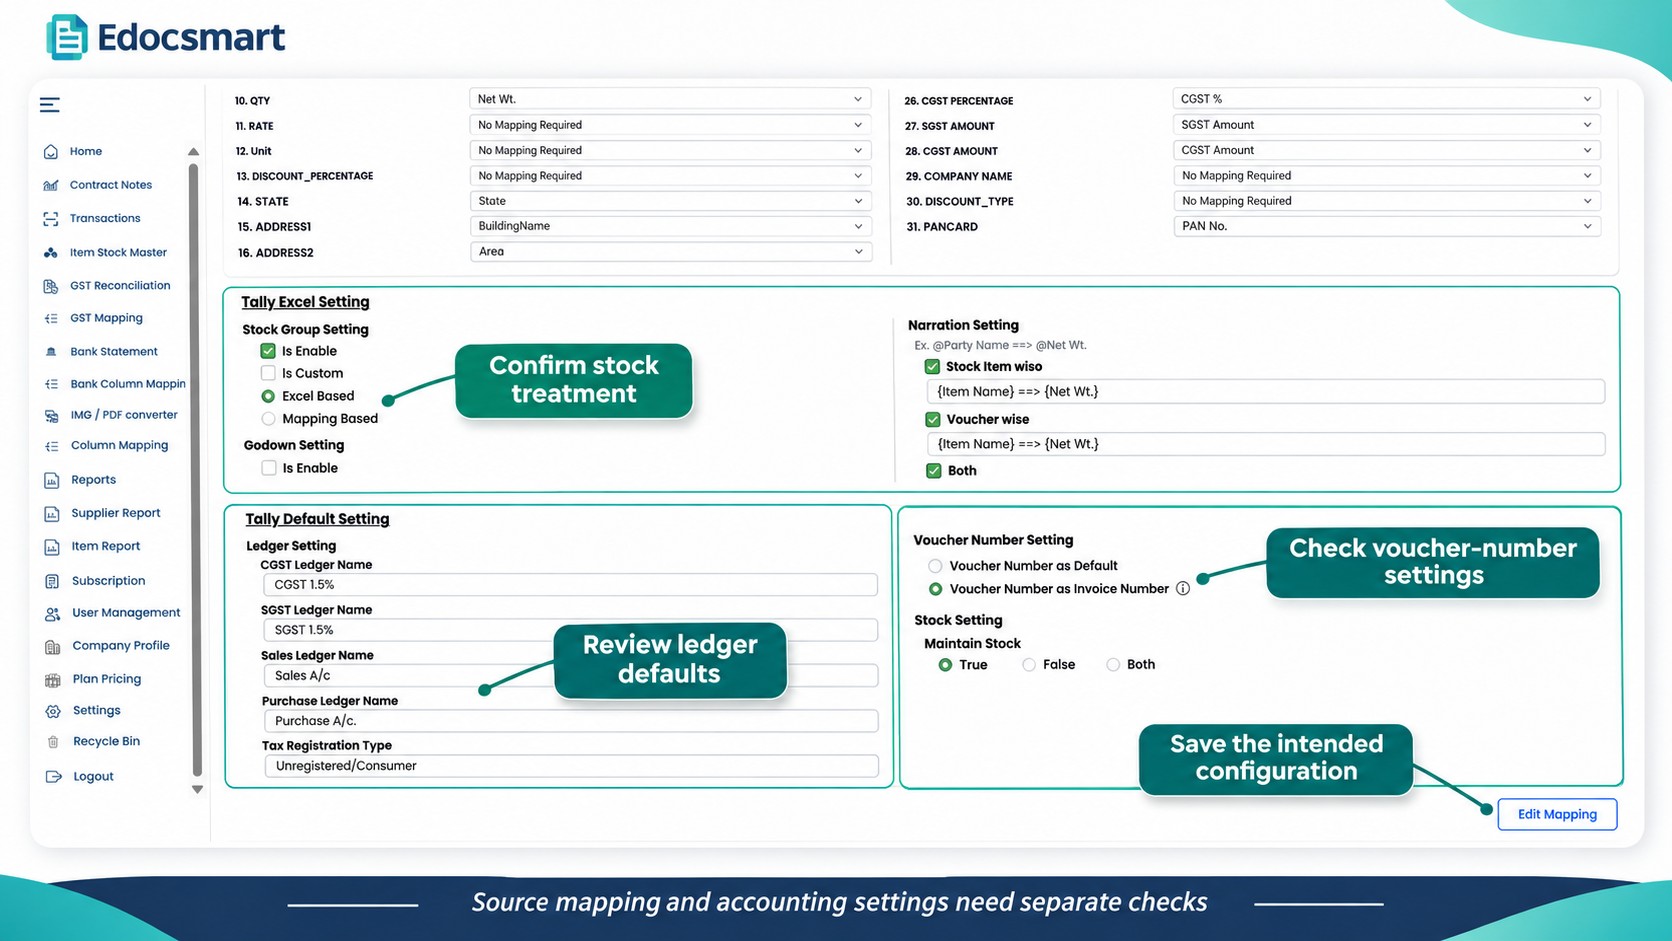
Verify a Sample in Tally
For either Excel format, keep a current company backup before syncing.
Open the intended Tally company and start the Edocsmart Tally Connector. Sync a small approved sample and inspect the resulting vouchers.
Check party details, invoice references, ledger allocations, item information, and totals before continuing with the remaining approved records.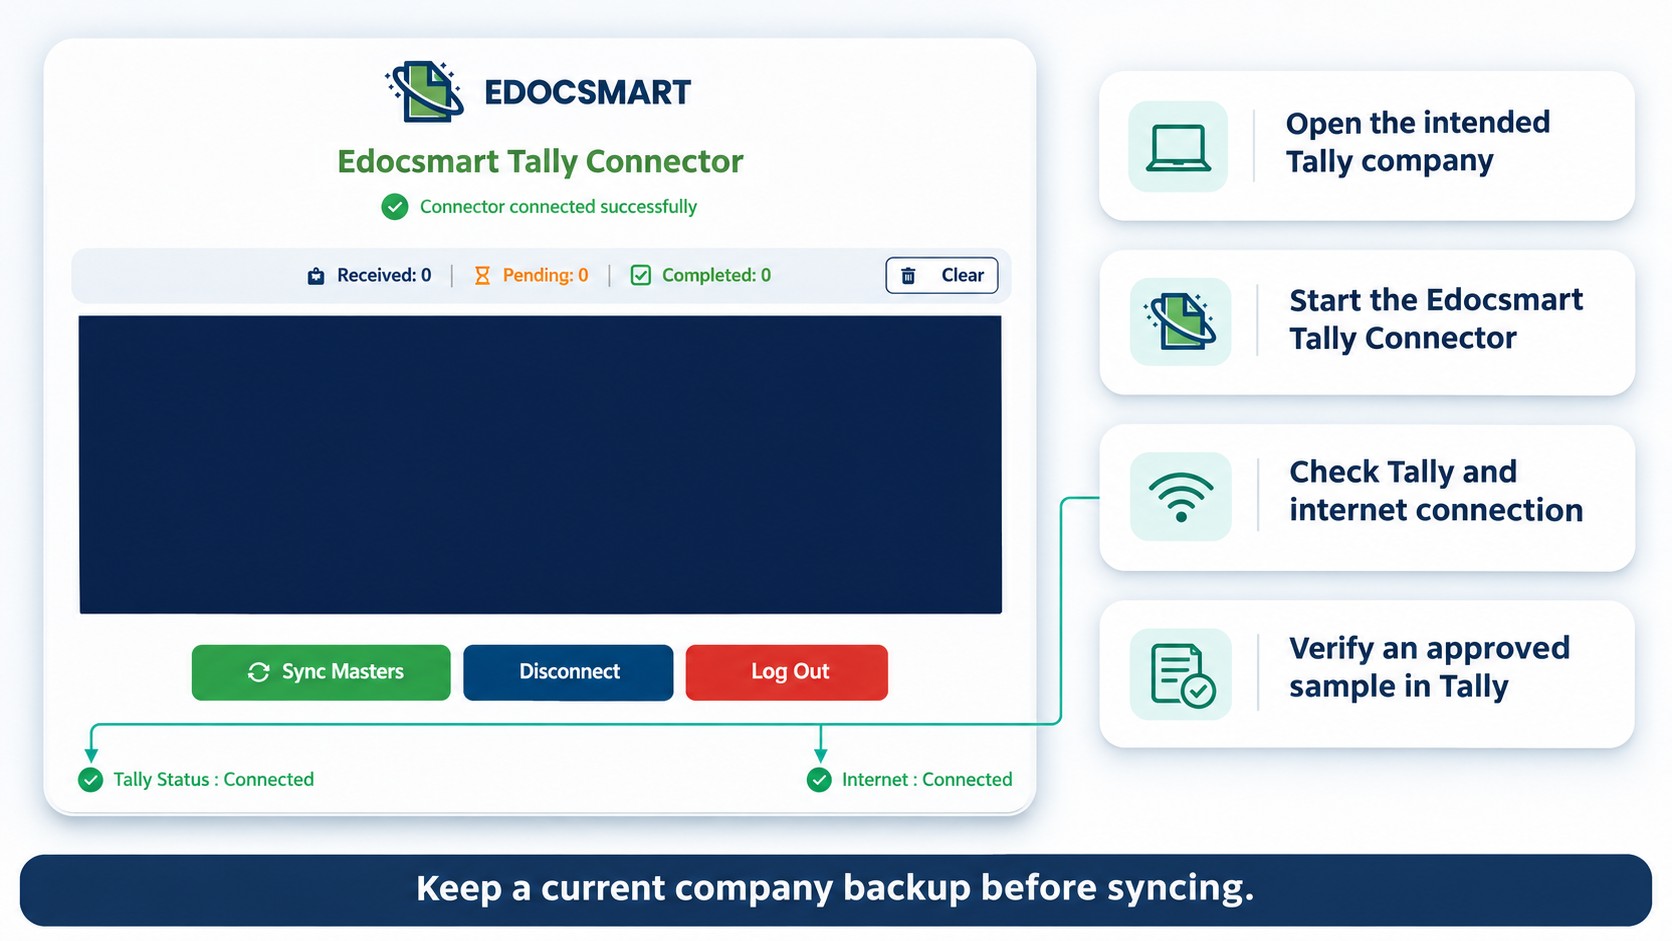
Common Mistakes to Avoid
- Selecting Default Excel for a excel that does not follow the sample structure.
- Changing sample headings while expecting the default workflow to read them correctly.
- Entering a report-title row as the header row.
- Mapping an invoice total into an item-amount field.
- Reusing mapping after the meaning of a source column has changed.
- Skipping record review because the file uploaded successfully.
Saved mapping can support recurring reports when their structure and field meanings remain consistent. Check the configuration whenever the source report changes.
Frequently Asked Questions
1. What is Excel to Tally mapping?
It connects Excel columns with the fields used to prepare accounting records for Tally.
2. Do I need mapping for the Edocsmart sample Excel?
Manual column mapping is not required when you use the sample in its expected format. Data and accounting settings still need checking.
3. Can I upload my own Excel format?
Use Customized Excel for a supported workbook and map its relevant columns before processing.
4. Do I need to rename my Excel columns?
With customized mapping, you can select your existing column headings and connect them with the appropriate system fields.
5. Can I reuse the same mapping?
Yes, when the workbook structure and field meanings remain consistent. Review the mapping if the report changes.
Choose the Format That Fits Your Work
Default Excel is a practical choice when you can follow Edocsmart’s sample structure. Customized Excel helps when you want to work with an existing supported report and configure its source columns.
If you are unsure which option fits your workbook, discuss your Excel mapping requirements with Edocsmart by sharing a sample file and the expected accounting output.
Explore Edocsmart Excel to Tally Software to understand the import workflow and prepare your records for review and transfer.