How to Automate Excel to Tally
Automate Excel to Tally by uploading your existing accounting data, mapping the required fields, reviewing generated entries, and syncing verified transactions through Edocsmart.

It's 6:30 PM.
You have
finished preparing the day's accounting data in Excel. Purchases
are ready. Sales are ready. The bank statement has been downloaded.
You think you're done.
Then you remember:
“Abhi toh Tally mein entries karni baaki hain.”
And suddenly, the next few hours are gone.
Open Tally.
Find the party ledger.
Enter the invoice number.
Enter the amount.
Check the details.
Save the voucher.
Then repeat it for the next invoice.
And the next one.
And the next one.
If you're an accountant, this workflow probably sounds painfully familiar.
The frustrating part is that the data is already sitting in your Excel file. You're simply entering the same information into Tally again.
So the real question is:
Why manually enter data into Tally when you can automate the Excel-to-Tally process?
With EdocSmart, you can upload your Excel data, map your customized Excel format, process invoices, assign bank ledgers, and sync the selected transactions directly to Tally using the EdocSmart Tally Connector.
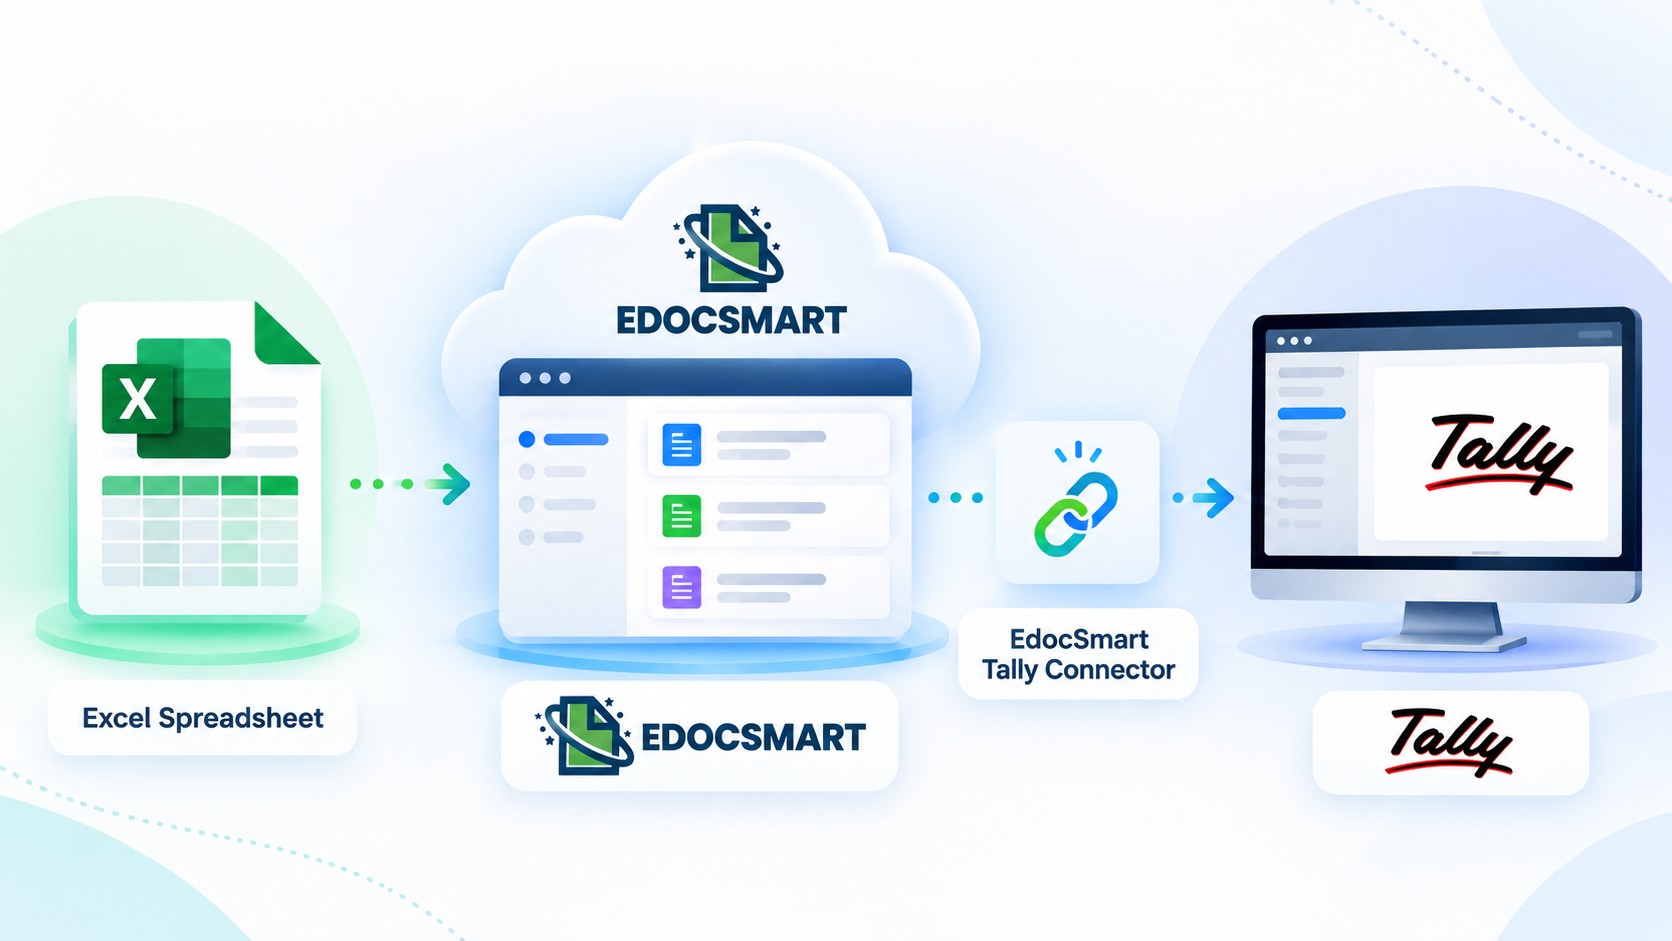
Let's see how the complete process works for Purchase, Sales, and Bank Statements.
EdocSmart provides a workflow that allows businesses to upload their Excel files or bank statements, process the data, map the required fields or ledgers, and then send the completed vouchers directly to Tally through the EdocSmart Tally Connector.
The overall workflow is:
Excel / Bank Statement → EdocSmart → Mapping & Processing → Document/Voucher Selection → Sync to Tally → EdocSmart Tally Connector → Tally
This guide explains the complete workflow for Purchase, Sales, and Bank Statement data.
1. Automating Purchase Excel to Tally
The
purchase workflow starts with uploading the purchase Excel file to EdocSmart.
Step 1: Log in to EdocSmart
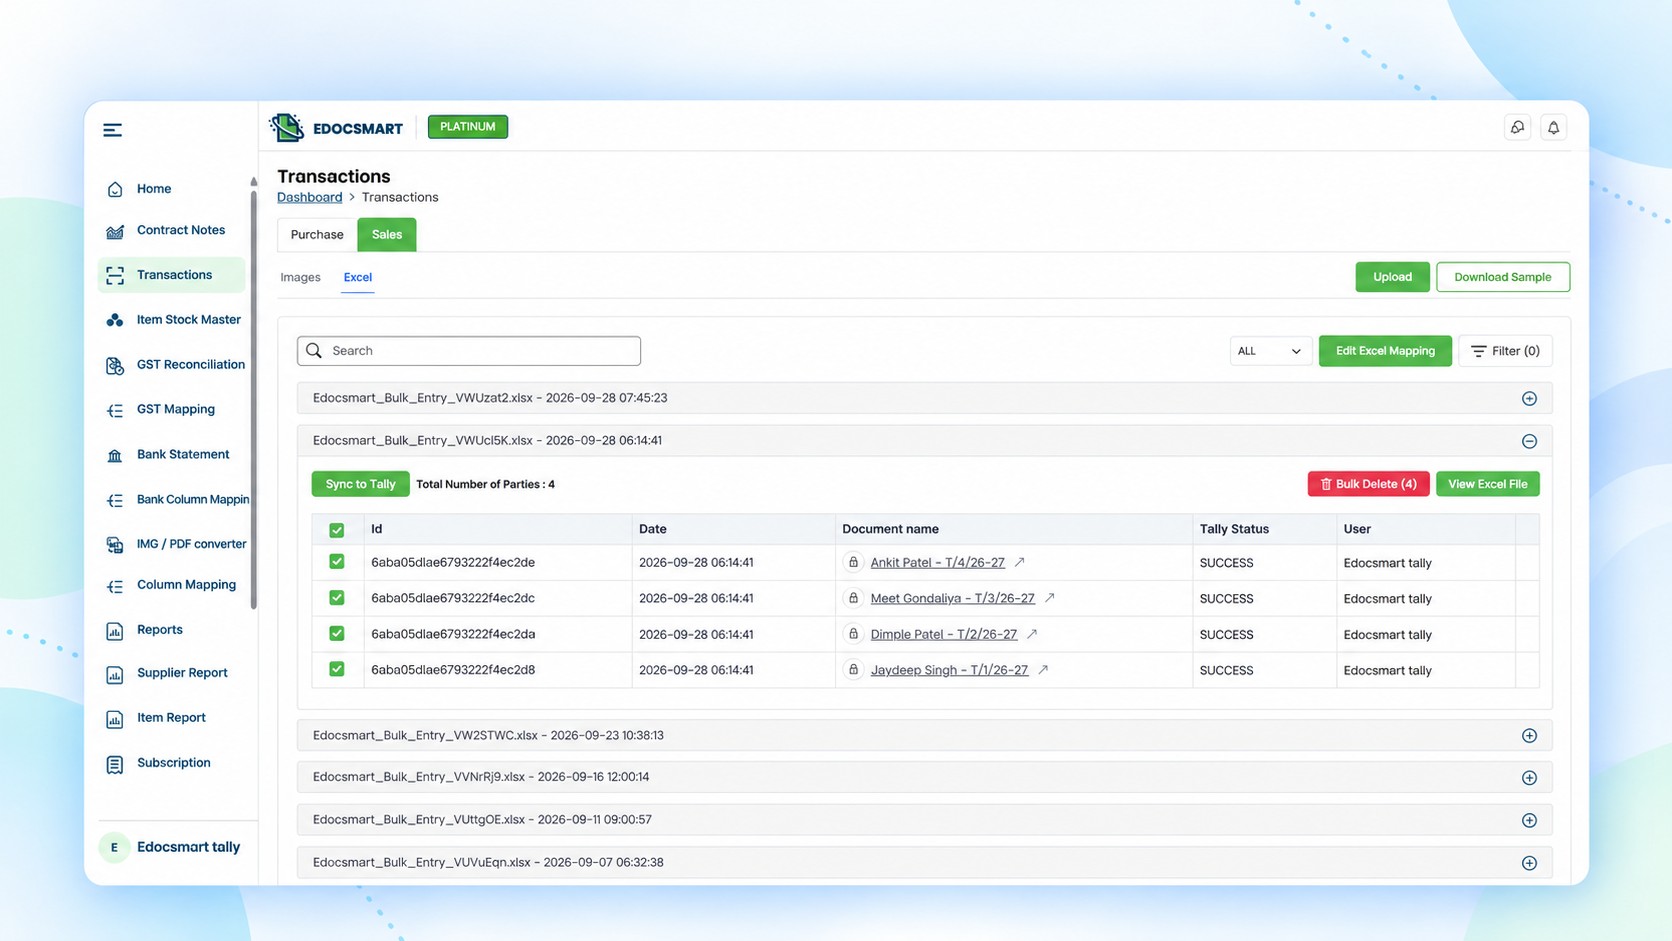
First, log in to your EdocSmart account.
Once you are inside EdocSmart, navigate to the Transaction section.
By default, the transaction screen opens with the Purchase option selected.
From here, click on Excel to begin the Excel-to-Tally purchase workflow.
2. Upload Your Purchase Excel File
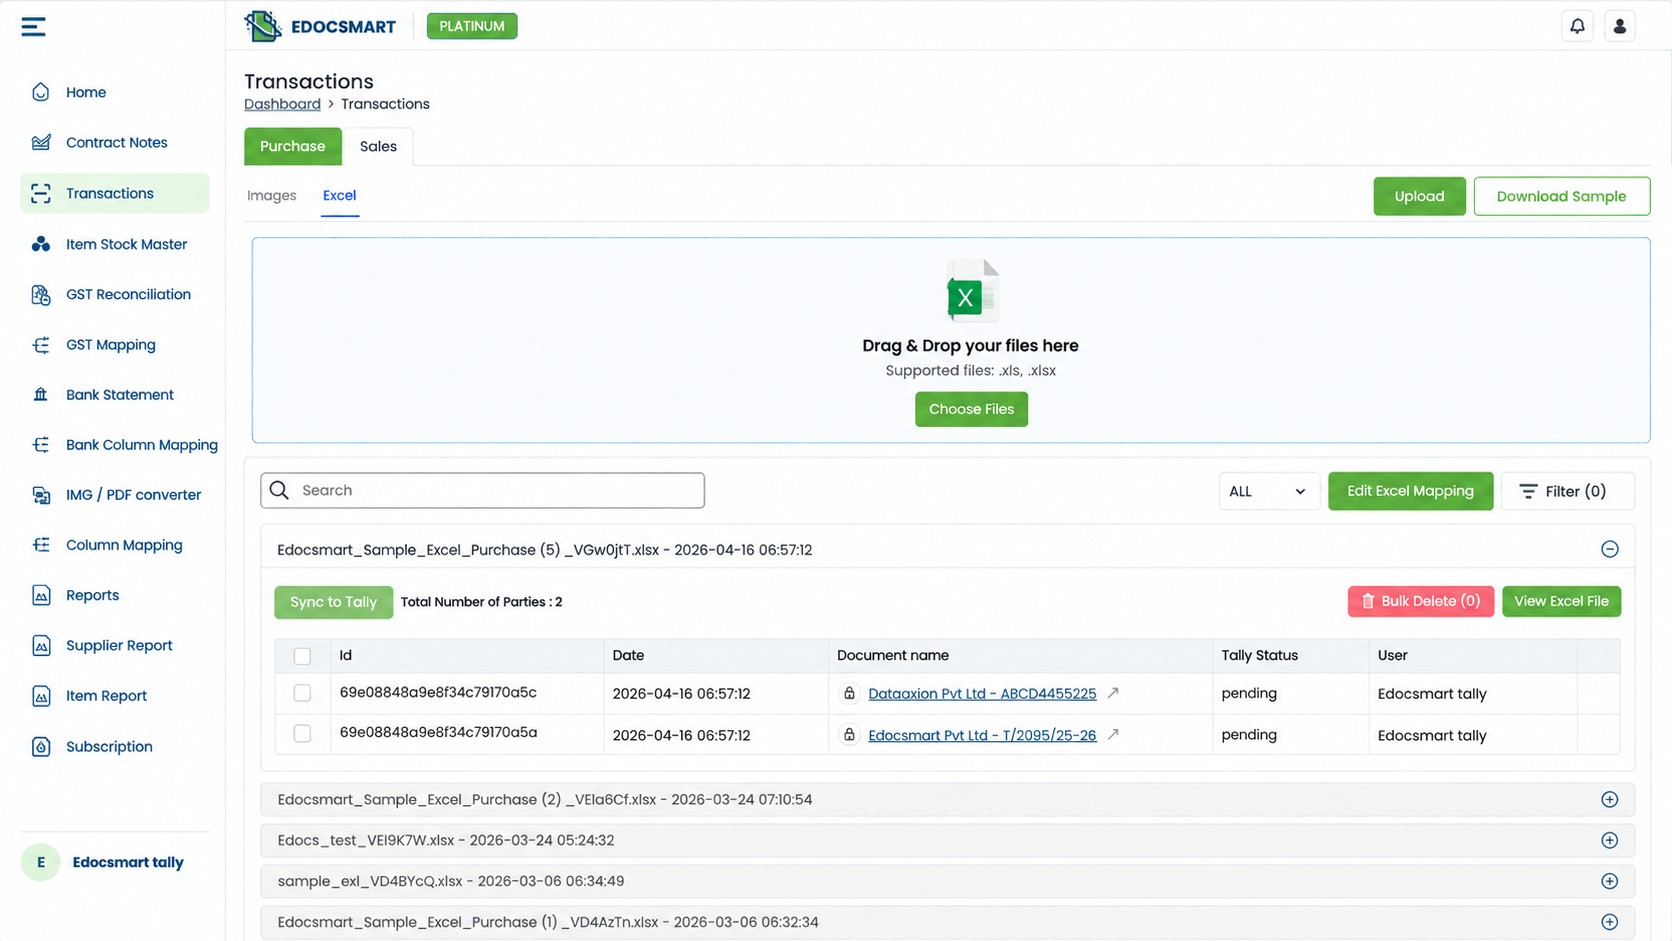
After selecting Excel, you can upload your purchase Excel file to EdocSmart.
The Excel file can be in either of two formats:
- EdocSmart's default Excel format
- A customer's customized Excel format
If you are using EdocSmart's default format, the file can be uploaded directly.
However, if your business uses a customized Excel format, the Excel fields need to be mapped once before processing the file.
Excel Field Mapping
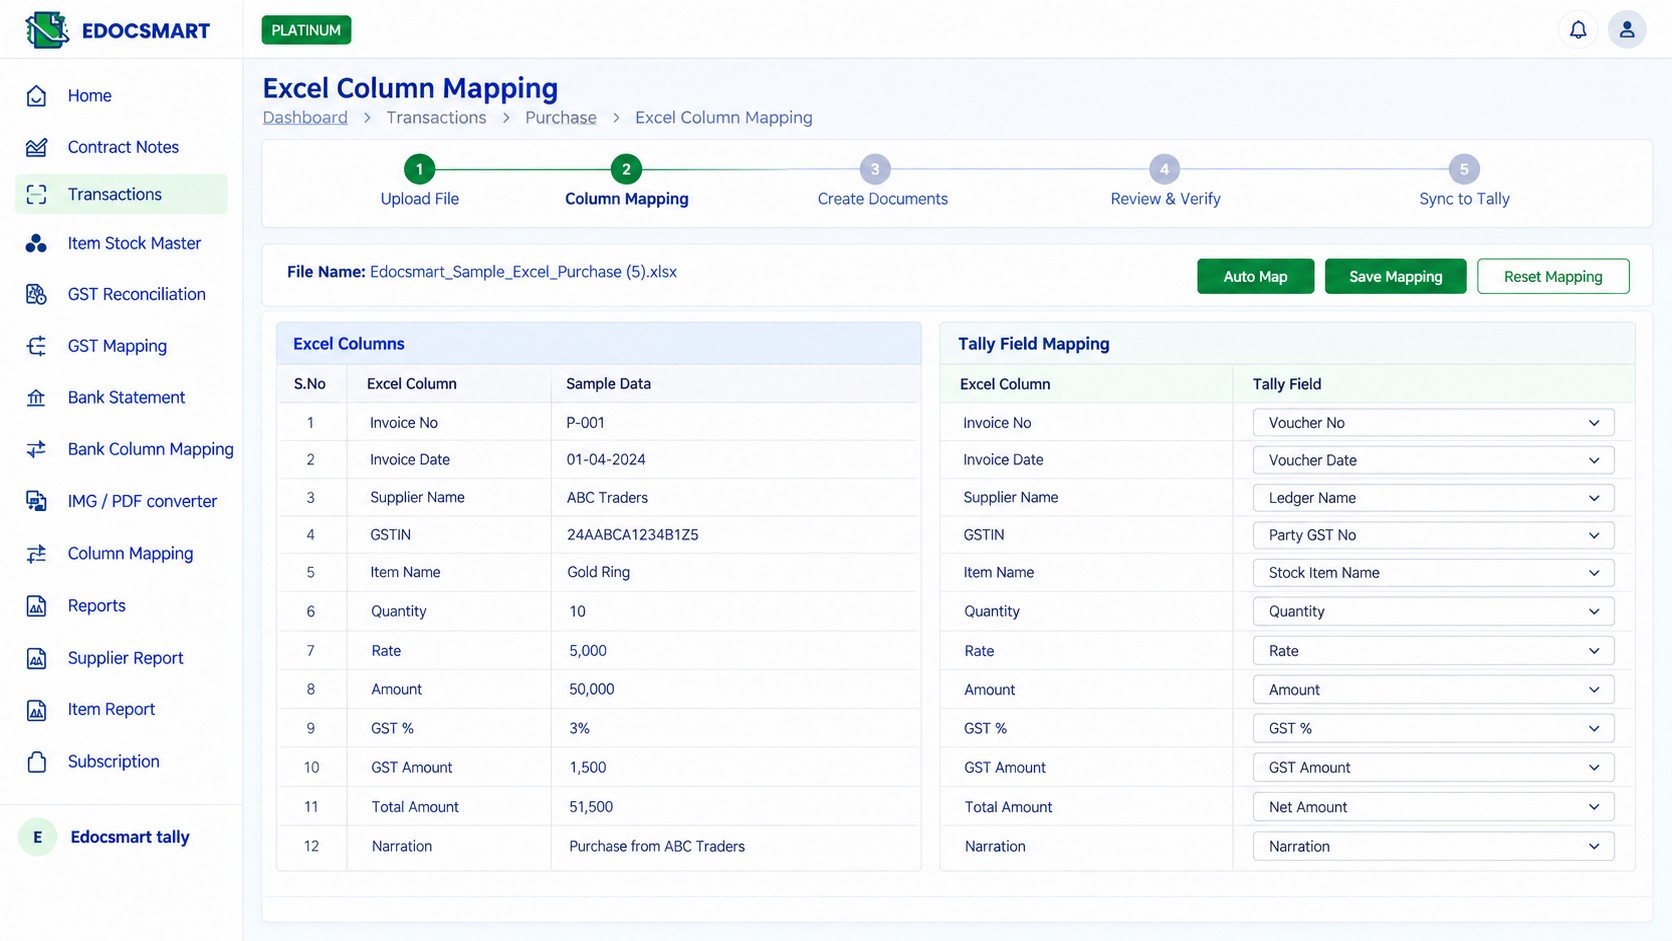 Mapping allows EdocSmart to understand which columns in your customized Excel file correspond to the required purchase information.
Once the mapping has been completed, you do not need to repeat the same mapping every time you upload an Excel file using that format.
After the mapping is complete, the customer can upload their Excel purchase files and continue with the processing workflow.
3. Create Separate Purchase Documents from the Excel File
Once the Excel file has been uploaded, EdocSmart processes the data inside the file.
The purchase invoices are divided into separate documents based on the Invoice Number specified in the Excel file.
For example, if the Excel file contains multiple purchase invoices, EdocSmart identifies the invoice numbers and creates separate documents for the respective invoices.
This makes it possible to process multiple purchase invoices from a single Excel file.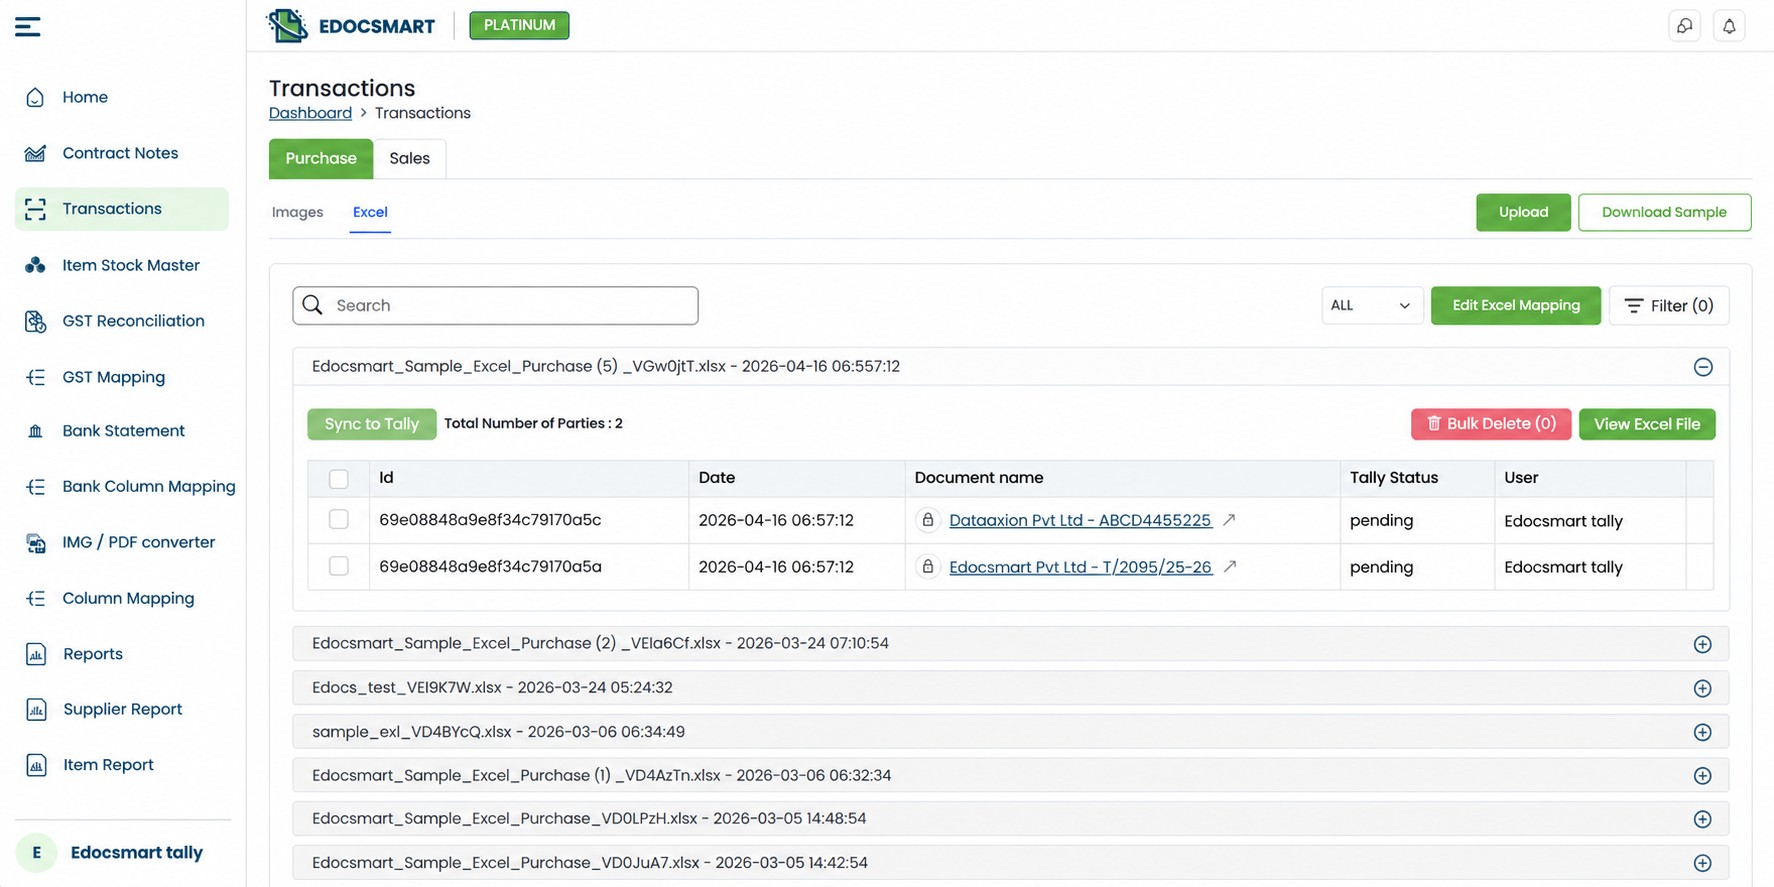
Once all the documents have been created, they are available in EdocSmart for further action.
4. Select Purchase Documents to Send to Tally
After the purchase documents have been created, you have the flexibility to send them to Tally either individually or together.
You can:
- Select and send one document at a time, or
- Select multiple documents together and send them in one go.
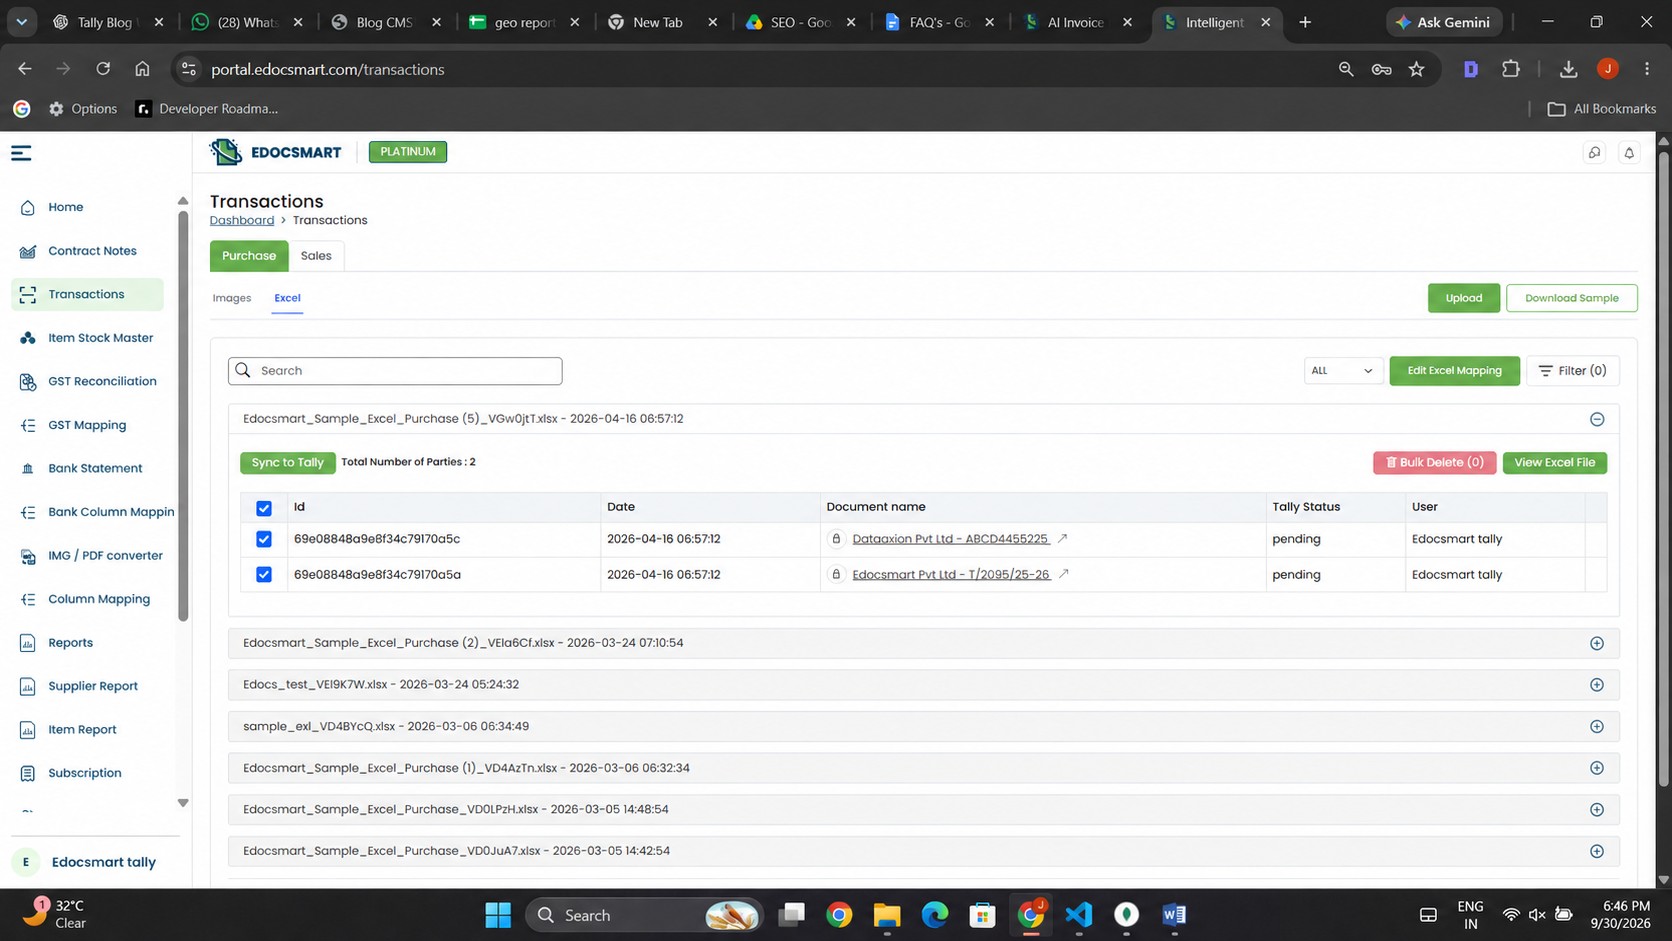
Once the required documents are selected, the customer can initiate the process of sending them to Tally.
5. Sync Purchase Vouchers to Tally
When the purchase vouchers are sent from EdocSmart, they are transferred to the EdocSmart Tally Connector.
The Tally Connector is installed locally on the customer's computer.
The connector then communicates with the Tally application that is running locally on the customer's system and starts creating the corresponding entries in Tally.
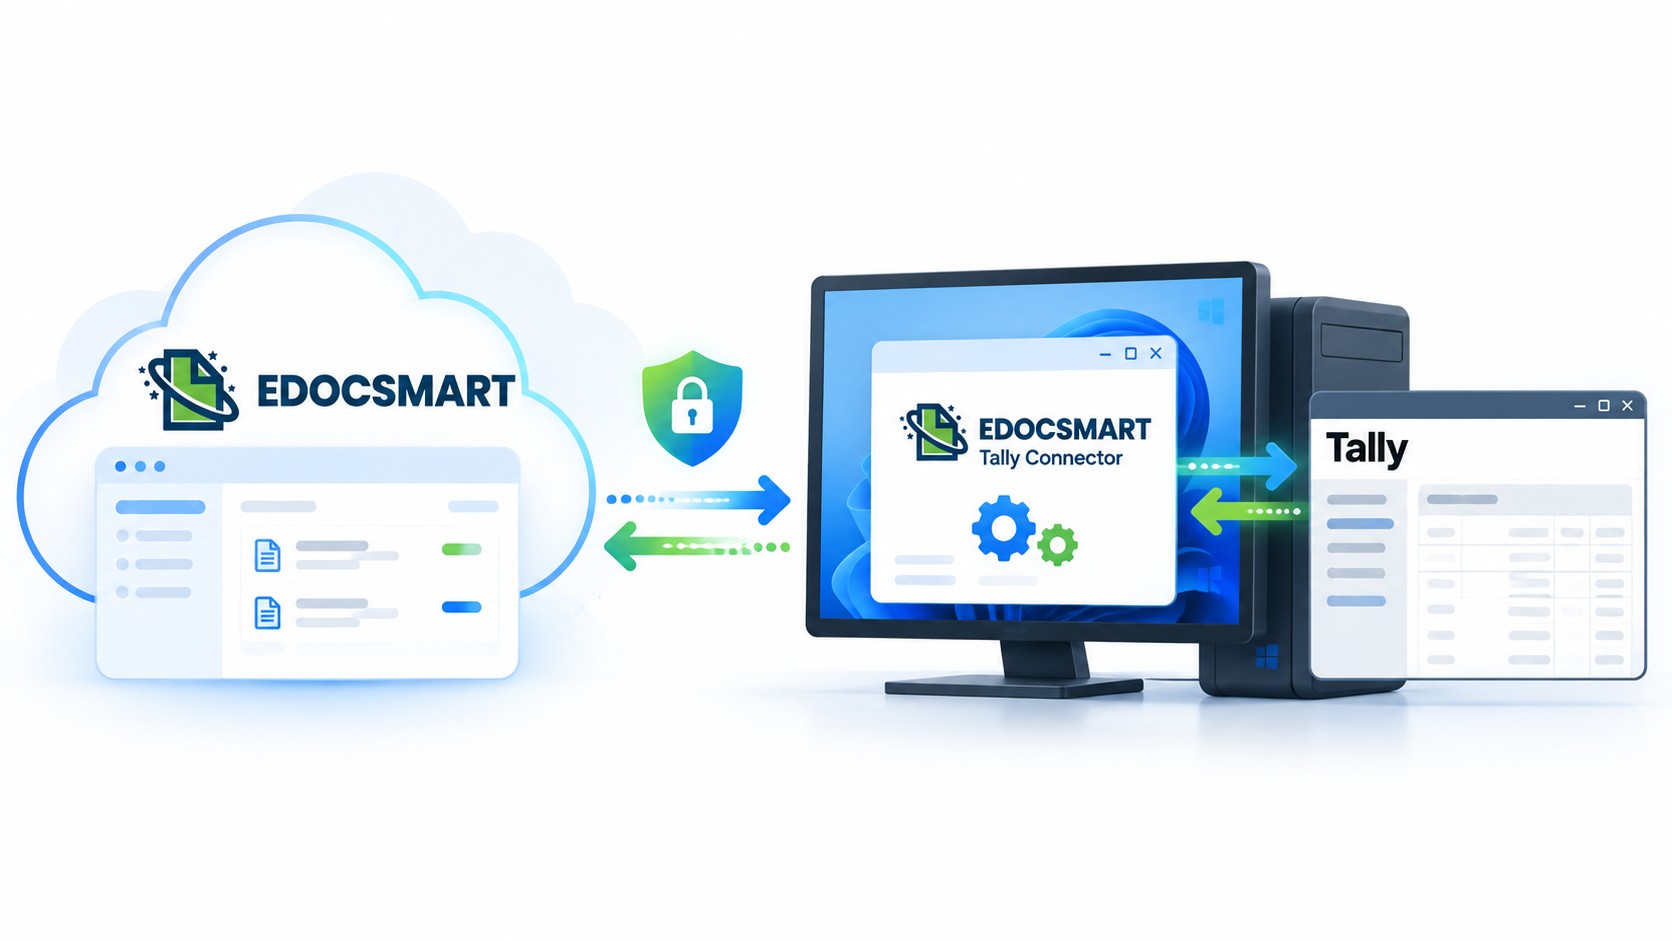 The complete purchase flow is therefore:
Purchase Excel → EdocSmart → Excel Mapping → Invoice-Based Document Creation → Select Documents → Send to Tally → EdocSmart Tally Connector → Tally
6. Automating Sales Excel to Tally
The Sales Excel-to-Tally workflow follows a similar process.
The customer can upload their sales Excel file to EdocSmart and process multiple sales invoices before sending them to Tally.
Just like the purchase workflow, customers may use either EdocSmart's default Excel format or their own customized Excel format.
Step 1: Upload the Sales Excel File
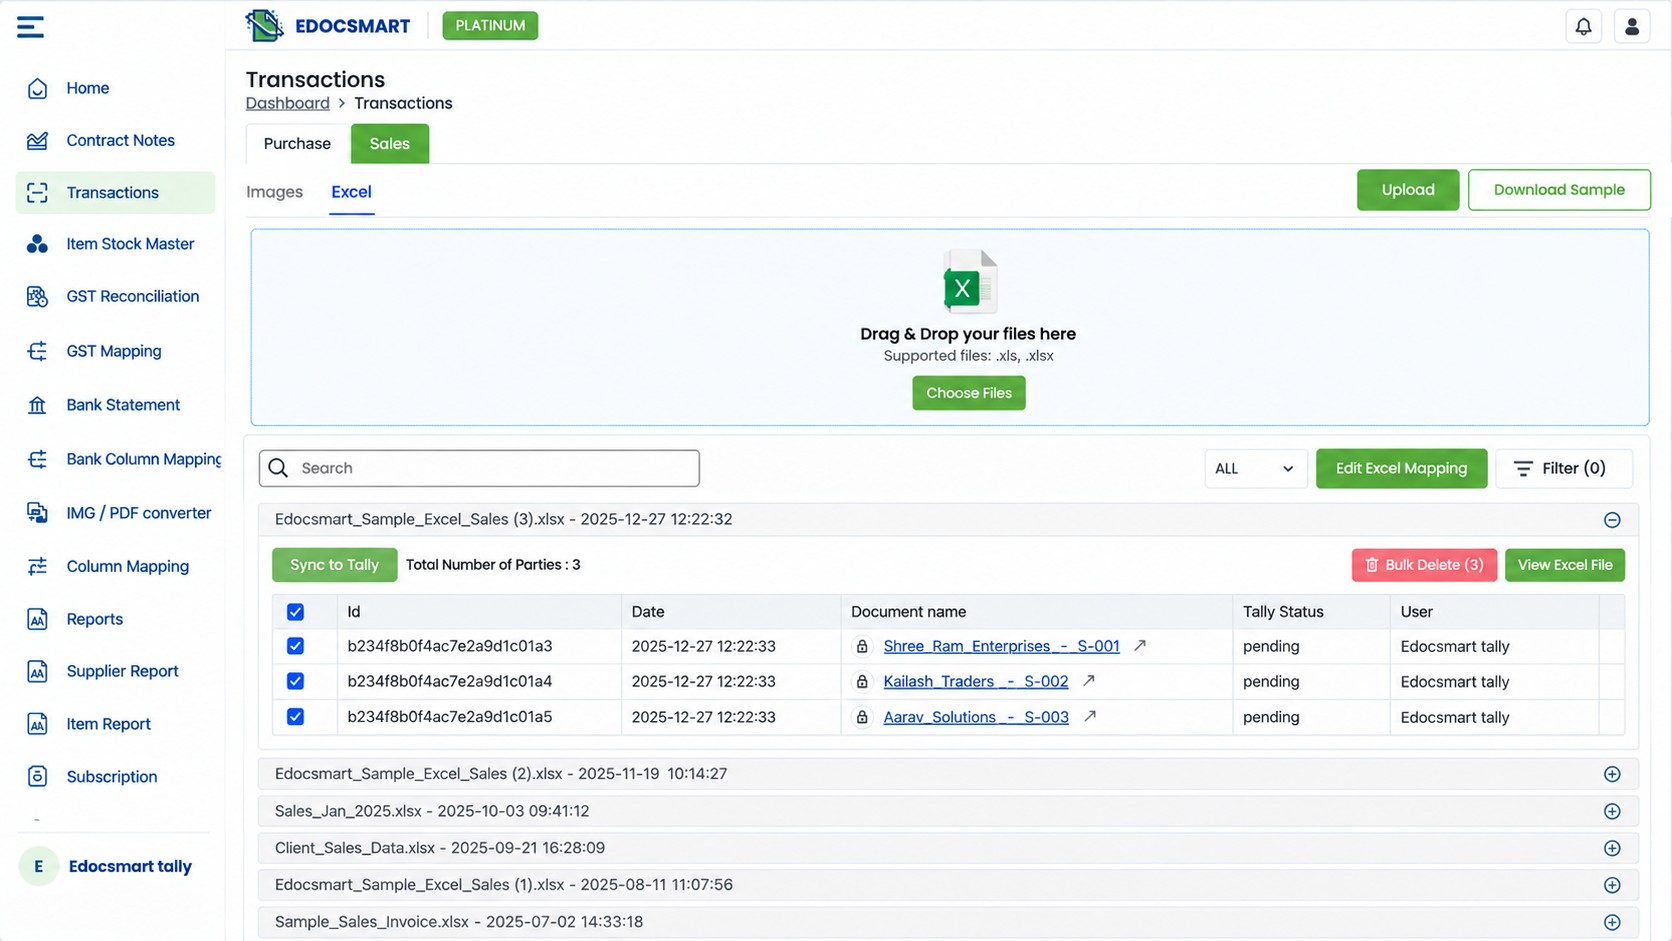
After accessing the relevant transaction section in EdocSmart, the customer can upload their sales Excel file.
If the Excel file uses a customized format, the customer needs to complete the required mapping first.
Once the mapping has been completed, the same mapped format can be used when uploading the customer's Excel files.
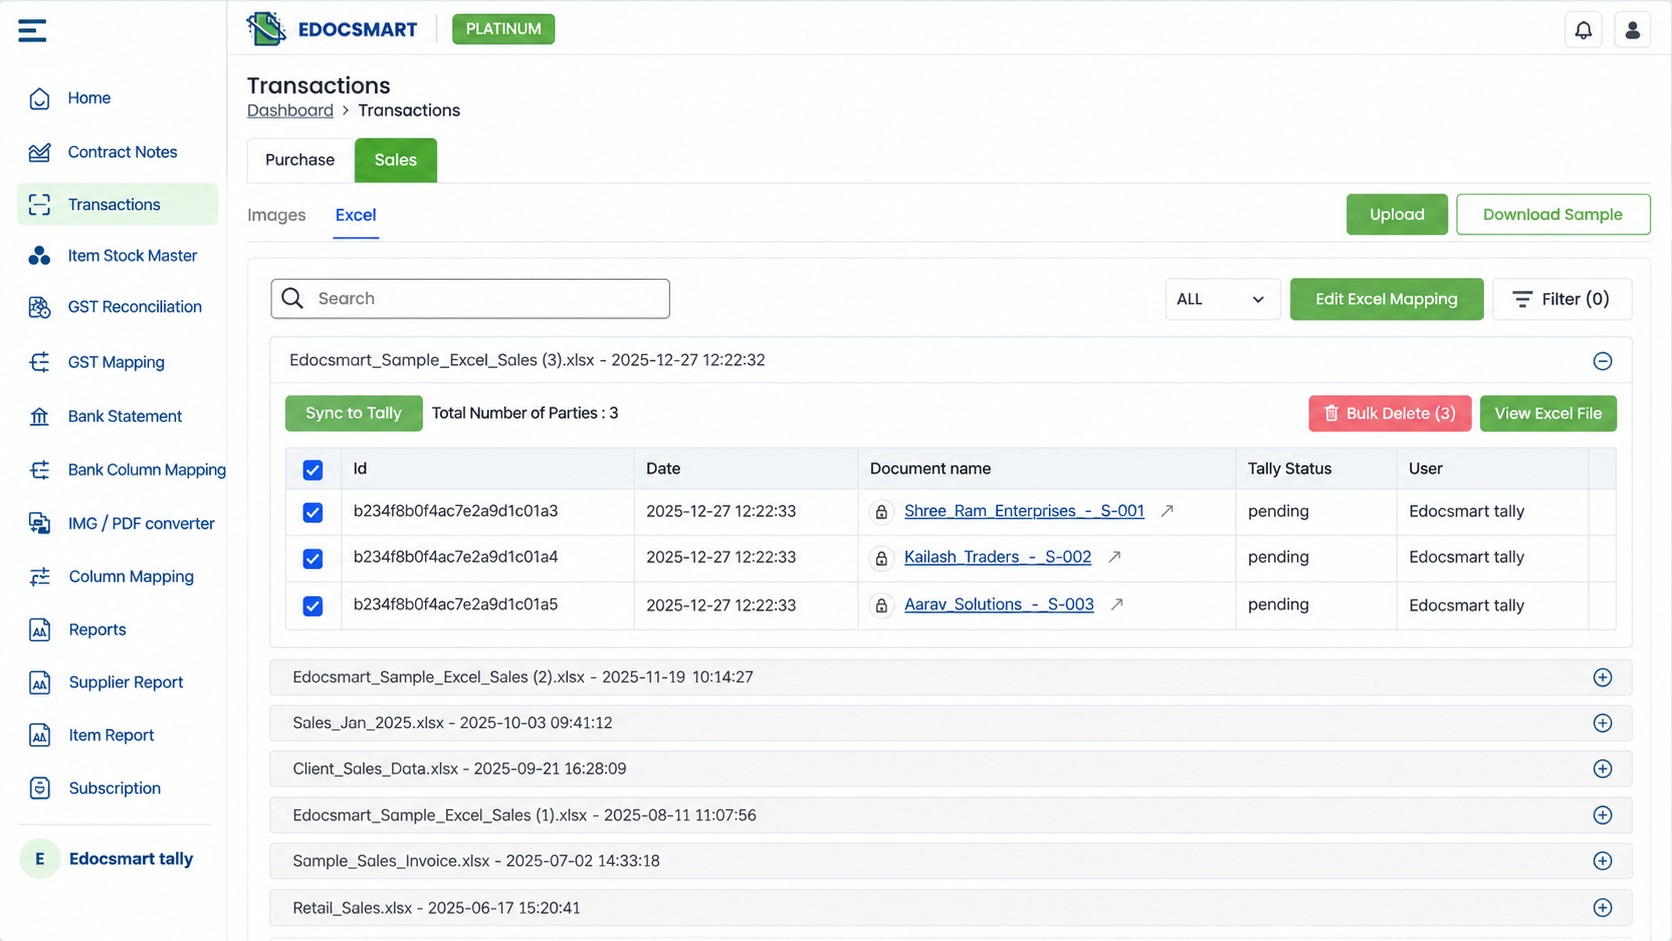
Step 2: Process the Sales Invoices
After the Excel file is uploaded, EdocSmart processes the information contained in the file.
The invoices are separated into individual documents based on the Invoice Number specified inside the Excel file.
So, instead of treating the entire Excel file as one document, EdocSmart processes the individual invoices separately.
Once processing is complete, the separate sales documents are available in EdocSmart.
Step 3: Select Sales Documents
The customer can then select the sales documents that need to be sent to Tally.
Documents can be selected individually or multiple documents can be selected together.
This allows multiple sales vouchers to be sent to Tally in a single operation.
Step 4: Send Sales Vouchers to Tally
After the required sales documents have been selected, the customer can send them to Tally.
EdocSmart transfers the vouchers to the EdocSmart Tally Connector, which is installed locally on the customer's computer.
The connector then sends the entries to the Tally application running on the customer's local system.
The complete sales workflow is:
Sales Excel → EdocSmart → Excel Mapping → Invoice-Based Document Creation → Select Documents → Send to Tally → EdocSmart Tally Connector → Tally
7. Automating Bank Statement to Tally
The bank statement workflow is slightly different from the purchase and sales workflows because the source file can be received directly from the bank in different
formats.
A bank statement can be uploaded to EdocSmart whether it is provided as:
- Excel
The bank statement may also be password-protected or password-free.
Step 1: Upload the Bank Statement
The customer can upload the bank statement directly to EdocSmart.
If the file is password-protected, there is no need to separately remove the password before uploading it.
EdocSmart asks for the password within the workflow itself.
This means the customer can provide the password directly in EdocSmart and continue processing the statement without having to use another tool to remove the password from the PDF or Excel file.
Step 2: Process the Bank Statement Entries
Once the bank statement has been uploaded, EdocSmart processes the statement and identifies the entries contained within it.
The entries from the bank statement are then displayed in EdocSmart.
At this stage, the customer can assign the appropriate ledger to each entry.
8. Assign Ledgers to Bank Entries
For each bank transaction, the customer can specify the ledger into which the transaction should be entered.
EdocSmart provides multiple filters to make this ledger-assignment process easier.
Instead of manually going through every transaction without any filtering options, customers can use the available filters to identify and work with the relevant entries and complete the ledger assignment.
Once the required ledgers have been assigned to the bank statement entries, the transactions are ready to be synchronized with Tally.
9. Sync Bank Entries to Tally
After completing the ledger assignment, the customer can select the required entries and use Sync to Tally.
The selected bank entries are then sent from EdocSmart to the EdocSmart Tally Connector.
The connector, which is installed locally on the customer's computer, communicates with the locally running Tally application and starts creating the corresponding entries.
The complete bank statement workflow is:
Bank Statement → EdocSmart → Password Handling → Transaction Processing → Ledger Assignment → Select Entries → Sync to Tally → EdocSmart Tally Connector → Tally
10. The Complete Excel-to-Tally Automation Workflow
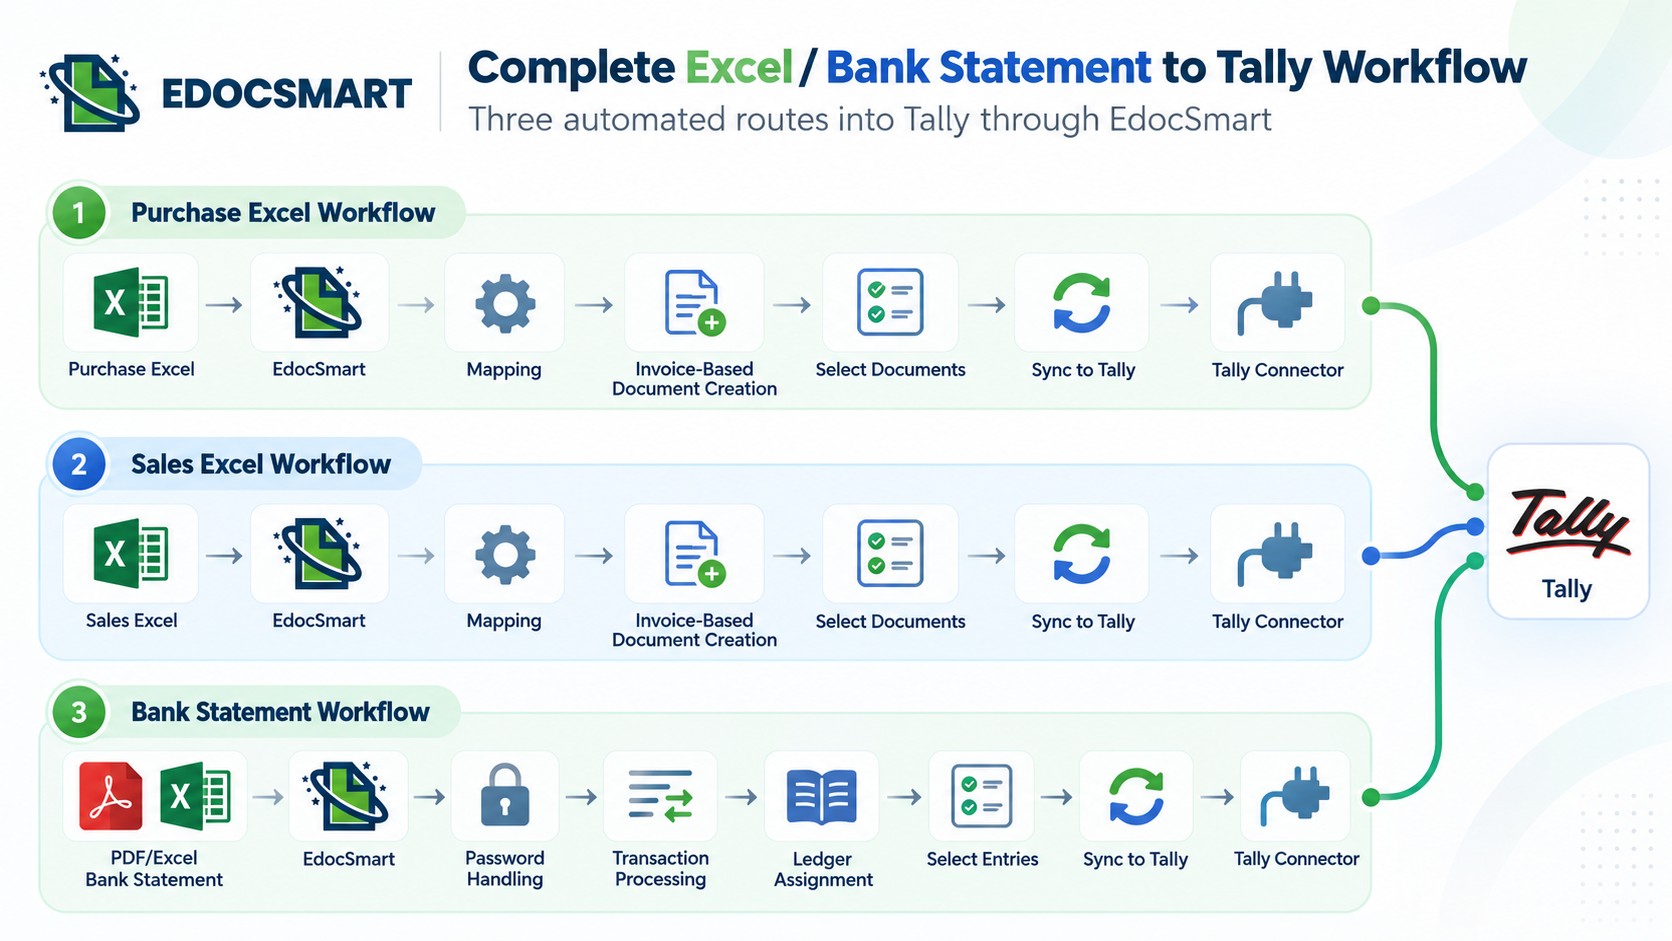
Although purchase, sales, and bank statement processing have different data sources and processing steps, the overall concept remains the same.
Purchase
Purchase Excel → Mapping → Invoice-Based Document Creation → Select Purchase Documents → Sync to Tally → Tally Connector → Tally
Sales
Sales Excel → Mapping → Invoice-Based Document Creation → Select Sales Documents → Sync to Tally → Tally Connector → Tally
Bank Statement PDF/Excel Bank Statement → Password Handling → Transaction Processing → Ledger Assignment → Select Entries → Sync to Tally → Tally Connector → Tally
The key part of this workflow is the EdocSmart Tally Connector. EdocSmart prepares and processes the data, while the locally installed connector transfers the selected vouchers and entries to the Tally application running on the customer's computer.
Automate Excel to Tally with EdocSmart

Automating Excel to Tally does not require manually entering every transaction into Tally after preparing the data in Excel.
With EdocSmart, the workflow can be handled in a structured process:
Upload → Map → Process → Review/Assign → Select → Sync to Tally
For purchase and sales data, Excel files can be mapped once when using a customized format, after which invoices can be processed individually based on their invoice numbers.
For bank statements, customers can upload PDF or Excel statements, provide the password directly in EdocSmart when required, process the transactions, assign the
appropriate ledgers, and then sync the selected entries to Tally.
Finally, the EdocSmart Tally Connector transfers the selected data to the Tally application running locally on the customer's computer.
This creates a streamlined workflow for moving purchase invoices, sales invoices, and bank transactions from Excel or bank statements into Tally through
EdocSmart.
FAQS
How can I automate Excel to Tally?
You can automate Excel to Tally by uploading your Excel file, mapping the required fields, reviewing the generated entries, and then syncing the verified data into Tally through Edocsmart.
Can Edocsmart process both purchase and sales Excel files?
Yes. Edocsmart can be used for both purchase and sales Excel workflows. The uploaded data can be mapped, reviewed, and converted into Tally-ready entries based on the selected transaction type.
Do I need to map Excel columns every time?
Not always. If the same Excel format and accounting structure are reused, the mapping can typically be reused after the initial setup, which helps reduce repetitive configuration work.
Can I import multiple invoices from one Excel file into Tally?
Yes. A single Excel file containing multiple invoice records can be processed into individual invoice-wise documents. These can then be reviewed and selected together for bulk synchronization to Tally.
How does Edocsmart connect with Tally?
Edocsmart uses the configured Tally Connector to transfer verified accounting data from the Edocsmart workflow into Tally. The connector acts as the bridge between the processed cloud data and the local Tally application.
Can bank statements also be processed along with Excel accounting data?
Yes. Bank statements in supported formats such as PDF or Excel can also be processed separately. After transaction review and ledger assignment, verified entries can be synchronized with Tally through the configured connector.
Conclusion
Overall, automating Excel to Tally helps businesses reduce repetitive accounting work and use the data they already maintain in Excel more effectively. Instead of entering purchase, sales, invoice, ledger, GST, or bank transaction details manually in Tally, the information can first be processed, mapped, reviewed, and then synchronized in a structured way.
With Edocsmart, businesses can upload Excel files, create invoice-wise documents, reuse mapping where applicable, review multiple entries together, and sync verified transactions to Tally through the configured Tally Connector. Bank statement workflows can also follow a similar review-and-sync approach after the required transaction processing and ledger assignment.
The complete workflow becomes:
Excel / Bank Statement → Edocsmart → Mapping & Processing → Review & Verification → Tally Connector → Tally
This makes accounting operations more organized, reduces repeated manual entry, and gives users better control over data before it reaches Tally. For businesses, accountants, and accounting firms dealing with large volumes of transactions, automation can turn a repetitive data-entry process into a more manageable and scalable accounting workflow.