How to Configure Tally Default Settings ?
Learn how to configure Tally default settings in Edocsmart, including ledger names, HSN sources, voucher types, and tax registration before Excel import.

An accountant had a folder of Excel reports ready for Tally. The records contained invoice numbers, party names, and amounts, but entering the same information again was taking up too much of his day. He decided to try Edocsmart to handle the import.
After checking the column mapping, he paused before sending the first batch. The data looked right, but he still needed to confirm how it would be recorded. His company used specific sales, purchase, and tax ledgers. He also maintained an item master and needed to choose whether HSN codes should come from that master or the uploaded invoices.
He wanted these choices saved before processing more files. Otherwise, every new report would bring back the same checks and decisions.
Edocsmart provides two areas for reviewing this setup: Tally Default Setting in Excel mapping and Settings → Tally Setting. Together, they let him review the available ledger defaults, HSN source, and voucher settings.
He could then process a small sample and check the resulting entries in Tally. For recurring reports with the same requirements, he would have a saved configuration to review and reuse.
What Are Tally Default Settings?
An Excel file tells you what happened in a transaction. The import setup also needs to establish which accounting values to use when preparing the entry.
For example, mapping the amount column tells the workflow where to read an amount. The relevant ledger settings help determine where that amount should be recorded.
Column mapping connects the source data to fields. Default settings provide the accounting values used by the configured workflow.
In Edocsmart’s Excel mapping screen, Tally Default Setting → Ledger Setting includes:
| Setting | What you need to check |
|---|---|
| CGST Ledger Name | Confirm the intended CGST ledger for applicable transactions. |
| SGST Ledger Name | Confirm the intended SGST ledger for applicable transactions. |
| Sales Ledger Name | Check the sales ledger required for the records. |
| Purchase Ledger Name | Check the purchase ledger required for the records. |
| Tax Registration Type | Confirm the appropriate registration category for the configured workflow. |
Check these values against the intended Tally company before processing. A ledger name already filled in on the screen may belong to an earlier setup, so it still needs reviewing.
Use the names and registration details required for your records. The values shown in a sample screenshot are examples, rather than settings every business should use.
Where Should You Check the Settings?
The accountant first reviewed the defaults within Excel mapping. He then opened Settings → Tally Setting to check the remaining configuration.
These are the two areas to review:
| Settings area | What to review |
|---|---|
| Tally Default Setting in Excel mapping | Ledger defaults and Tax Registration Type |
| Settings → Tally Setting | HSN Setting, Ledger Setting, and Voucher Setting |
Check both areas before importing. If a ledger value appears in more than one place, confirm which value your workflow uses. Do not assume that changing one screen automatically updates or overrides the other.
Once the configuration is saved, review a processed sample and verify it in Tally. This helps confirm that the records use the intended accounting settings before you continue with the full batch.
How to Configure Tally Settings in Edocsmart
Step 1: Open the Relevant Excel Mapping
Log in to Edocsmart and open Transactions.
Select Sales or Purchase, then open the Excel workspace and access Edit Excel Mapping.
Review the source columns before moving to the default settings. Correct ledger defaults cannot resolve an incorrectly mapped party name, amount, or invoice reference.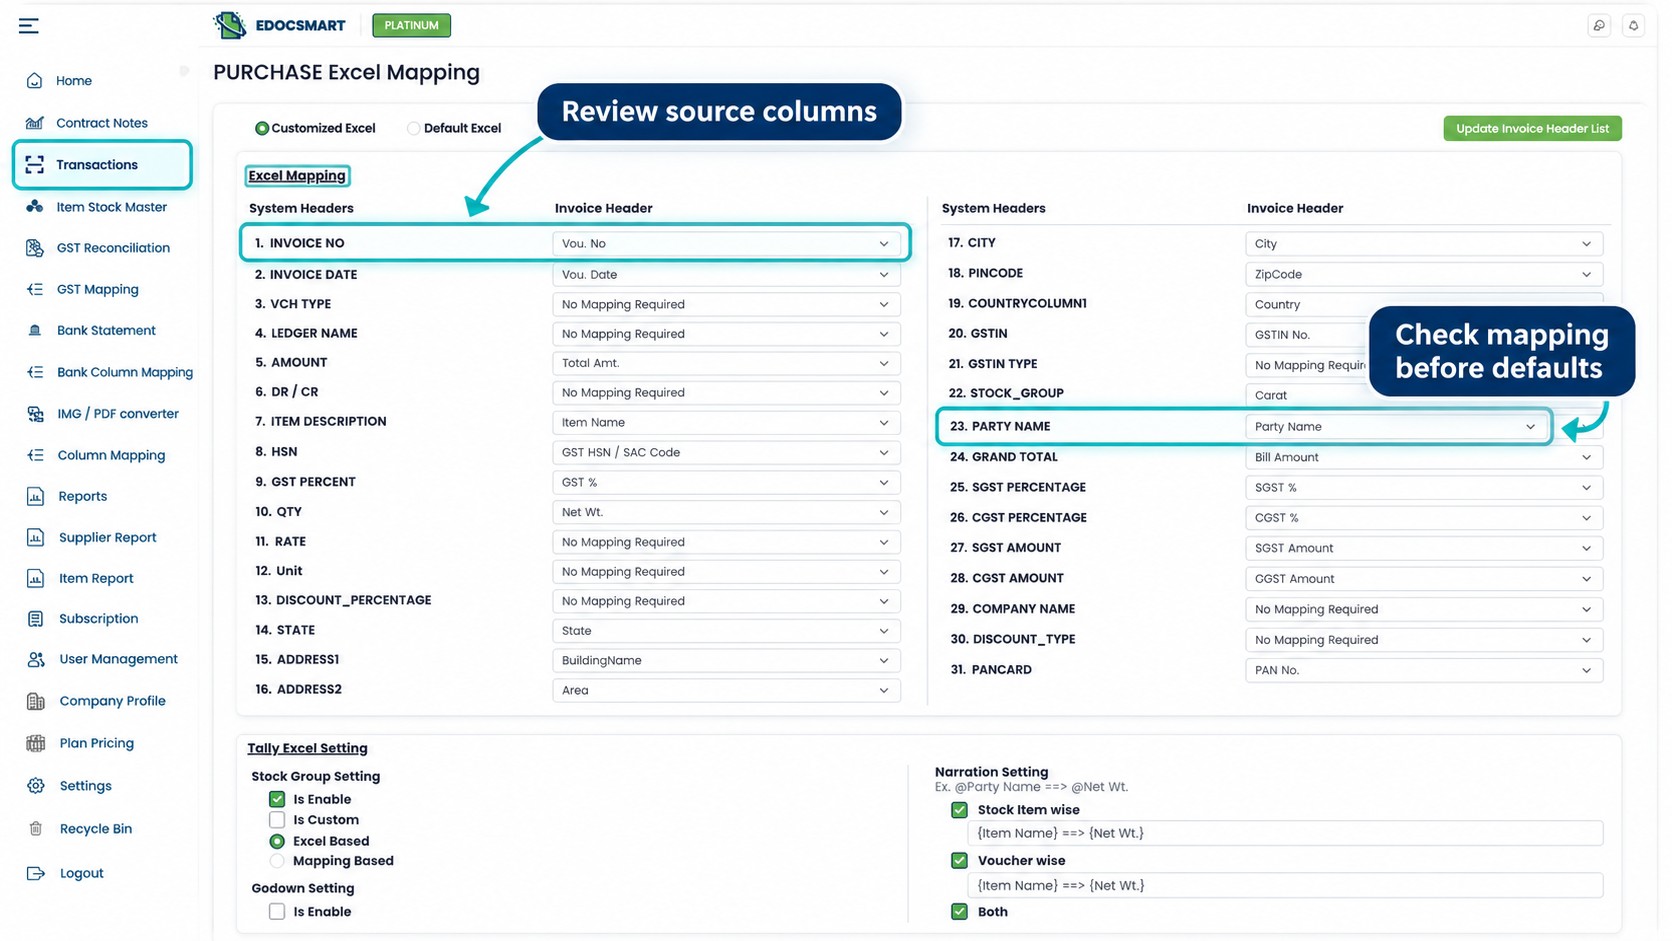
Step 2: Review the Default Ledger Names
Scroll to Tally Default Setting → Ledger Setting.
Check the CGST Ledger Name, SGST Ledger Name, Sales Ledger Name, and Purchase Ledger Name.
Compare the names with the intended ledgers in the relevant Tally company. Pay attention to spelling, spaces, and punctuation.
For recurring imports, confirm that the saved names still match the company’s accounting requirements. A setting prepared for one company should not be reused for another without checking.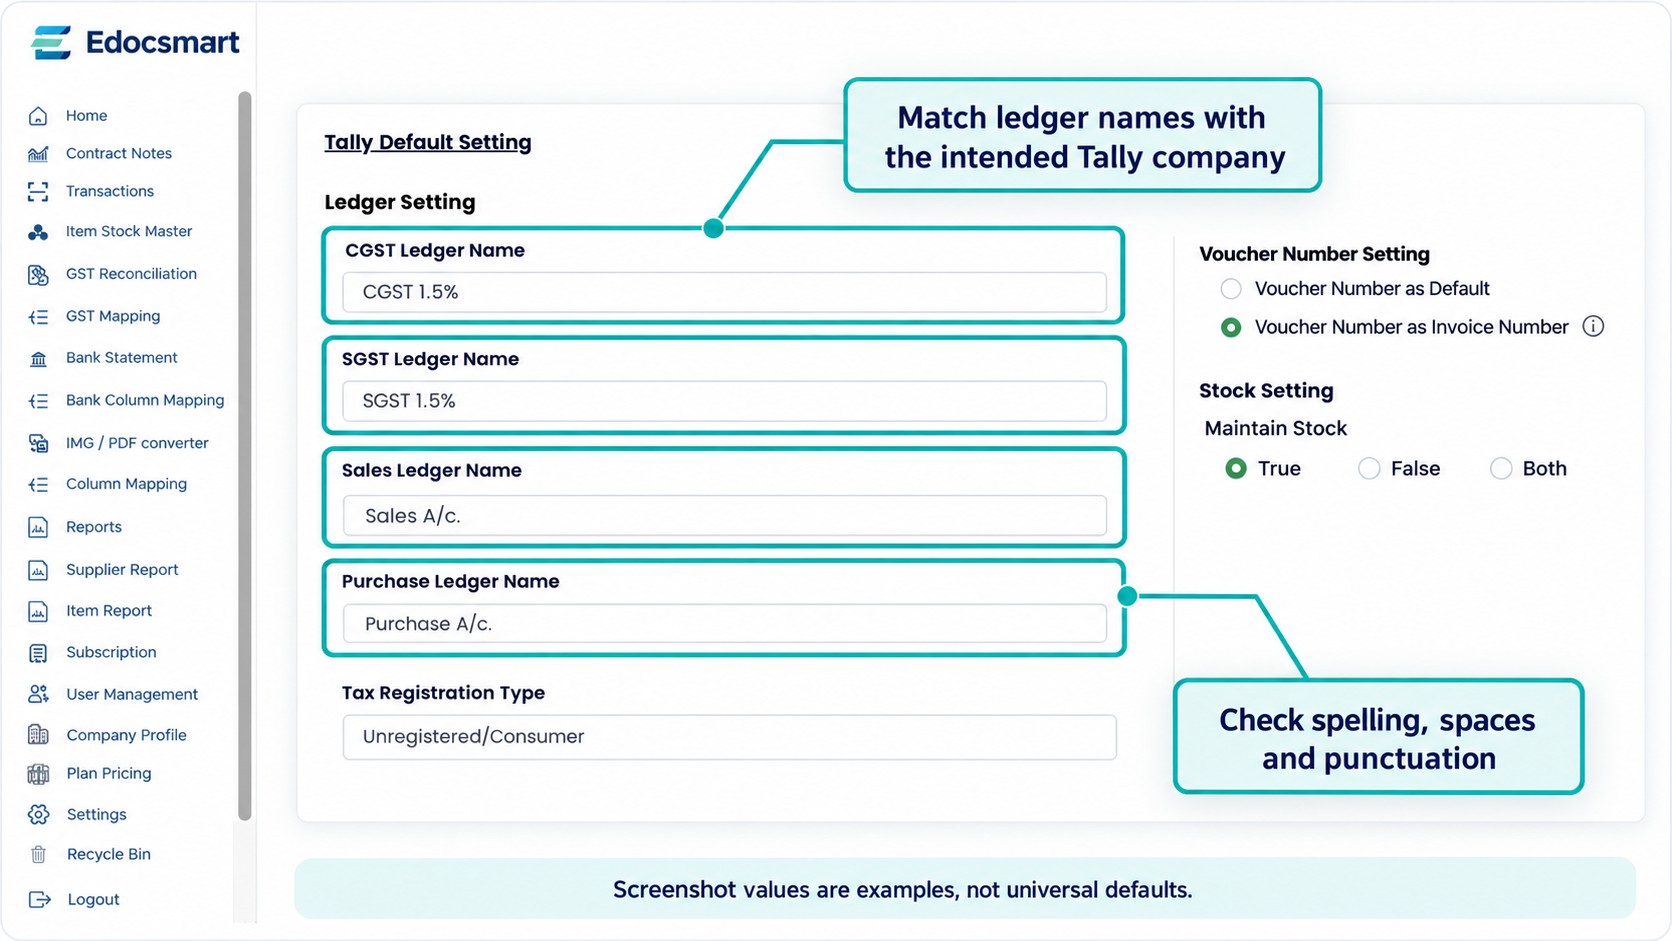
Step 3: Check Tax Registration Type
Review the Tax Registration Type field.
Confirm that the selected value is appropriate for the records and how your configured workflow uses this default.
Do not leave a sample value unchanged simply because it is already filled in. If the workbook contains records requiring different treatment, establish how those differences should be handled before processing the batch.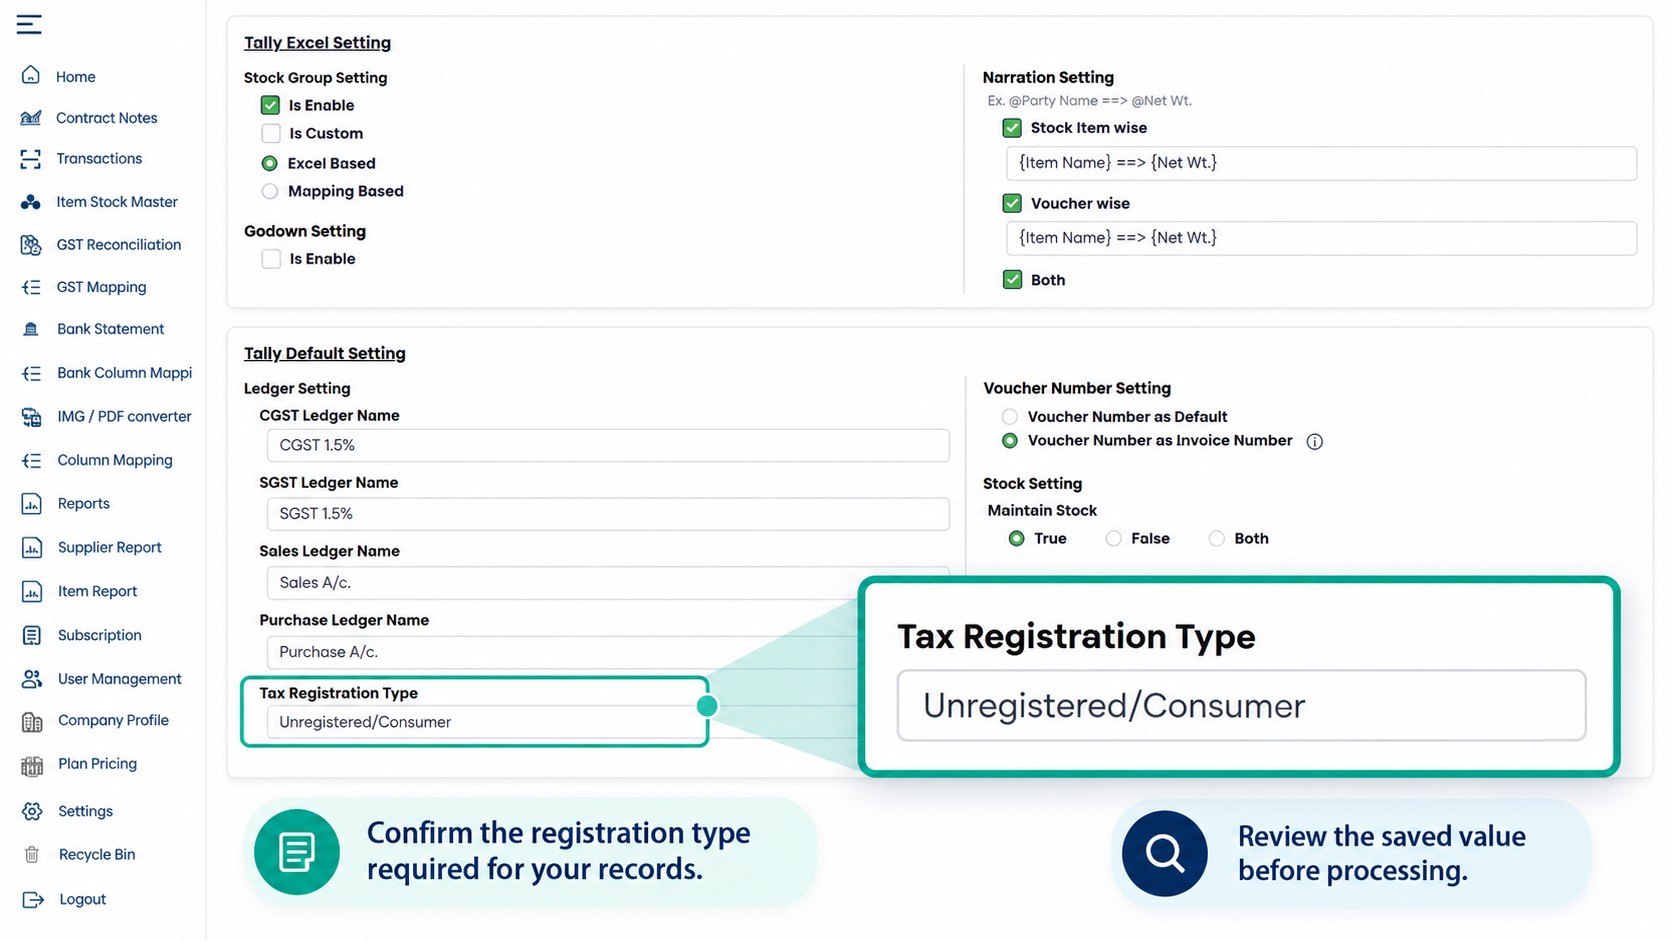
Step 4: Open Settings and Review Ledger Setting
From the sidebar, open Settings, then select Tally Setting → Ledger Setting.
The supplied screen contains fields for:
- Sales Ledger Name
- Purchase Ledger Name
- CGST Ledger Name
- SGST Ledger Name
Review the required names and use Save Settings after making the intended changes.
Check their relationship with the defaults in Excel mapping. Avoid changing both areas without understanding which values the configured process uses.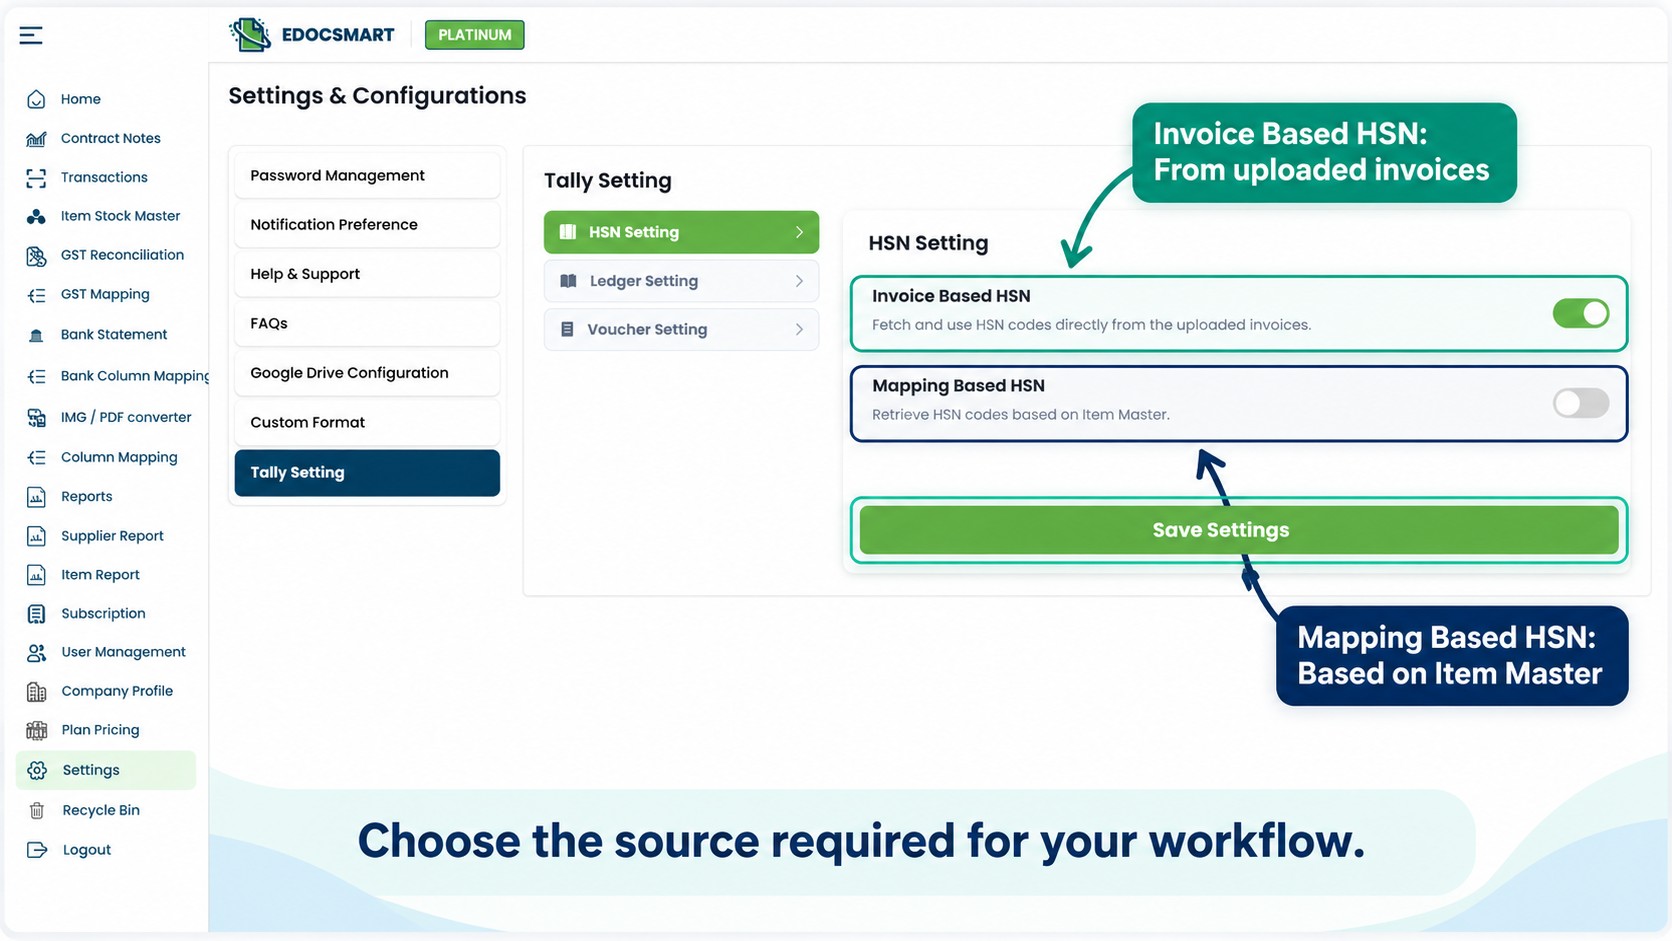
Step 5: Choose the Required HSN Source
Open HSN Setting under Tally Setting.
The available options shown are:
| Option | Source described in the interface |
|---|---|
| Invoice Based HSN | HSN codes from uploaded invoices |
| Mapping Based HSN | HSN codes retrieved based on Item Master |
Choose the source required for your accounting process and save the settings.
If using item-master information, check that the maintained records contain the intended HSN values. Review unclear or missing matches before approving the prepared data.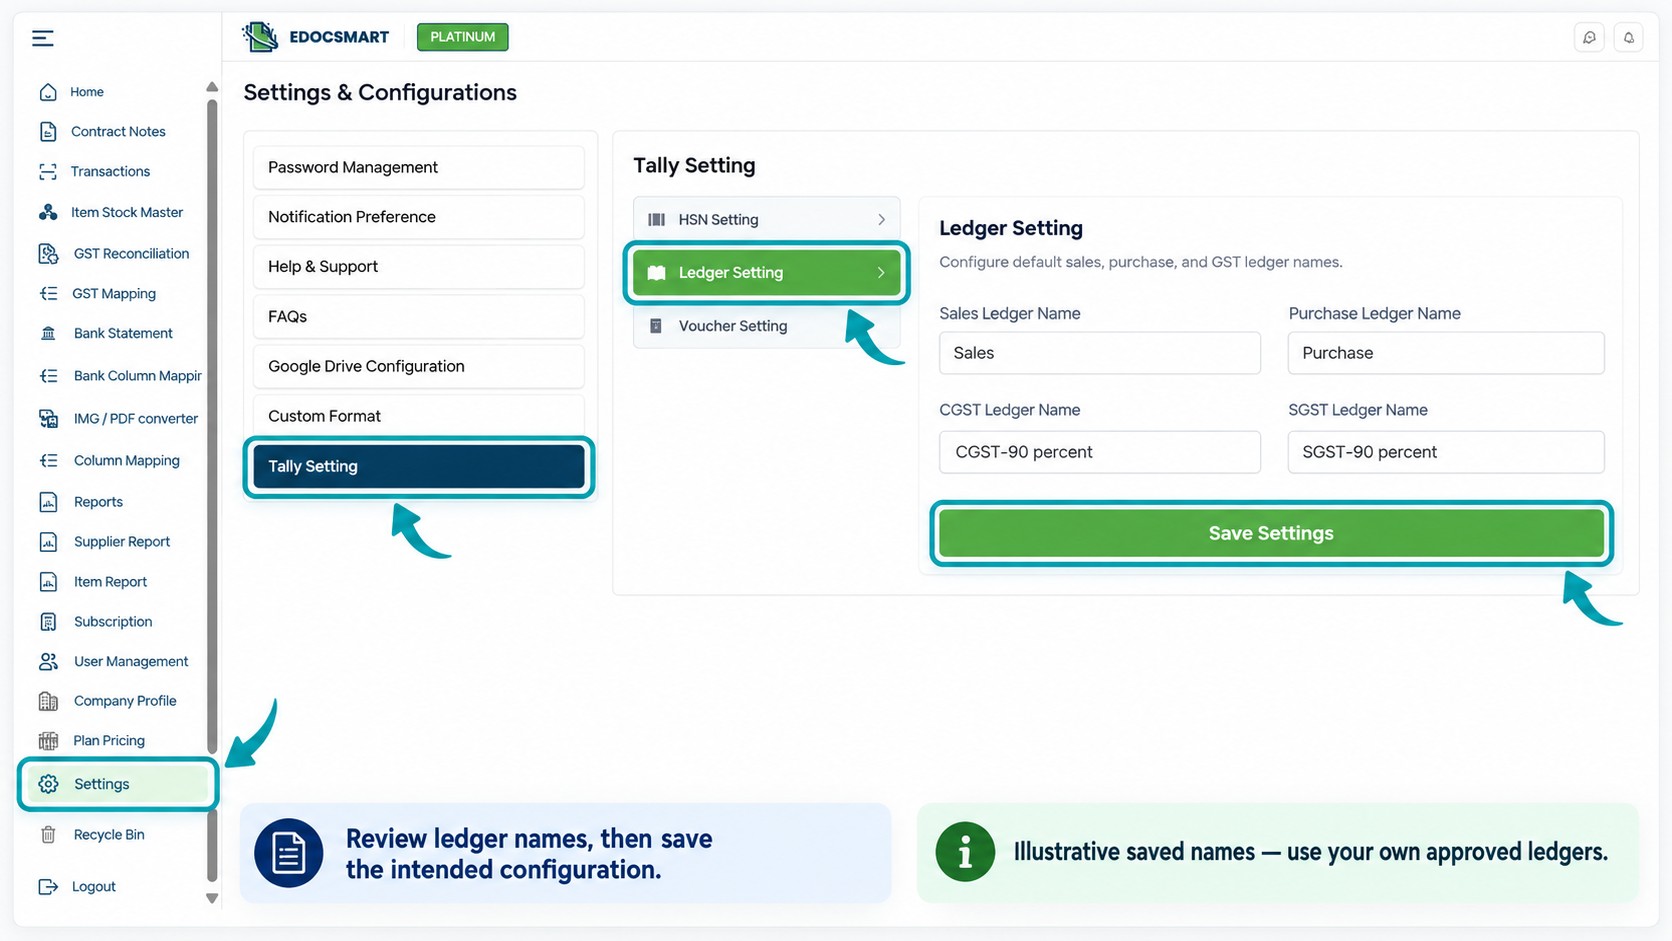
Step 6: Review Voucher Setting
Open Voucher Setting.
Check the Voucher Type Name required for the workflow, then save the intended setting.
A voucher type name and a voucher number serve different purposes. The voucher-type field should contain the intended type, rather than an invoice reference or accounting voucher number.
Also review the separate voucher-number options in Excel mapping where applicable.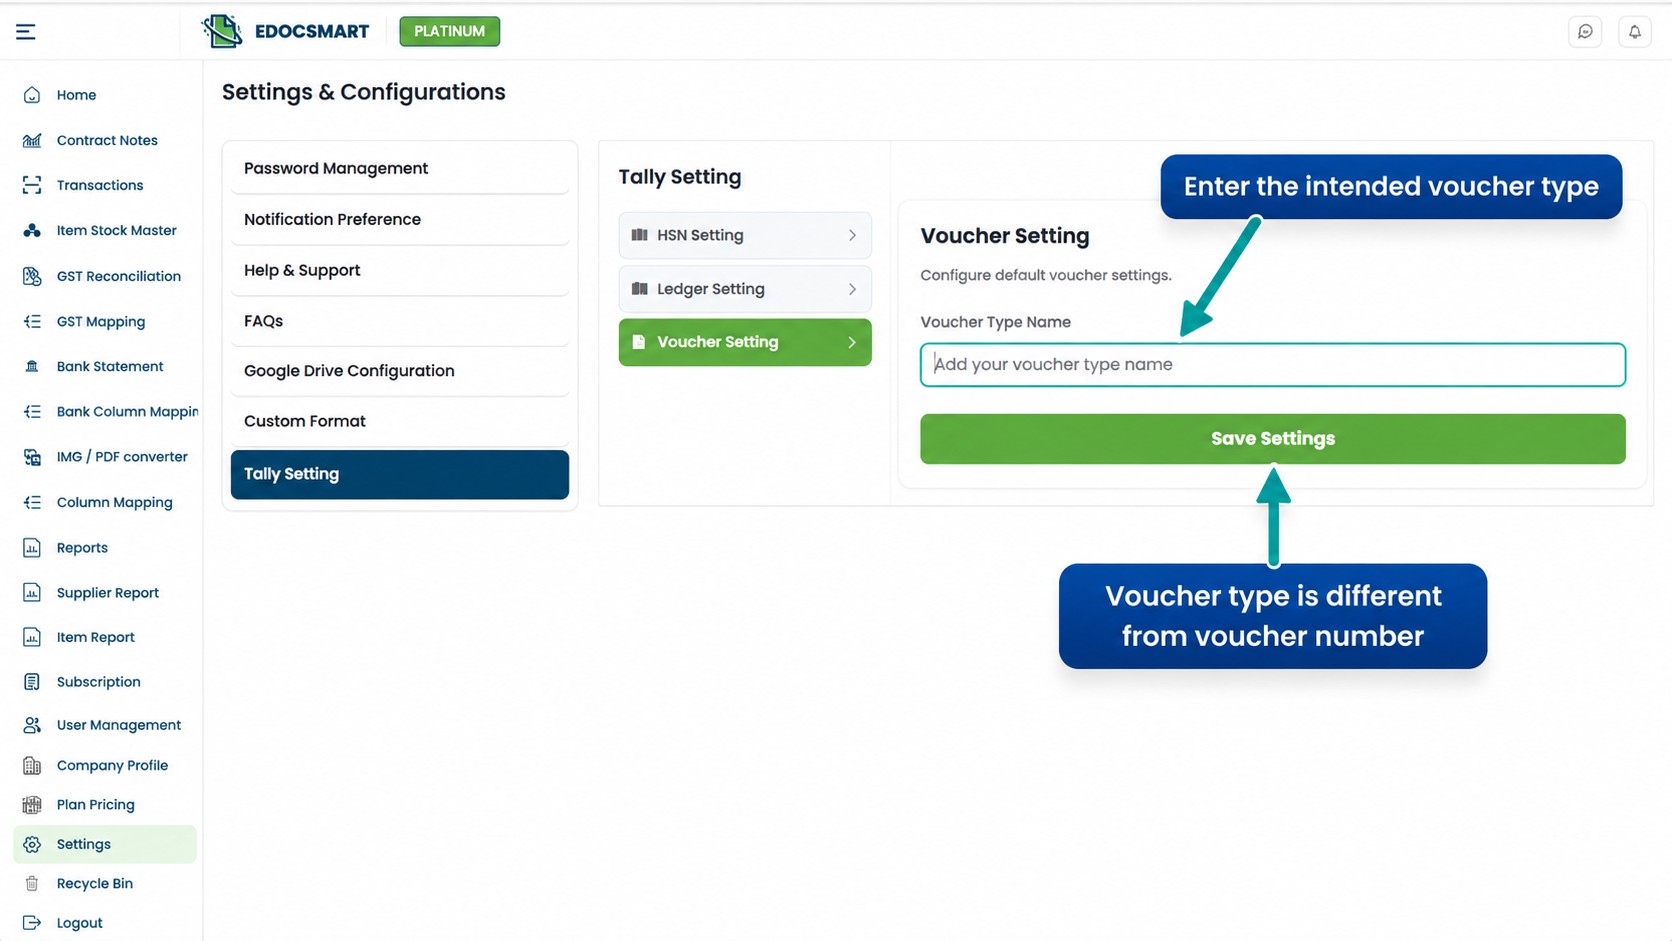
Step 7: Process, Review, and Verify a Sample
Prepare a small sample using the saved configuration.
Review the party, ledger allocations, voucher type, HSN source, tax details, and totals. Resolve differences before approving the records.
Keep a current company backup, open the intended Tally company, and start the Edocsmart Tally Connector.
Sync approved samples and inspect the resulting entries in Tally before continuing with the remaining records.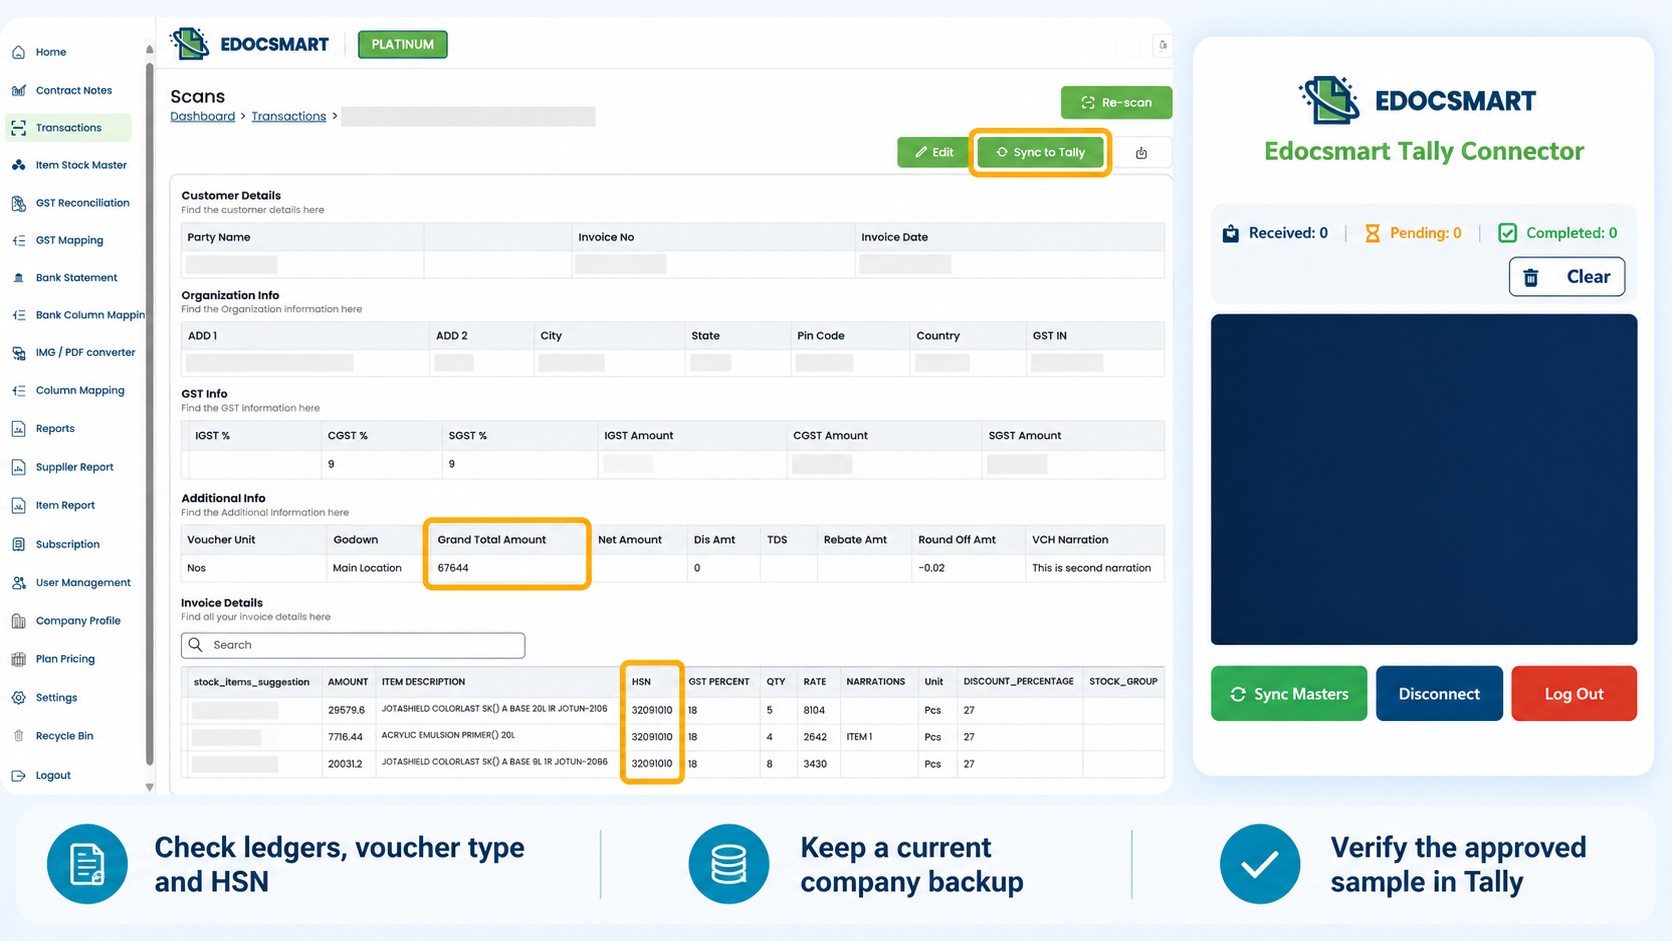
When Should You Review Saved Defaults?
Recheck the configuration when ledger names, voucher requirements, HSN sources, or company requirements change.
If several entries show the same issue, inspect the shared defaults and mapping before editing each record individually.
For company-specific requirements, discuss your Tally configuration with Edocsmart using a sample file and the expected output.
Frequently Asked Questions
1. What are Tally default settings?
They provide accounting values used by the configured import process.
2. Where can I check ledger names?
Compare the configured names with the ledgers in the intended Tally company.
3. Are ledger names the same for every company?
No. Check the names required by each company.
4. What is Invoice Based HSN?
It uses HSN information from the uploaded invoice.
5. What is Mapping Based HSN?
It retrieves HSN information based on the maintained item master.
6. Is a voucher type the same as a voucher number?
No. The type identifies the transaction category; the number identifies the voucher.
7. Should I test after changing settings?
Yes. Review and verify a small sample before processing the remaining records.
Conclusion
Tally default settings help prepare entries with the intended ledger names and accounting configuration. Review the ledger defaults, tax registration type, HSN source, and voucher settings together.
Save the required configuration, check prepared records, and verify a sample through the Excel-to-tally-software before completing a bulk import.