How to Convert Scanned Invoice to Tally
Convert scanned invoices into structured, review-ready accounting data and sync verified supplier, item, GST, and amount details into Tally with Edocsmart.
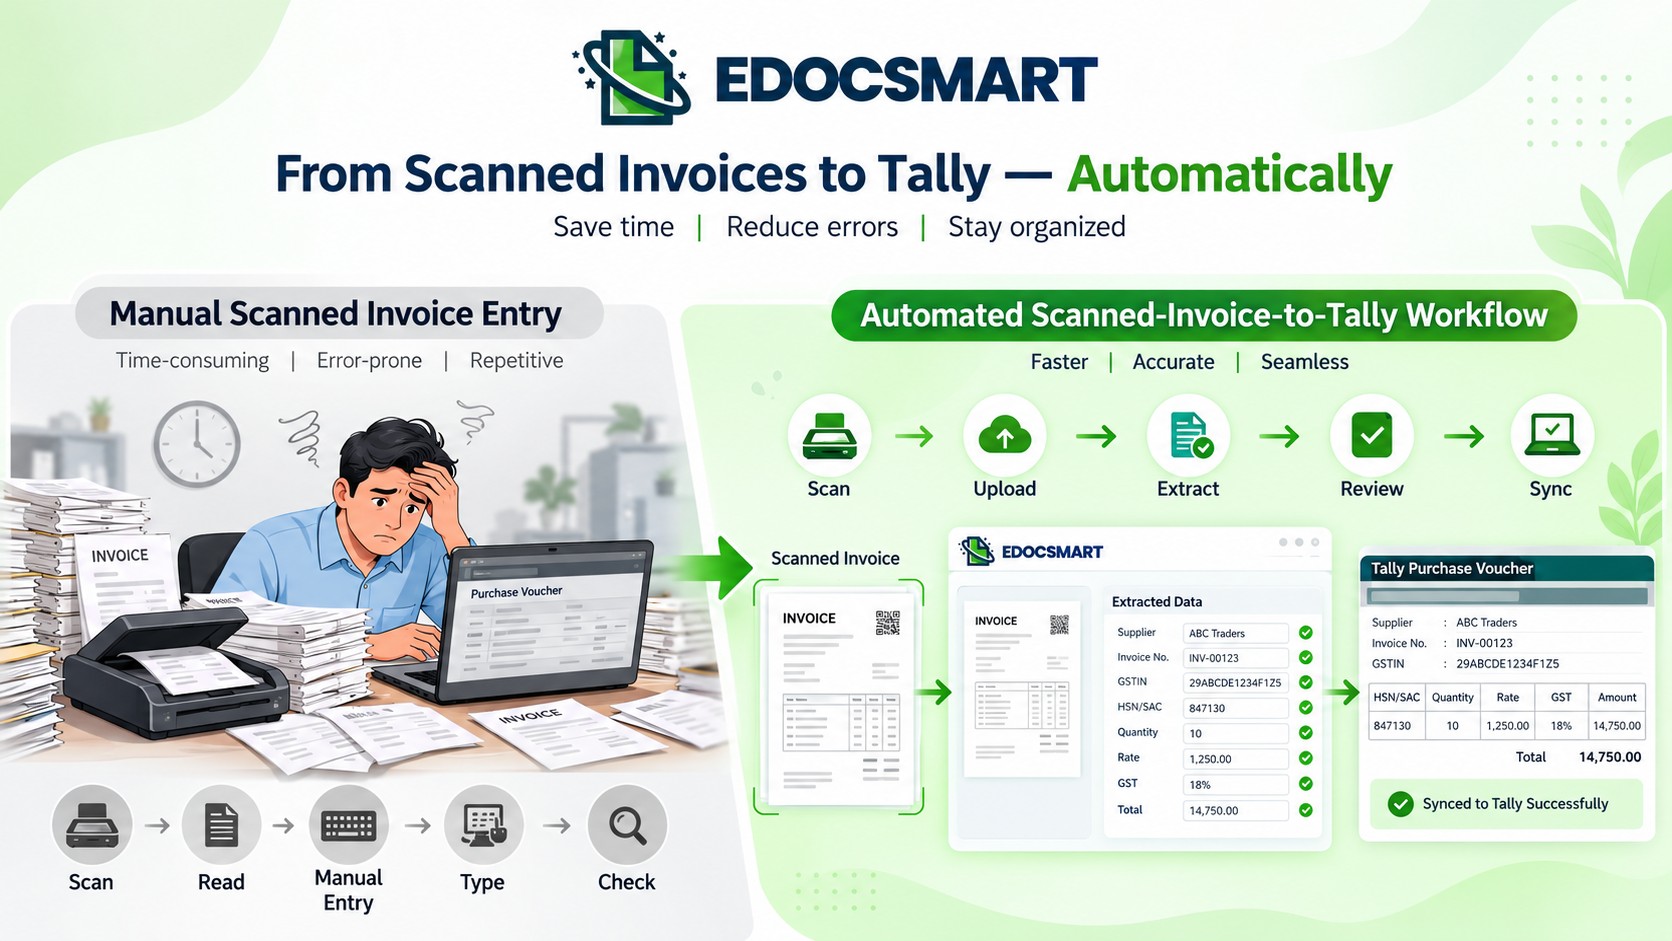
A business may have hundreds of supplier invoices neatly scanned and saved on a computer. At first, this looks like a digital accounting process. Paper bills are converted into PDFs or images, files are organized in folders, and invoices can be accessed whenever required.
But when it is time to create the accounting entry, the real work begins.
Someone still has to open the scanned invoice, read the supplier name, invoice number, GST details, item information, quantity, rate and total amount, and then manually type the same information into Tally.
So the invoice has become digital, but the accounting process is still manual.
This is where a scanned invoice to Tally workflow can help. Instead of manually entering every field, a scanned invoice can be uploaded into Edocsmart, where the available information is extracted into structured fields, reviewed by the user and then synchronized with Tally through a configured connector.
The workflow changes from:
Scan Invoice → Read Manually → Enter into Tally
to:
Scan Invoice → Upload → Extract Data → Verify → Sync to Tally
This provides a more practical way to scan invoice to Tally when businesses regularly receive physical, scanned or image-based supplier invoices.
For a broader document-to-accounting workflow, explore our Invoice to Tally solution.
What Is a Scanned Invoice?
A scanned invoice is a digital copy of a physical invoice.
For example, a supplier may provide a printed GST invoice. The accounts team scans the document and saves it as a JPEG, image or scanned PDF.
A scanned invoice can therefore include:
- Scanned PDF invoices
- JPEG or JPG invoices
- Invoice photographs
- Scanner-generated images
- Image-based PDF documents
The important point is that a scanned invoice often behaves like an image.
The information is visible to a person, but it may not automatically exist as structured digital data that Tally can directly use.
This is why simply scanning an invoice does not complete the accounting process.
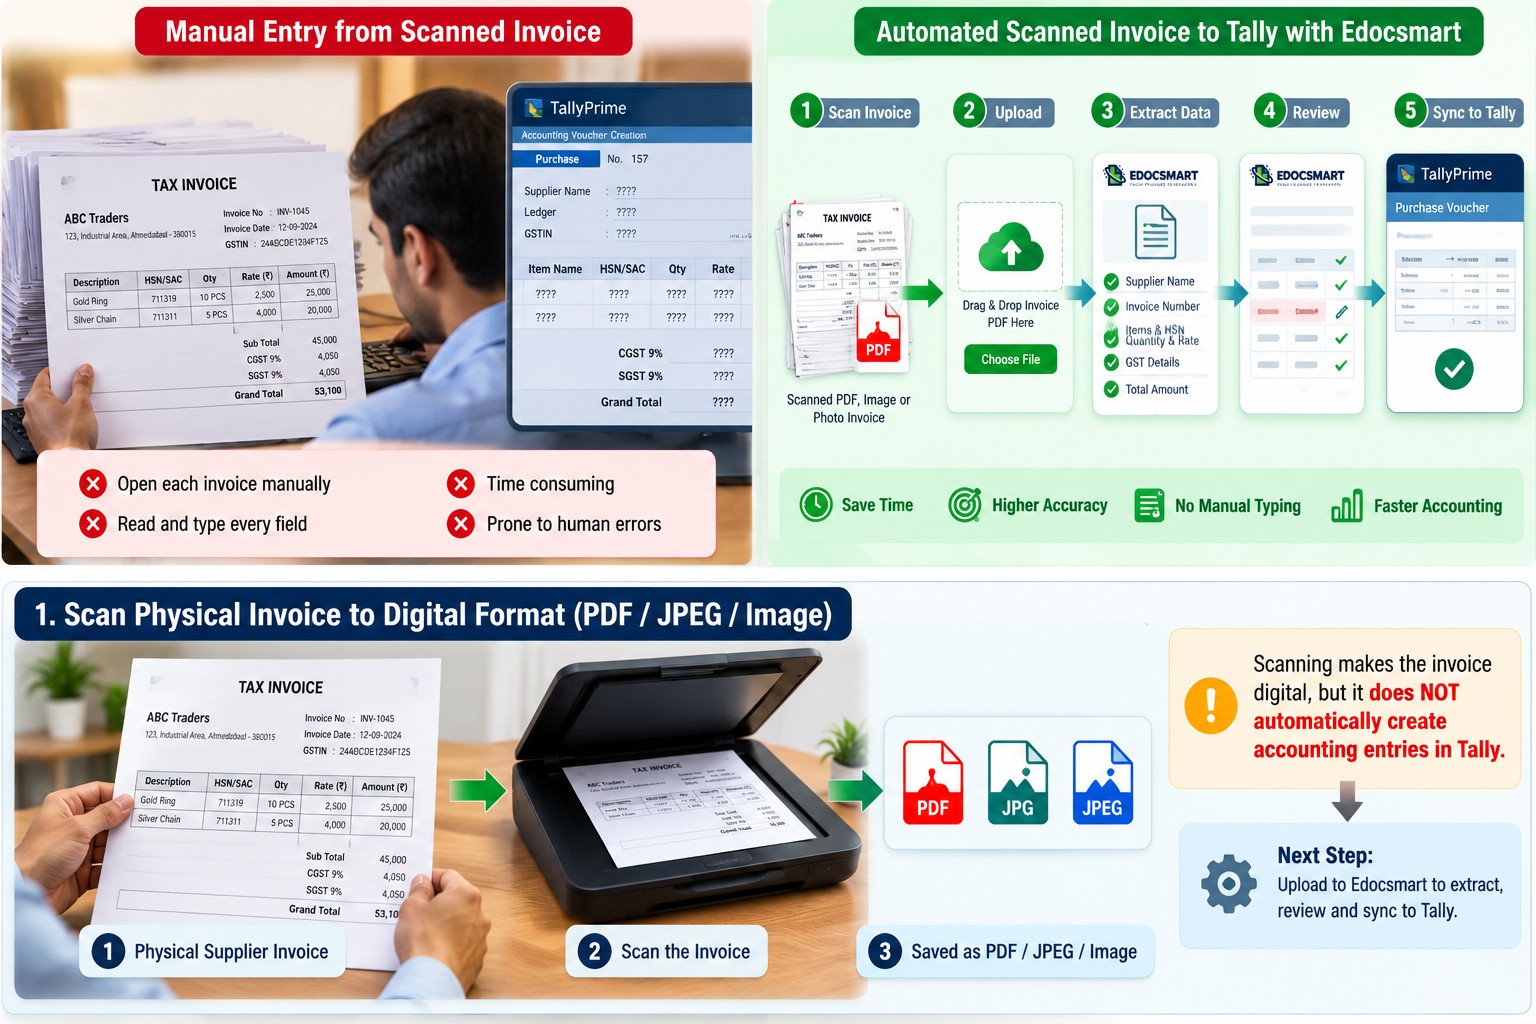
Scanning an Invoice Is Not the Same as Automating It
Scanning is useful for storing documents digitally.
It reduces physical paperwork and makes invoices easier to access. However, if an accountant still opens the scan and manually types the values into Tally, the data-entry process remains manual.
For example, after scanning an invoice, the accountant may still need to enter:
- Supplier ledger
- Invoice number
- Invoice date
- GSTIN
- Stock items
- HSN codes
- Quantity
- Rate
- GST
- Final amount
A proper invoice image to Tally workflow goes one step further.
Instead of using the scanned file only for storage, the information inside that document is extracted and converted into structured data.
So the difference is:
Scanning only: Paper → Digital Image
Invoice automation: Paper → Scan → Extract → Review → Tally
This is what makes an image invoice to Tally process more useful for accounting teams.
For businesses handling recurring supplier scans, invoice automation for Tally can reduce repeated typing while keeping verification in the workflow.
How OCR Helps Process Scanned Invoices
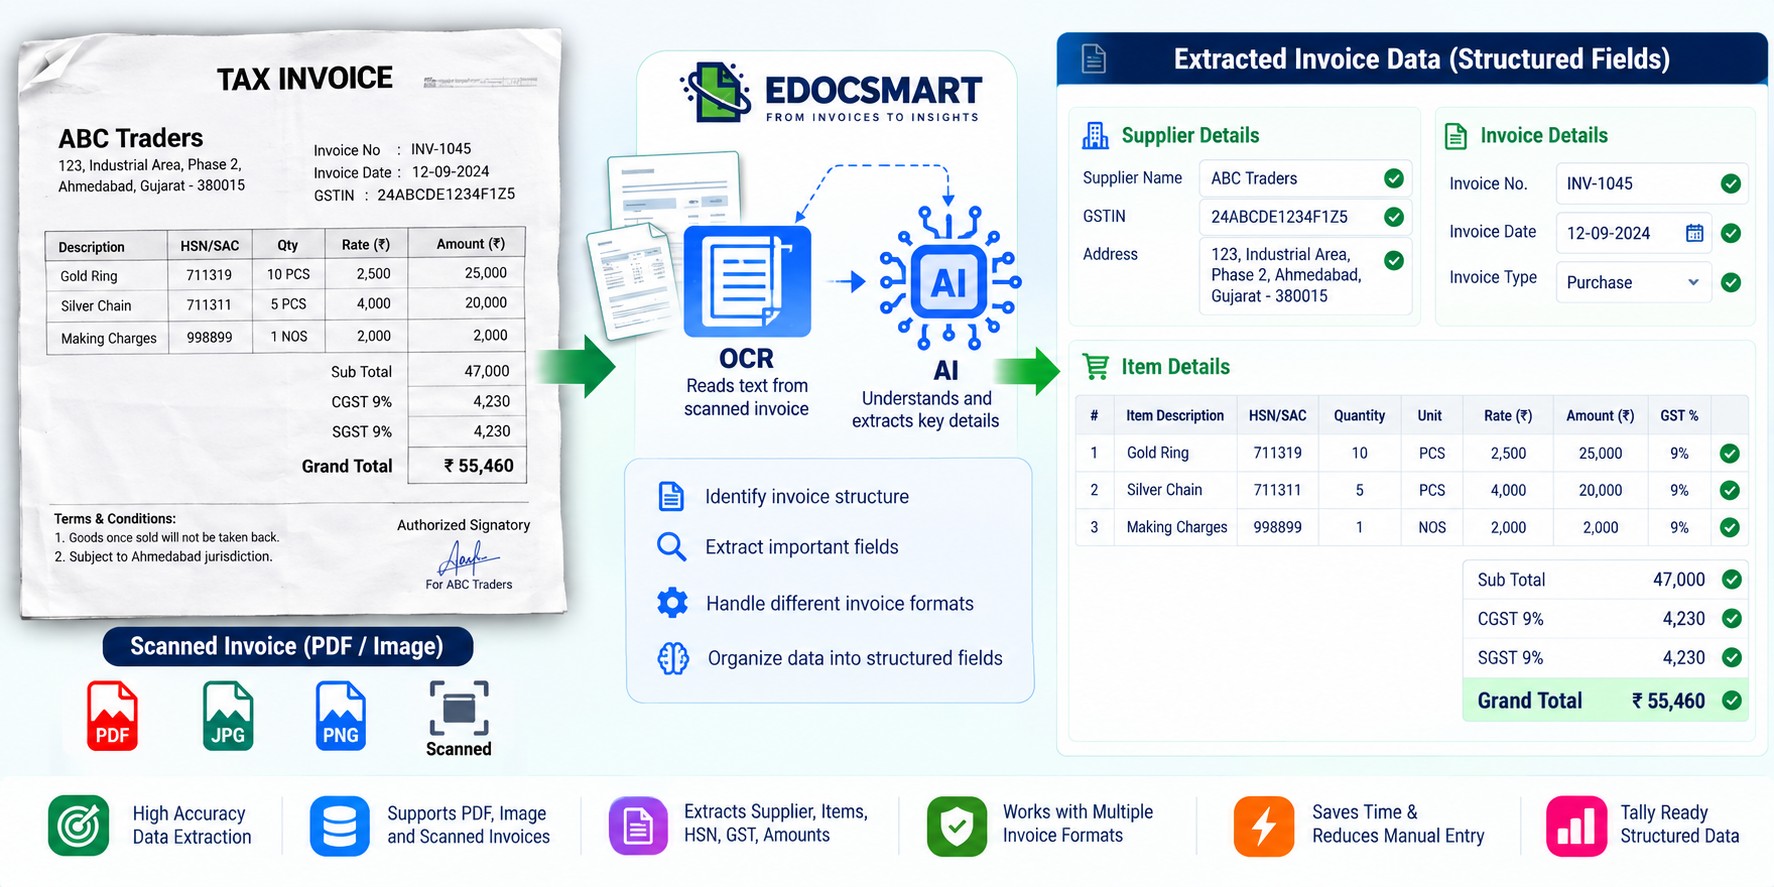
OCR, or Optical Character Recognition, helps identify text from scanned images and image-based documents.
Suppose a scanned invoice contains:
Invoice No: INV-4582
Invoice Date: 24-09-2026
Quantity: 20
GST: 18%
Grand Total: ₹48,500
Without extraction technology, someone has to manually read and type these values.
An AI invoice scanner for Tally workflow can help identify relevant information from the document and organize it into structured fields.
However, OCR alone does not complete the accounting process.
The extracted data still needs to be mapped, reviewed and transferred into the correct accounting structure.
That is why an OCR to Tally software workflow generally involves several stages:
Scan → OCR/Data Extraction → Mapping → Verification → Tally Sync
In practice, AI invoice processing for Tally combines OCR with field identification, mapping, and user review rather than relying on text recognition alone.
How to Convert Scanned Invoice to Tally Using Edocsmart
The Edocsmart workflow can be divided into a few simple steps.
Step 1: Prepare a Clear Invoice Scan
Start with a clear scanned copy of the invoice.
If you have a physical bill, scan it using a scanner or capture a clear image.
For better processing, make sure:
- The full invoice is visible
- Text is readable
- Important fields are not cropped
- The image is not heavily blurred
- The invoice is reasonably straight
This is especially important for fields such as invoice numbers, GSTINs, quantities and item descriptions.
A clear scan helps create a better photo invoice to Tally workflow because the information is easier to identify and verify.
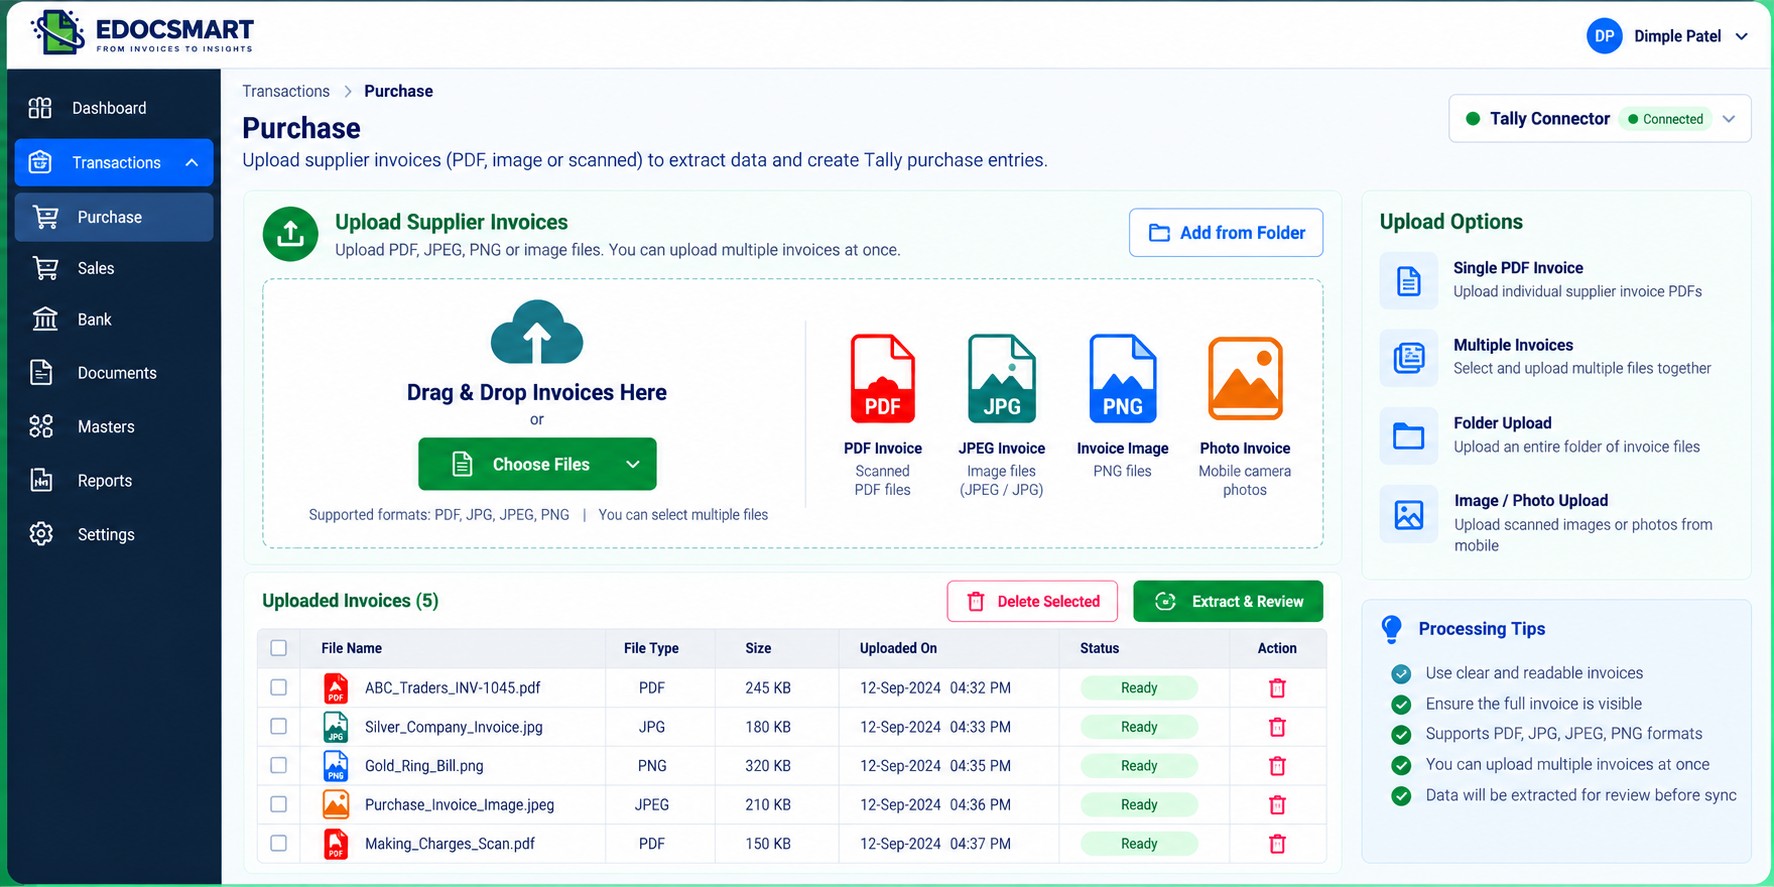
Step 2: Login to Edocsmart
Open Edocsmart and sign in using your credentials.
After login, go to:
Transactions → Purchase
The Purchase section is where the scanned invoice can be uploaded and processed.
Instead of opening Tally first and manually creating a voucher, the invoice document becomes the starting point.
Step 3: Upload the Scanned Invoice
Inside the Purchase section, upload the required scanned invoice.
Depending on the supported workflow, this may include:
- Scanned PDF
- JPEG invoice
- Invoice image
- Invoice photograph
Once uploaded, the system begins processing the document.
This is where invoice scanner to Tally automation differs from traditional invoice entry—the user does not have to manually recreate the entire document before processing can begin.
Step 4: Extract Invoice Information
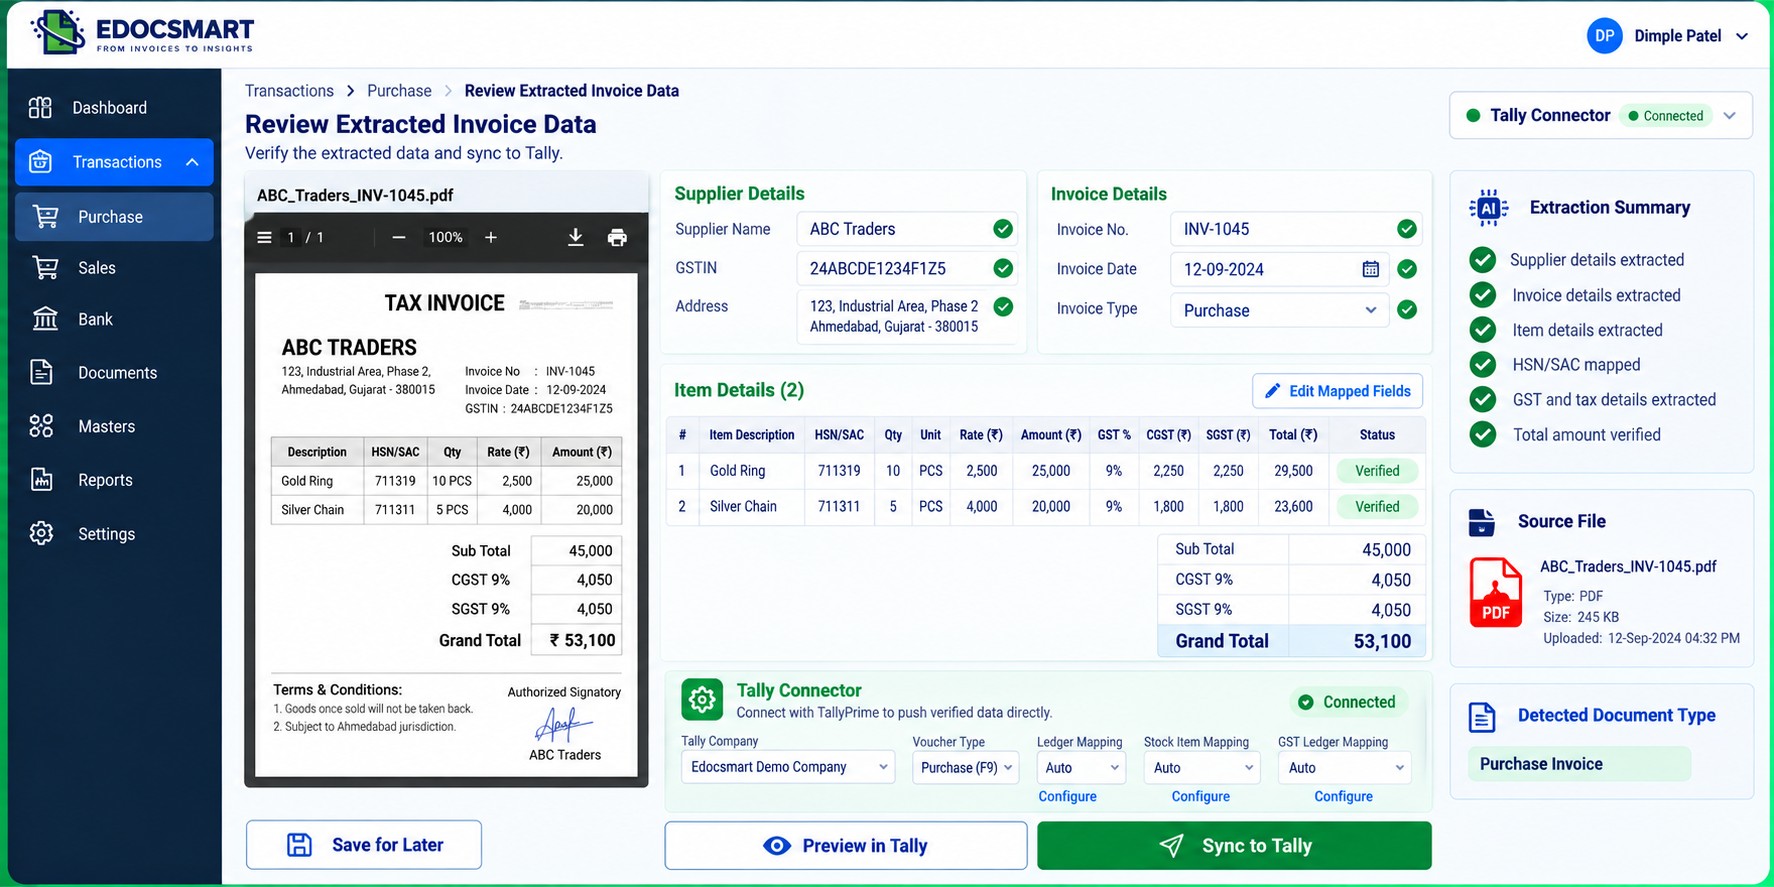
After upload, Edocsmart processes the scanned invoice and converts the available information into structured fields.
The extracted information can include different categories of invoice data.
Supplier Details
These may include:
- Party or supplier name
- GSTIN
- Address
- City
- State
- PIN code
Invoice Information
The system may extract:
- Invoice number
- Invoice date
- Reference information
Item-Level Details
For each product, information can include:
- Product description
- HSN code
- Quantity
- Unit
- Rate
- MRP
- Discount
- GST percentage
- Amount
Tax and Total Information
The invoice may also contain:
- CGST
- SGST
- IGST
- Taxable amount
- Net amount
- Round-off
- Grand total
Instead of remaining locked inside an image, this information becomes structured data that can be reviewed before it moves further.
Step 5: Complete the Initial Mapping
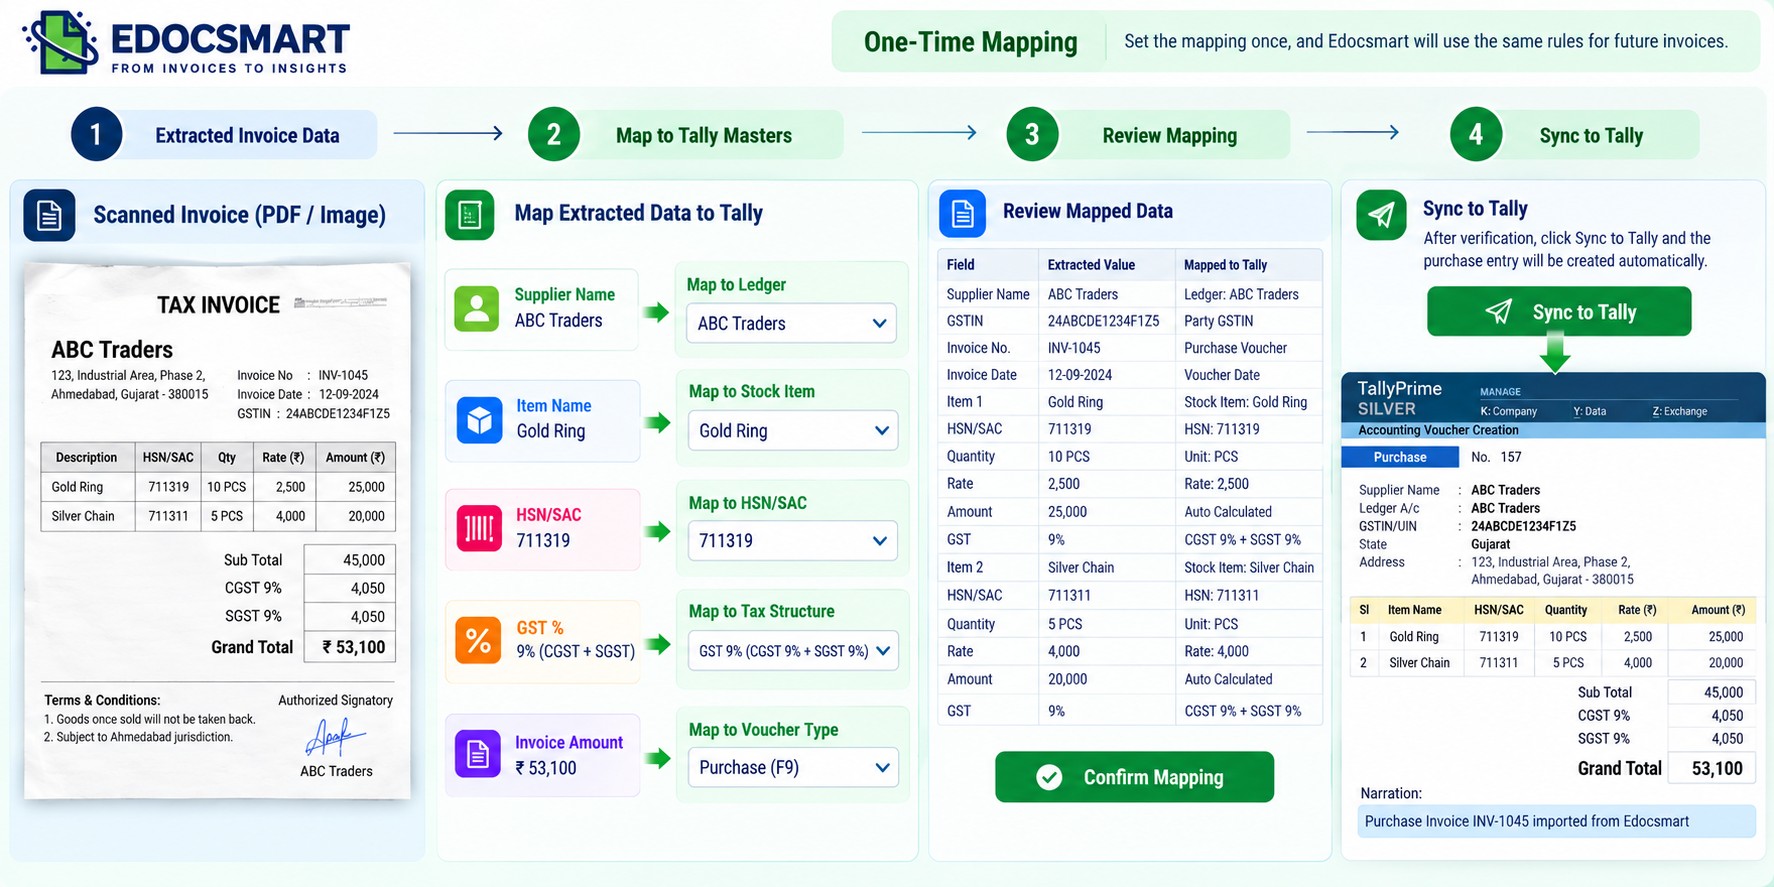
The extracted invoice information needs to correspond with the required accounting fields.
This is where mapping is used.
For example:
Supplier Name → Party/Ledger
Item Description → Stock Item
Invoice Number → Voucher Information
GST Details → Tax Structure
Invoice Amount → Purchase Value
The useful part is that mapping is mainly an initial configuration.
Once the required setup has been completed, the same applicable configuration can be reused for future scanned invoices.
This helps reduce repetitive setup work while processing a scanned bill to Tally.
Step 6: Review the Extracted Information
Verification is especially important for scanned invoices because document quality can vary.
After extraction, users can compare the structured information with the original scan.
Important fields to verify include:
- Supplier name
- Invoice number
- Invoice date
- GSTIN
- HSN code
- Stock items
- Quantities
- Rates
- GST percentage
- Final amount
Suppose the scanned invoice contains 18 different products.
In a manual workflow, the accountant may need to enter all 18 rows manually.
With automated extraction, those rows are already available for review. If only one quantity is incorrect, the user can focus on that field instead of recreating the complete invoice.
This is one of the main advantages of automatic invoice entry in Tally.
Step 7: Save the Invoice or Sync It
Once the information has been checked, the user can either save it or continue directly with synchronization.
If additional verification or approval is required, the invoice can be saved for later.
The workflow can therefore be:
Upload → Extract → Review → Save
and later:
Saved Invoice → Review → Sync to Tally
If everything is already correct, the user can proceed directly with Sync to Tally.
Step 8: Connect Edocsmart with Tally
To move the verified information into Tally, a connector is required.
Businesses can use the Edocsmart Tally Connector or another compatible connector depending on their configuration.
During the initial setup, the required templates may be configured for:
- Purchase vouchers
- Supplier ledgers
- Stock items
- Tax information
- Other business-specific fields
This configuration defines how the extracted invoice information should appear in Tally.
Once this setup is complete, the workflow can support TallyPrime invoice automation without rebuilding the same structure for every scanned invoice.
Step 9: Sync the Scanned Invoice Data to Tally
Once the invoice is ready, click Sync to Tally.
The verified information is then transferred through the configured connector.
Depending on the setup, this can include:
- Purchase voucher information
- Supplier ledger data
- Stock items
- GST and tax details
- Other mapped invoice fields
It is important to understand that the scanned image itself is not simply converted directly into a voucher.
The process actually works like this:
Scanned Invoice → Extracted Data → Reviewed Data → Tally Connector → Tally Entry
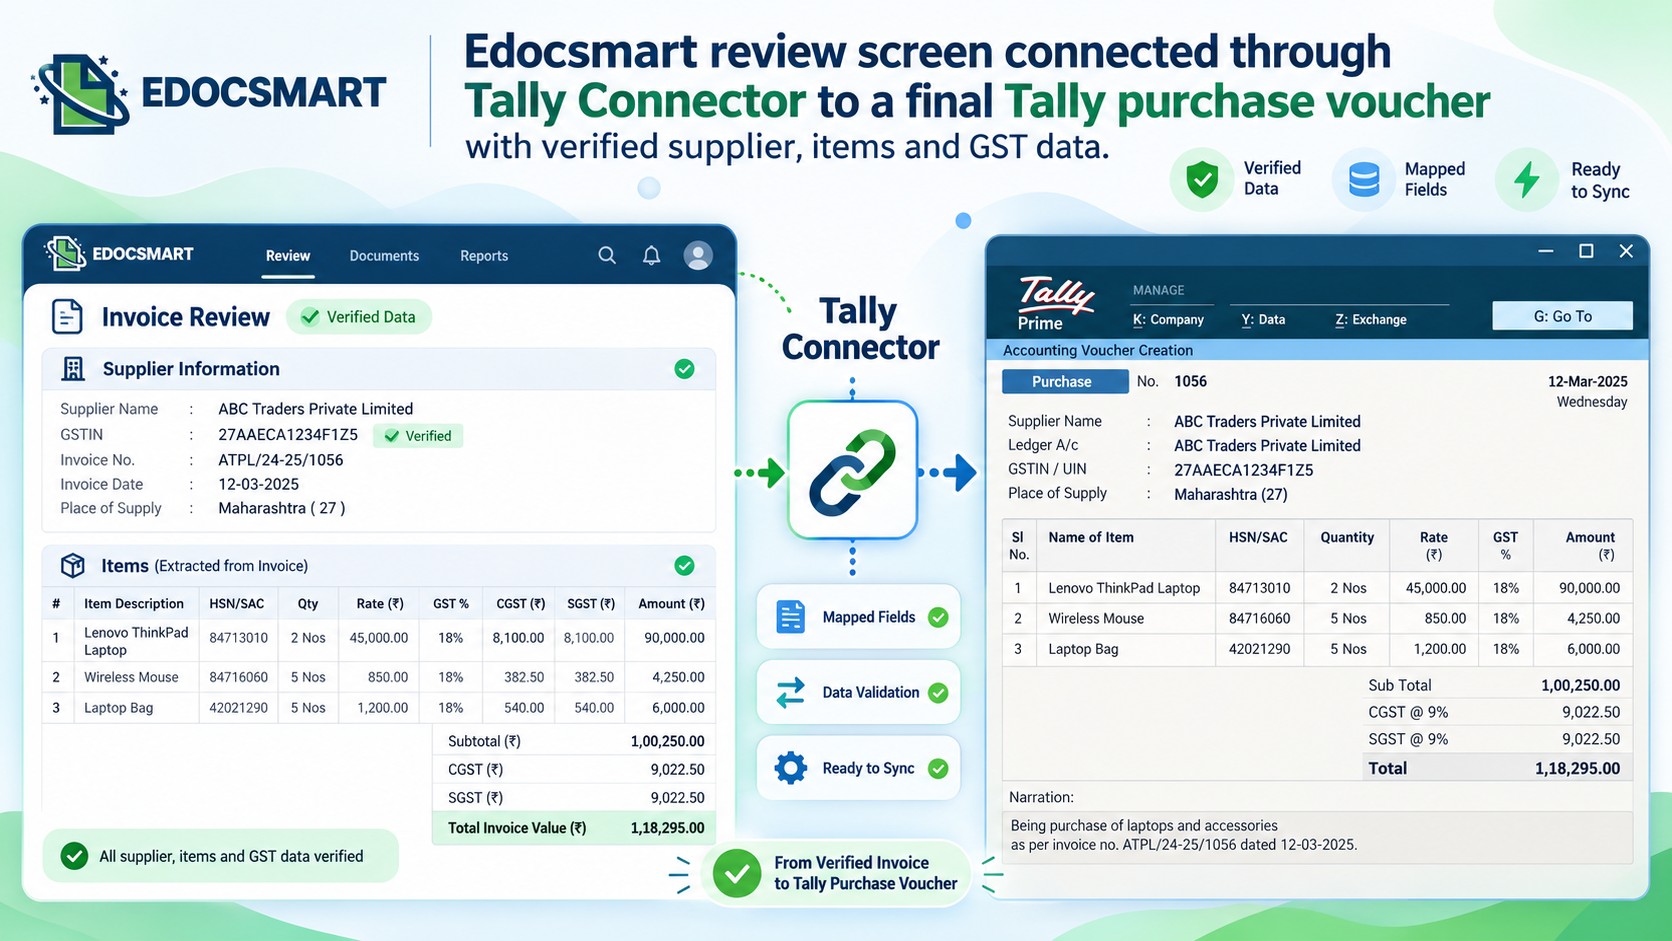
This makes the workflow more controlled and easier to verify.
Practical Example: From Printed Invoice to Tally
Suppose a wholesaler receives a printed purchase invoice containing 20 stock items.
The invoice is scanned and stored as a PDF.
In a manual process, the accountant opens that PDF, creates the purchase voucher in Tally and enters every item, quantity, rate and GST value individually.
With Edocsmart, the scanned document can first be uploaded.
The supplier information, invoice number, item details, taxes and totals are extracted.
The accountant reviews the captured information.
Suppose 19 items are correct and only one rate requires correction. Instead of manually entering all 20 rows, the user corrects that particular field.
The invoice can then be synced into Tally through the configured connector.
That is the practical benefit of using invoice scanner software for Tally instead of treating scans only as stored documents.
Scanning Only vs Scanning with Automation
|
Scanning Only |
Scanning + Invoice Automation |
|
Invoice becomes a digital image |
Invoice becomes structured data |
|
Mainly useful for storage |
Useful for processing and accounting |
|
Accountant reads the invoice |
Data is extracted first |
|
Tally entry remains manual |
Verified data can be synced |
|
Every field may need typing |
User mainly reviews extracted fields |
The difference is important.
Digitizing a document makes it easier to store.
Automating it makes the information easier to use.
Benefits of Converting Scanned Invoices to Tally
A scanned-invoice automation workflow can help reduce repetitive typing and make purchase invoice processing more organized.
It is particularly useful for manufacturers, wholesalers, distributors, retailers, jewellery businesses and accounting firms where physical or image-based supplier invoices are common.
Businesses can retain their original scanned documents while also converting important invoice information into usable accounting data.
For companies processing many invoices, this changes the accountant's role from repeatedly entering data to reviewing and validating it.
FAQS
Can I convert a scanned
invoice to Tally?
Yes. A scanned invoice can first be processed to extract important information such as supplier details, invoice number, stock items, GST values and totals. After verification and the required mapping, the structured data can be synchronized with Tally using a configured connector.
Can a photo invoice be
processed?
Supported invoice photographs and image files can be processed as part of an automated invoice workflow. A clear image is preferable so important information can be extracted and properly reviewed before further processing.
Can an image-based PDF be
used?
Yes. A scanned or image-based PDF can be uploaded for processing. The information inside the document is extracted into structured fields and reviewed before it is used in the Tally workflow.
Is mapping required for every
scanned invoice?
No. Mapping is primarily an initial configuration. Once the required structure has been properly configured, it can be reused wherever the same setup applies.
What if the scanned invoice is
blurry?
A poor-quality scan may make certain information more difficult to identify. It is better to use a clear scan where the text, invoice number, GSTIN, product details and totals are readable. Extracted information should always be reviewed before synchronization.
Can GST invoices also be
processed?
Yes, supported GST invoices can be processed so that information such as GSTIN, CGST, SGST, IGST and relevant invoice amounts can be extracted and reviewed before being transferred according to the configured accounting workflow.
Conclusion
Scanning an invoice solves the problem of storing a physical document digitally, but it does not automatically eliminate manual accounting work.
If the accountant still has to read every scanned bill and re-enter supplier details, stock information, GST and totals into Tally, the process remains largely manual.
A better workflow is:
Scan → Upload → Extract → Map → Review → Sync to Tally
With Edocsmart, a scanned invoice can become a source of structured accounting data rather than simply an image stored on a computer.
This makes it possible to move from basic document scanning toward a more complete scanned invoice to Tally workflow where the accountant focuses primarily on verifying the information before it reaches Tally.