How to Enter Invoice in Tally Automatically
Automatic invoice entry means reducing the amount of information an accountant has to manually type into Tally.
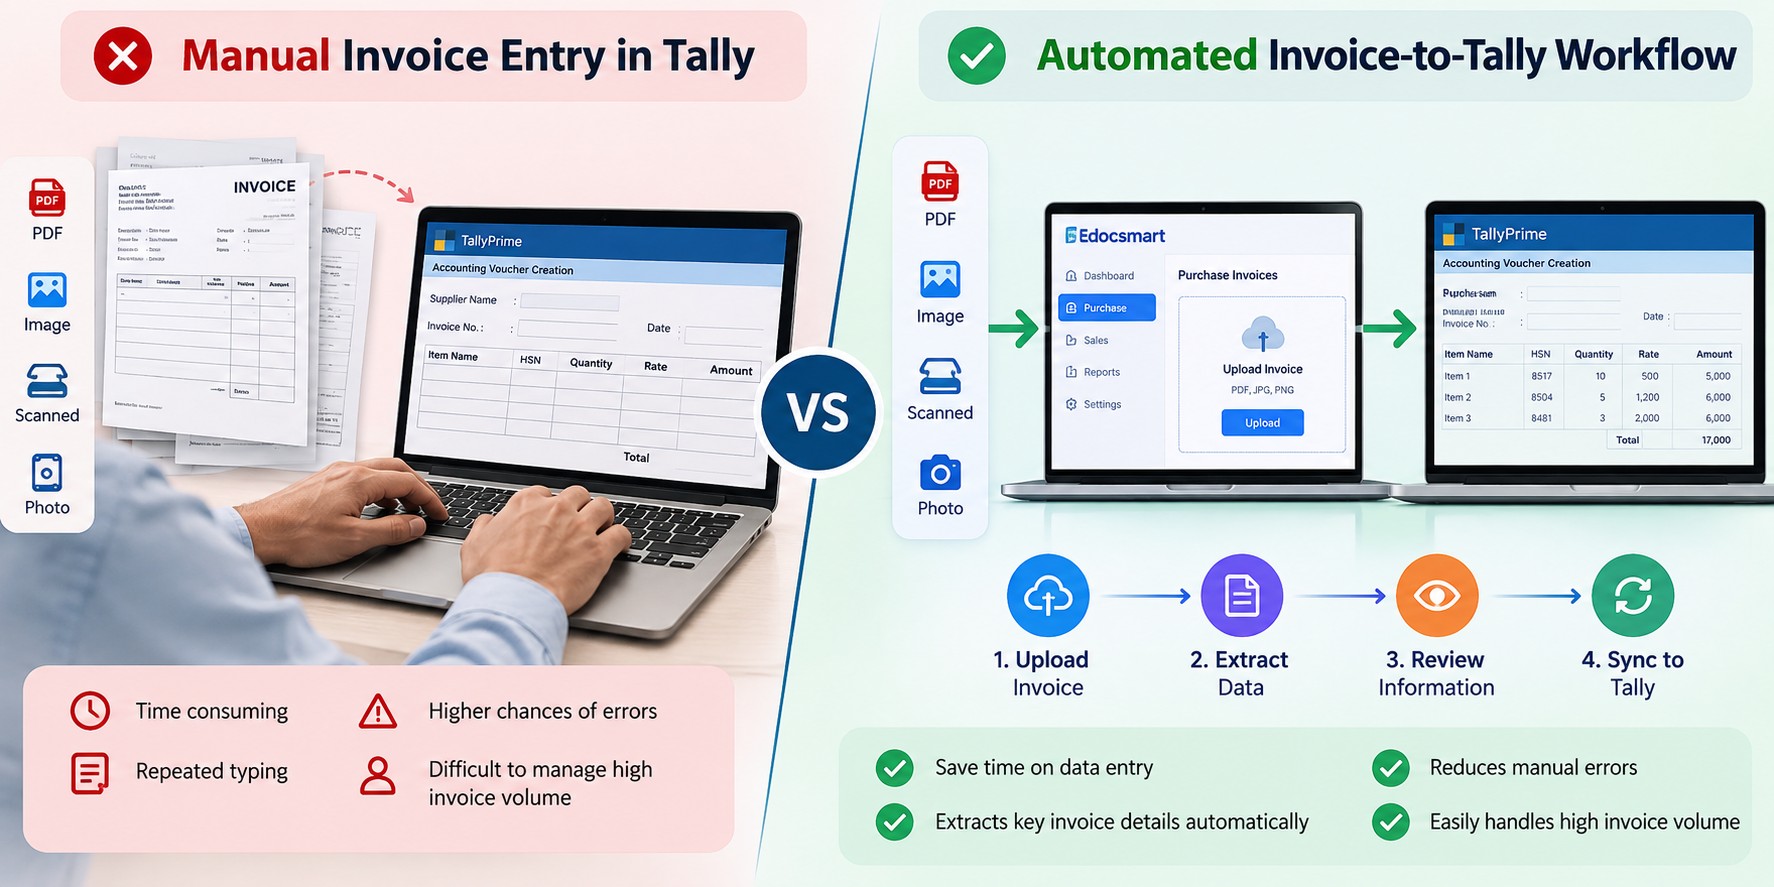
An invoice arrives on WhatsApp. Another comes through email as a PDF. A third supplier sends a scanned copy, while someone else simply shares a clear photograph of the bill.
For an accountant, the format may change, but the work usually remains the same: open the invoice, read the details, open Tally, select the correct voucher, enter the party information, add stock items, check taxes, type amounts, verify everything and finally save the transaction.
Then the next invoice arrives.
The problem is not that entering one invoice into Tally is difficult. The problem begins when the same process has to be repeated every day for dozens or hundreds of invoices.
A more practical approach is to make the invoice itself the starting point of the accounting process.
Instead of manually transferring every detail from the document into Tally, the invoice can be uploaded into Edocsmart, converted into structured data, reviewed by the user and then synced with Tally through a configured connector.
The workflow becomes much simpler:
Invoice → Upload → Extract → Review → Sync → Tally
So, if you are trying to understand how to enter invoice in Tally automatically, the important part is not simply importing a document. The complete process involves extracting the right information, mapping it correctly, validating it and sending it into the required Tally structure.
This creates a practical invoice entry in tally workflow where the document becomes the starting point instead of manual retyping.
What Does Automatic Invoice Entry in Tally Actually Mean?
Automatic invoice entry means reducing the amount of information an accountant has to manually type into Tally.
A normal invoice already contains most of the information required for accounting. The supplier name is there. The invoice number and date are there. Product descriptions, quantities, rates, HSN codes, GST percentages and total amounts are also present.
Traditionally, the accountant reads this information from the invoice and enters it again into Tally.
With an automated workflow, the document is first processed digitally.
The invoice details are extracted and converted into structured fields. The user then checks the information before sending it to Tally.
This changes the accountant's work from primarily data entry to data verification.
For a broader document-to-accounting workflow, explore our Invoice to Tally solution.
From Invoice File to Tally Entry: How the Process Works
An automated invoice workflow can be understood as a bridge between an unstructured document and a structured accounting entry.
On one side, there may be a PDF, JPEG, scanned invoice or invoice photograph.
On the other side, Tally needs properly structured information for vouchers, ledgers, stock items and related accounting fields.
Edocsmart sits between these two stages and helps convert the invoice into information that can be reviewed and then transferred into Tally.
This document-to-accounting flow is the core idea behind invoice automation for tally.
Here is how the actual workflow works.
Step 1: Open Edocsmart and Login
The process starts by opening Edocsmart and signing in using the user's account credentials.
Once the user logs in successfully, the main dashboard becomes available.
Instead of beginning directly inside Tally, the invoice is first processed through the Edocsmart transaction workflow.
From the sidebar, navigate to:
Transactions → Purchase
The Purchase section is where the invoice document can be uploaded and prepared for further processing.
Although the final entry will be created in Tally, the
invoice processing begins here because this is where the document is converted
into usable structured information.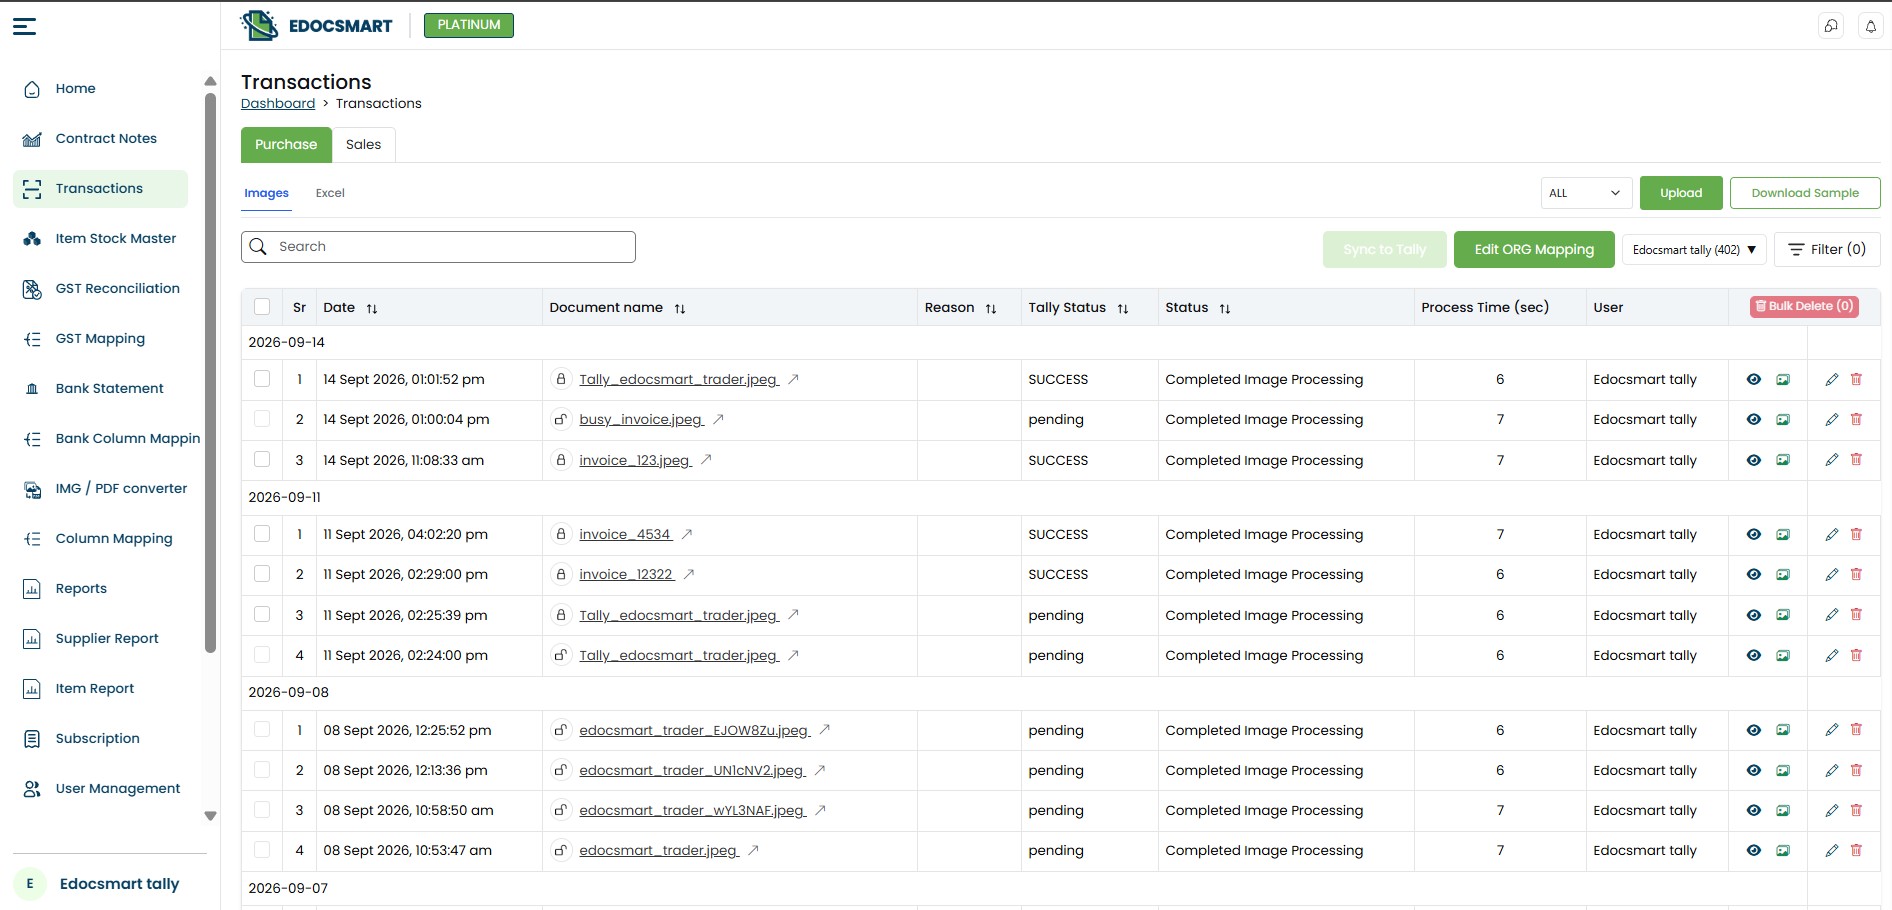 Login Step 2: Upload the Invoice
Inside the Purchase section, the user uploads the invoice that needs to be processed.
One useful aspect of this approach is that the invoice does not always have to arrive in one specific digital format.
Depending on the supported document type, the user can work with files such as PDF invoices, JPEG images, scanned copies or clear invoice photographs.
This matters in real accounting environments because suppliers rarely follow one common document format.
For example, one supplier may email a computer-generated PDF while another may share a photograph of a printed invoice through WhatsApp.
Instead of manually recreating the information from each
document, the user uploads the available invoice into the workflow.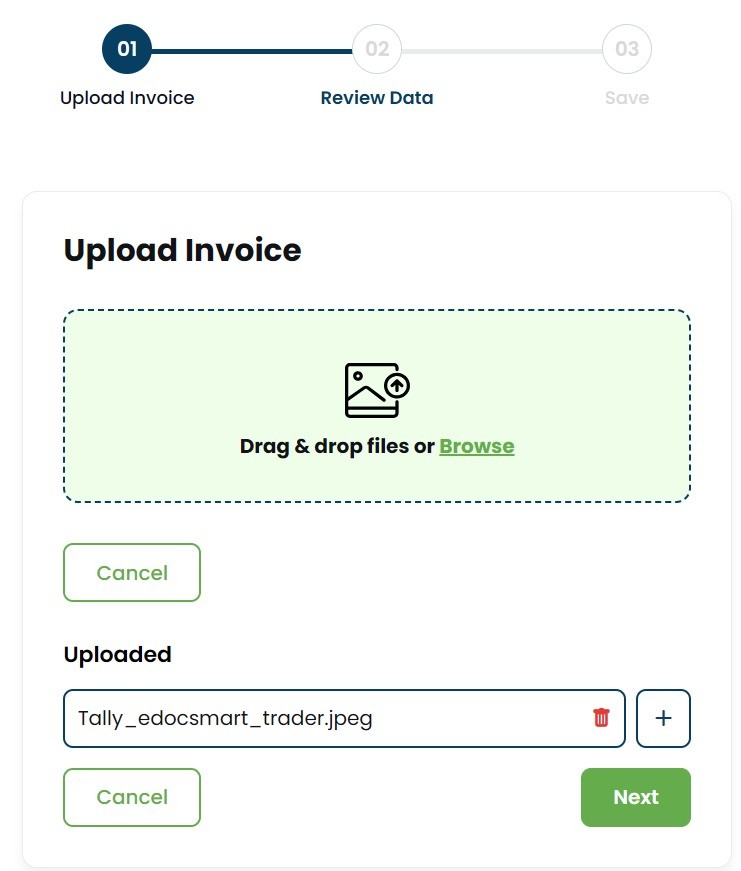 Upload
For scanned or photographed documents, the same approach can also support an AI invoice scanner for tally workflow before review.
Step 3: Complete the Initial Mapping
Uploading a file alone is not enough to create the correct accounting entry.
The information extracted from the invoice needs to correspond with the fields required by the Tally workflow.
This is where mapping becomes important.
The good part is that mapping is mainly an initial setup activity.
When the workflow is being configured for the first time, the relevant invoice fields are connected with their corresponding accounting fields.
For example, the supplier name needs to relate to the required party or ledger structure, the invoice number needs to move into the relevant voucher field, and product information needs to correspond with the required stock-item configuration.
Once the required mapping has been properly configured, the same setup can be reused wherever it remains applicable.
That means the user does not need to repeat the complete mapping process every time another invoice is uploaded.
This makes the regular workflow much shorter.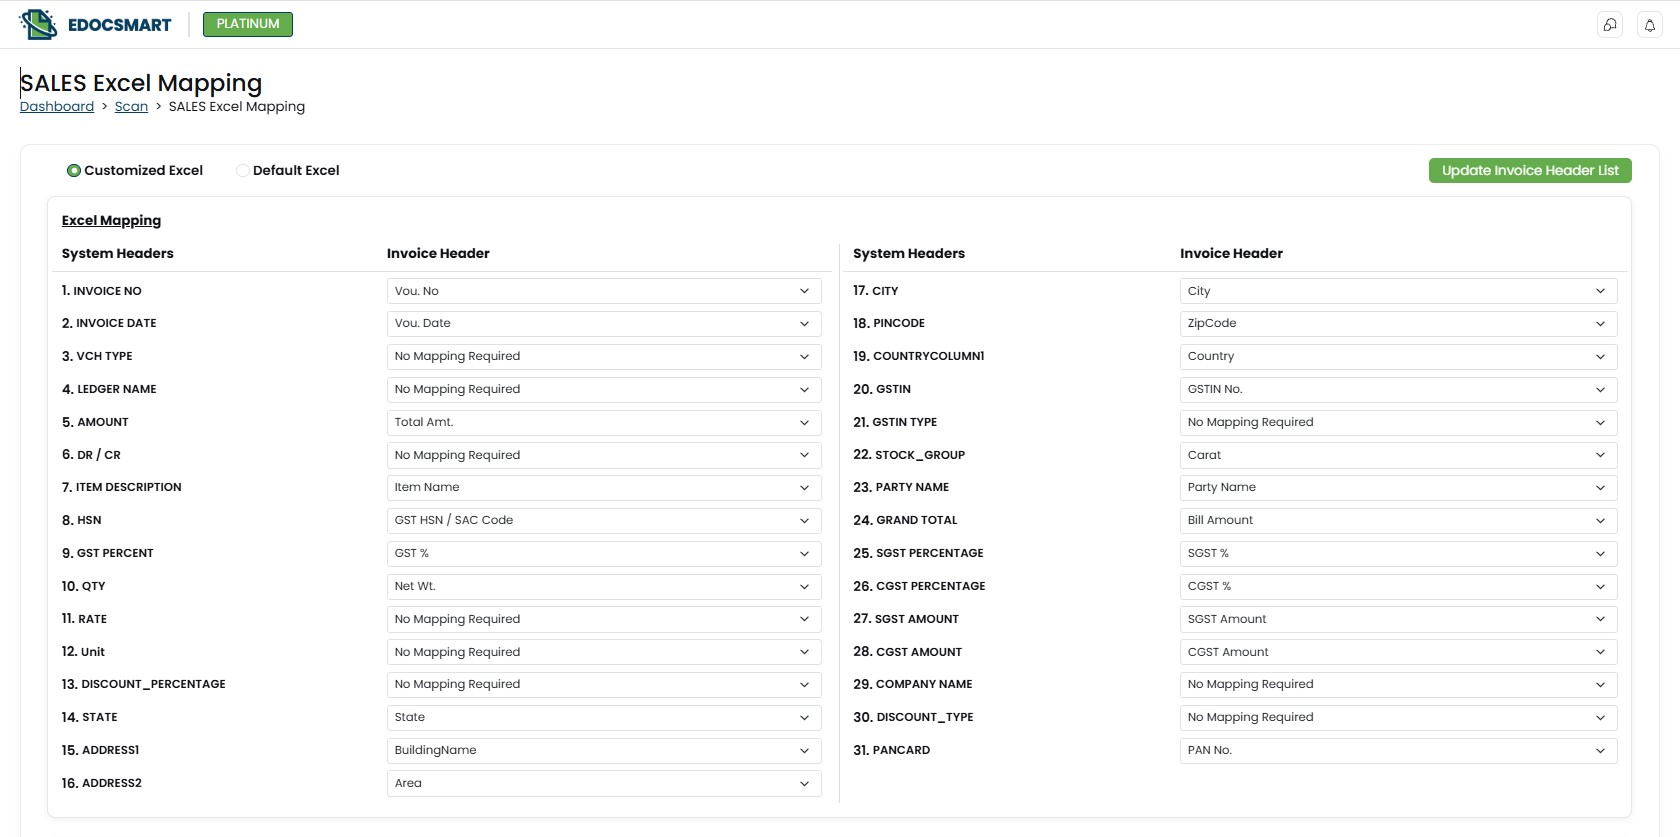 Initial MappingStep 4: Let the Invoice Become
Structured Data
Initial MappingStep 4: Let the Invoice Become
Structured Data
After the document has been uploaded, Edocsmart processes the invoice and presents its information in a structured format.
This is where automatic invoice entry becomes very different from traditional manual entry.
Instead of reading the invoice on one screen and typing information into another, the accountant can review extracted information directly.
Depending on what is available on the invoice and how the workflow is configured, the review screen may contain information such as:
- Party or supplier name, invoice number and invoice date
- Address, city, state, PIN code and GSTIN
- Item descriptions and HSN codes
- Quantity, unit, rate and MRP
- Discount and taxable values
- GST rate, CGST, SGST or IGST information
- Grand total, net amount and round-off
- Other configured fields such as narration or TDS-related information
The key point here is that the invoice is no longer just an image or PDF.
Its information has been converted into fields that can be checked and used in the accounting workflow.
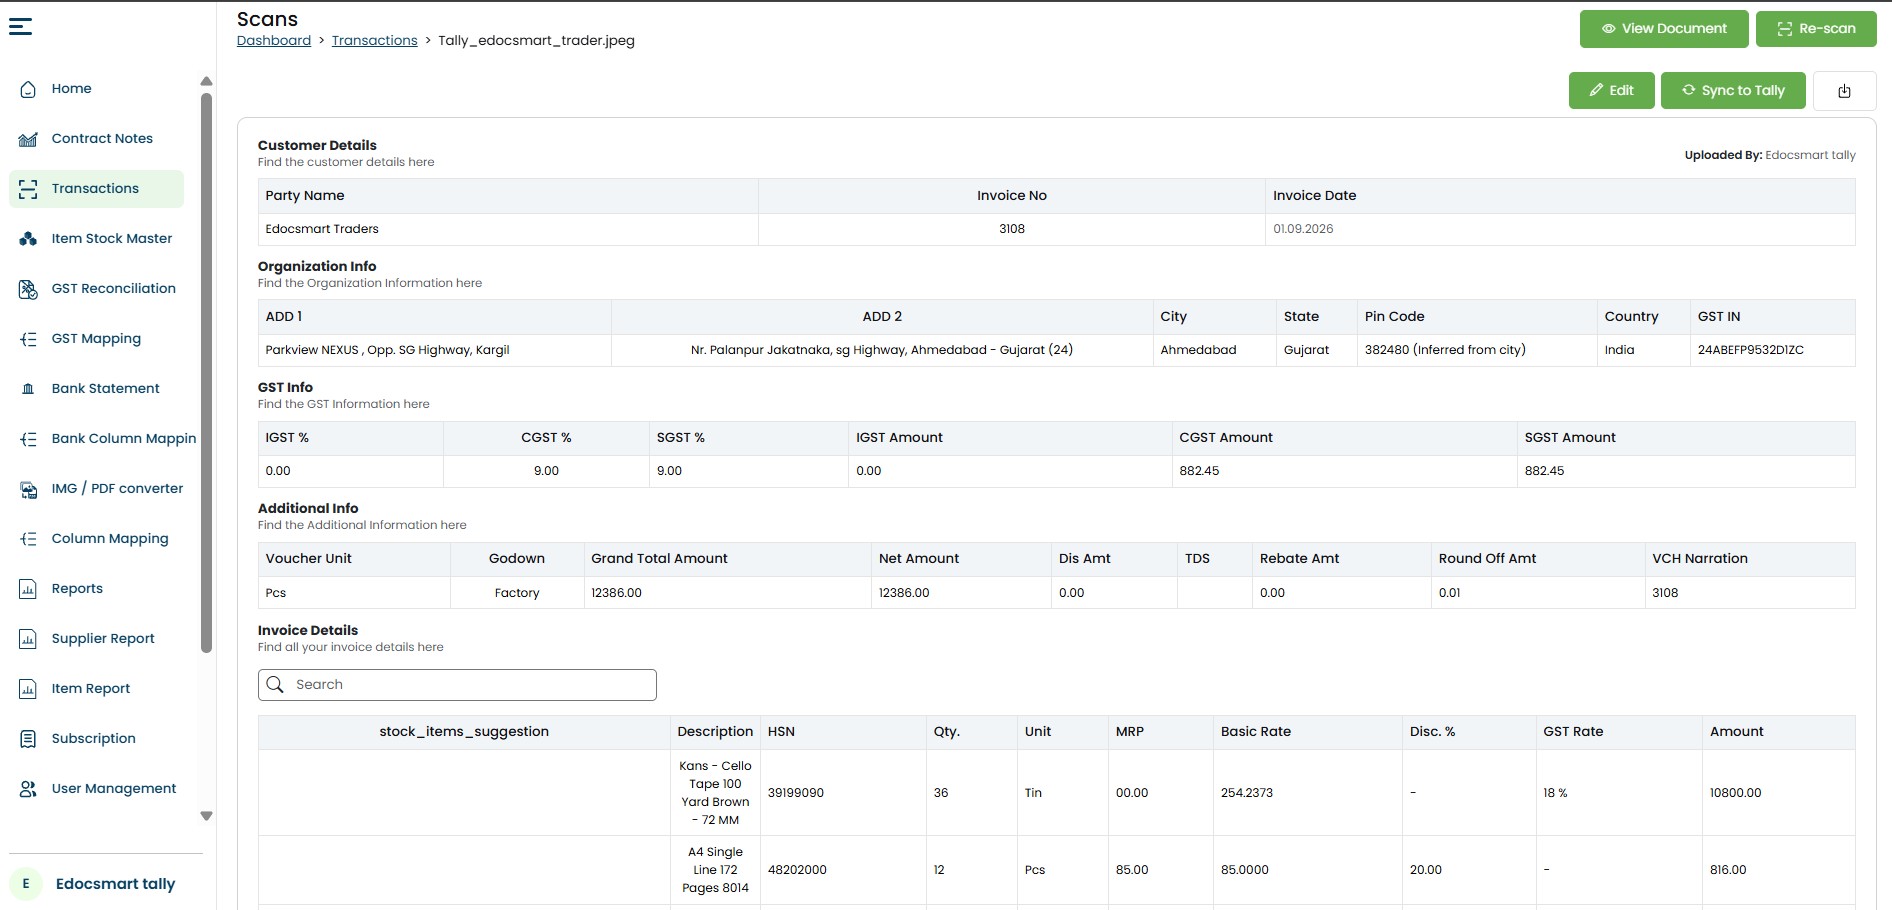 Review and confirmThis AI invoice data
extraction stage turns invoice content into structured fields that are
easier to verify and process.
Review and confirmThis AI invoice data
extraction stage turns invoice content into structured fields that are
easier to verify and process.
Step 5: Review the Data Before It Reaches Tally
Automatic extraction can reduce typing, but the review stage remains important.
Once the data appears on the screen, the user can check whether the information matches the original invoice.
For example, the accountant can confirm the party name, invoice number and invoice date before moving forward.
They can also verify whether the correct GST values have been captured and whether product quantities, rates and amounts look right.
This becomes particularly important when invoices contain several stock items.
Suppose an invoice contains fifteen products.
Instead of manually entering all fifteen products from the beginning, the accountant can review the extracted line items and focus on identifying anything that needs correction.
This is a much more efficient use of the accountant's time than repeatedly retyping information that is already present on the supplier invoice.
This review-first approach is a key part of AI invoice processing for tally because the user validates the extracted information before synchronization.
Step 6: Save the Invoice or Continue Immediately
The invoice does not necessarily have to be sent to Tally immediately after extraction.
Edocsmart also allows the workflow to include a save stage.
This means the accountant can upload and review a document, save the processed information and return to it later when they are ready to complete the Tally entry.
This can be useful in situations where an invoice requires internal checking, approval or additional verification before it is recorded in the accounting system.
If the invoice has already been checked and everything looks correct, the user can continue directly to synchronization.
Step 7: Click “Sync to Tally”
Once the invoice data has been reviewed, the user can proceed using the Sync to Tally option.
This is the point where the structured invoice information begins moving toward the accounting system.
Without automation, the accountant would now open Tally and manually enter the same information again.
With the automated workflow, that duplicated effort can be reduced.
This is where automatic invoice entry in tally changes the user's role from repeated data entry to controlled verification.
However, the synchronization depends on the Tally connection and templates being configured correctly.
Step 8: Start the Tally Connector
For Edocsmart and Tally to communicate, a connector is required.
The user may work with the Edocsmart Tally Connector or another compatible connector depending on the business setup.
Before syncing invoices regularly, the required connector needs to be configured and running.
This connector acts as the communication layer between the processed invoice information and Tally.
The invoice may have already been extracted and verified,
but Tally still needs to understand where each part of that information should
go.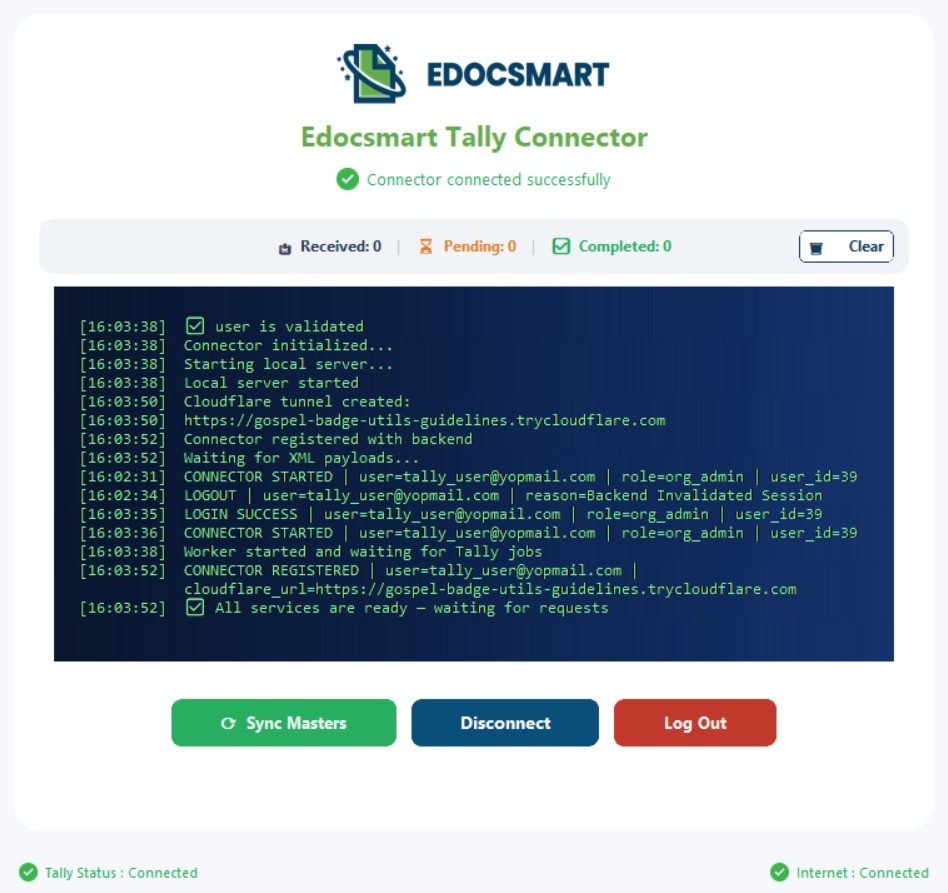 Tally connectorThat is why connector configuration and templates are an
important part of the setup.
Tally connectorThat is why connector configuration and templates are an
important part of the setup.
Step 9: Configure Voucher, Purchase and Stock Templates
Before invoice synchronization can work properly, the Edocsmart team may need to configure the required structure according to the business's Tally setup.
This can include templates related to purchase vouchers, stock information and other required accounting fields.
The objective is to define how the invoice information should appear when it reaches Tally.
For example, invoice data may need to connect with an existing supplier ledger, while product information may need to map with stock items.
Similarly, purchase-related values need to move into the correct voucher structure.
Because businesses may use different accounting structures, this initial configuration helps align the invoice workflow with the company's Tally setup.
Once the templates and mappings have been properly established, regular invoice processing becomes much simpler.
The configured setup can then support a repeatable TallyPrime invoice automation workflow for applicable invoices.
Step 10: The Invoice Becomes a Tally Entry
After the verified information is synchronized through the connector, the relevant data reaches Tally according to the configured structure.
Depending on the setup, this can include the purchase voucher, supplier ledger information and stock-item-related data.
This is the point where the original invoice has effectively travelled through the complete automation journey.
It started as a PDF, image or photograph.
It was then uploaded, converted into structured information, reviewed, mapped and synchronized.
Finally, the information reached Tally in the required accounting structure.
For purchase invoices containing tax information, the same process can support GST invoice to Tally processing through the configured workflow.
So the complete journey looks like this:
Invoice File → Edocsmart → Data Extraction → Verification
→ Mapping → Tally Connector → Purchase Voucher / Ledger / Stock Data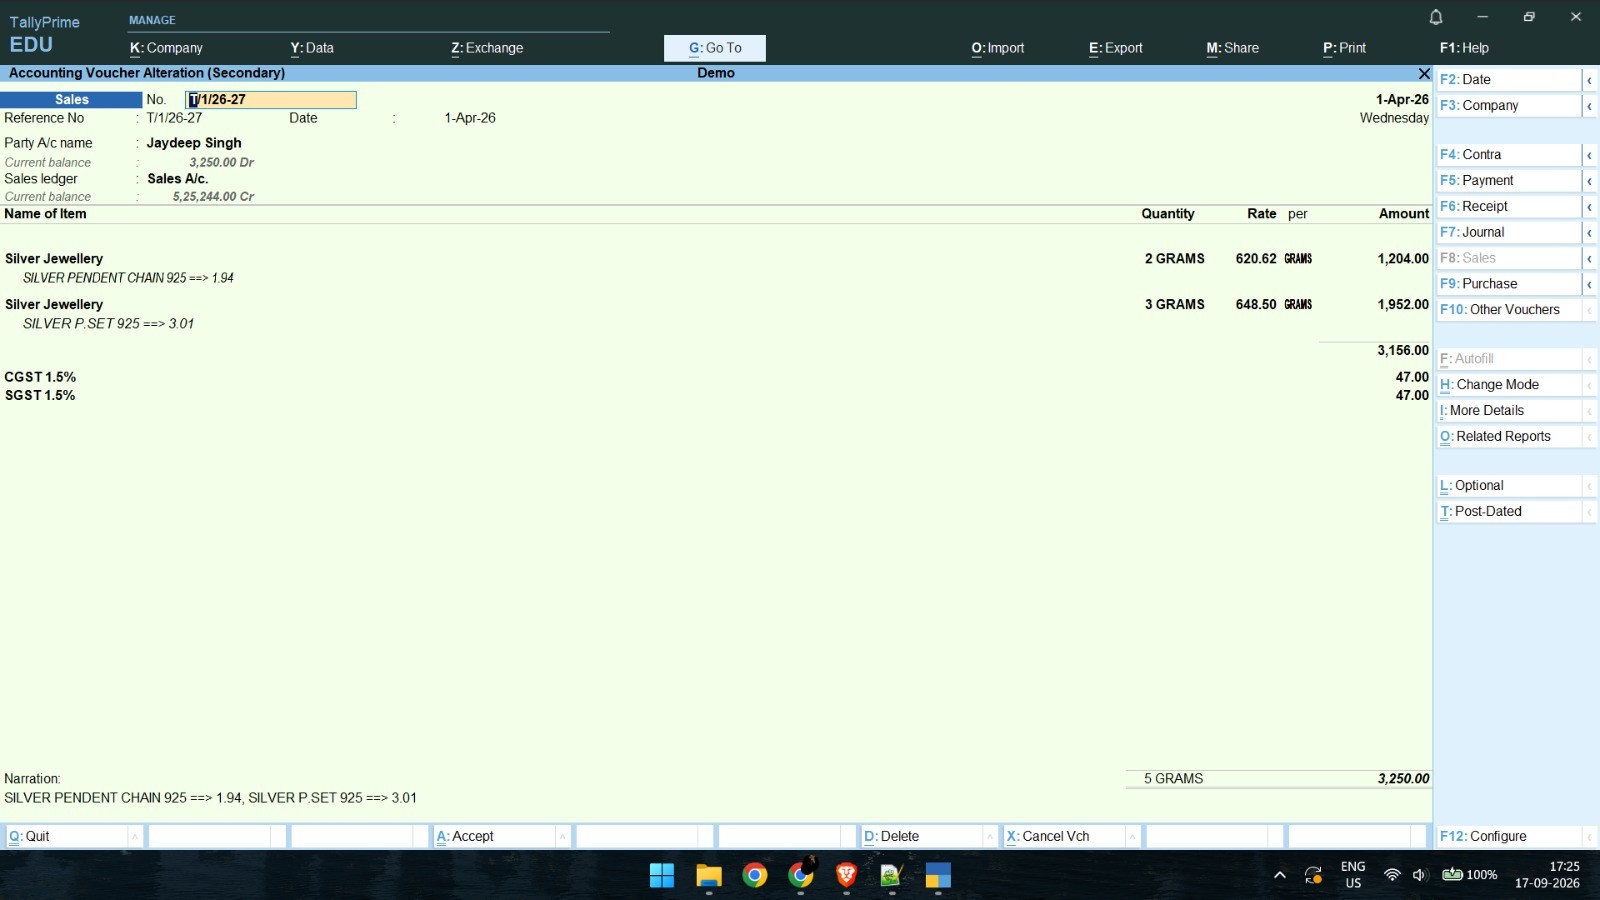 Sync to tallyWhy One-Time Mapping Makes a
Difference
Sync to tallyWhy One-Time Mapping Makes a
Difference
One of the common questions businesses have about invoice automation is whether they will need to configure everything whenever they upload another invoice.
That would defeat much of the purpose of automation.
The idea behind the initial mapping is to configure the required relationship once and then reuse it wherever the same setup applies.
For example, once the relevant supplier, voucher, stock and other fields have been properly structured for the workflow, the accountant can continue processing subsequent invoices without rebuilding the configuration from the beginning.
This is particularly helpful for companies that repeatedly process invoices following similar accounting rules.
What Happens After You Click Sync to Tally?
This part is important because automatic invoice entry is not simply about scanning a document.
Once the user clicks Sync to Tally, the connector handles the movement of the verified information according to the configured template.
If the required configuration has been completed, the invoice information can contribute to the relevant purchase entry inside Tally.
Stock-related information can be handled according to the configured stock-item structure, while supplier and accounting information can move according to the ledger and voucher setup.
So instead of recreating the transaction from scratch, the accountant is essentially approving structured information that has already been prepared from the original invoice.
A Realistic Example
Suppose a wholesaler receives a supplier invoice containing 20 different items.
Each item has its own description, HSN code, quantity, rate and GST information.
Using the manual method, the accountant opens the invoice, selects the supplier in Tally and starts entering all 20 items one by one.
If even one quantity or rate is typed incorrectly, the total may need to be checked again.
Now consider the automated approach.
The invoice is uploaded into Edocsmart.
The system processes the document and displays the captured party information, invoice details, GST values and individual item rows.
The accountant reviews the information and corrects anything that requires attention.
If they want to continue later, the processed invoice can be saved.
If everything is ready, they click Sync to Tally.
The configured connector and templates then handle the movement of the required data into the Tally workflow.
The accountant spends less time recreating invoice data and more time checking whether the transaction is correct.
For businesses evaluating an invoice to tally software workflow, this shift from typing to verification is one of the main practical benefits.
Manual Invoice Entry vs Automatic Invoice Entry
The biggest difference between the two approaches is repetition.
In the manual process, information moves like this:
Invoice → Accountant Reads → Accountant Types → Tally
The accountant acts as the bridge between the document and the accounting software.
With automation, the workflow changes to:
Invoice → Data Extraction → Accountant Reviews → Tally
The accountant is still involved, but their main role shifts toward validation instead of repetitive typing.
This is the practical purpose of tally invoice automation: reduce repetitive entry while keeping the review step with the user.
For businesses processing only a few invoices, the difference may seem small.
But when invoice volume increases, reducing repetitive steps can make day-to-day accounting much easier to manage.
Before Syncing an Invoice, What Should You Check?
Automatic processing does not mean invoices should be pushed into Tally without review.
Before synchronization, it is useful to confirm that the supplier details match the original document, the invoice number and date are correct, GST information has been captured properly, item quantities and rates are accurate, and the final amount matches the original invoice.
If stock items or ledgers are involved, their configured mapping should also be checked.
This final verification helps maintain accuracy while still keeping the workflow faster than complete manual entry.
It also supports invoice data entry automation without removing the final validation stage.
Who Can Use Automatic Invoice Entry in Tally?
This workflow can be useful for businesses that regularly receive supplier invoices and use Tally for accounting or inventory management.
For example, manufacturers may receive invoices for raw materials and components. Wholesalers and distributors may process invoices containing many stock items. Retailers can receive documents from several suppliers, while jewellery businesses may work with detailed stock-related purchase invoices.
Accounting firms may also need to process documents for multiple clients.
The common factor is invoice volume.
The more often information has to be copied from invoices into Tally, the more useful a structured document-to-Tally workflow can become.
In higher-volume environments, a structured Invoice to Tally process can help standardize how documents are reviewed and synchronized.
FAQS
How can I enter an invoice in
Tally automatically?
An invoice can be entered automatically by first processing the document through an invoice data extraction workflow. With Edocsmart, the invoice is uploaded, relevant information is extracted and displayed for review, and the verified data can then be synchronized with Tally using the configured connector, mapping and voucher structure.
Can I upload an invoice PDF
and send its data to Tally?
Yes, supported PDF invoices can be uploaded for processing. The relevant invoice information is extracted into structured fields and can be reviewed before synchronization. Once the required Tally connector, mapping and templates have been configured, the verified invoice information can be transferred according to the defined accounting workflow.
Can a photo of an invoice also
be processed?
Supported invoice photographs or image files such as JPEGs can be used in the document processing workflow. This is useful when the original invoice is not available as a structured digital file. The image is processed first, and the extracted information is then presented for checking before it moves to the Tally synchronization stage.
Is mapping required for every
invoice?
Mapping is generally part of the initial configuration. Once the required fields and accounting structure have been mapped correctly, the same setup can be reused wherever it remains applicable. This avoids repeating the complete configuration for every new invoice and makes regular processing much more convenient.
Can I edit invoice information
before syncing it?
The review stage allows users to check the extracted invoice information before sending it to Tally. If an invoice number, item detail, quantity, GST value or another field requires attention, it can be reviewed before synchronization. This keeps the accountant involved in validating the transaction before the final accounting entry is processed.
Can I save an invoice without
immediately sending it to Tally?
Yes. A processed invoice can be saved if the user does not want to synchronize it immediately. This allows the accounting team to review the document now and complete the Tally entry later, which can be useful when the company follows an internal checking or approval workflow.
What is required to sync
invoice data with Tally?
A configured Tally connector is required for transferring the verified invoice information. The relevant voucher, purchase, ledger and stock-related templates also need to be configured according to the business's accounting setup. Once the required setup is completed, regular invoice synchronization becomes much more straightforward.
Conclusion
Understanding how to enter invoice in Tally automatically becomes easier when the process is viewed as a complete document-to-accounting journey.
The objective is not simply to upload an invoice.
The invoice first needs to be converted into structured information. That information must then be reviewed, mapped correctly and passed through a configured connector before it becomes part of the Tally workflow.
With Edocsmart, the regular process can move from manually reading and retyping every invoice field to a simpler workflow:
Upload → Extract → Review → Save or Sync → Tally
Once the initial mapping, connector and required Tally templates are configured, businesses can reuse the same workflow for applicable invoices instead of starting from zero every time.
The invoice remains the original source, the accountant remains responsible for verification, and automation handles much of the repetitive work between the two.
That is the main idea behind automatic invoice entry in Tally: use the information already available on the invoice instead of manually entering the same information again.