How to Import Excel to Tally Prime
Import Excel data into Tally Prime by uploading spreadsheets, mapping columns, reviewing transactions, and syncing verified entries through Edocsmart.
Businesses often maintain their sales, purchase, inventory, and accounting information in Excel. It is simple, flexible, and familiar to most accounting teams. But the real challenge begins when the same information has to be entered again into Tally Prime.
Imagine an accountant receiving an Excel file containing hundreds of sales transactions. The file already contains customer names, invoice details, item information, quantities, rates, amounts, taxes, and other required data. However, if the accountant has to manually create every voucher again in Tally Prime, the same work is being repeated.
This is where knowing how to import Excel to Tally Prime becomes useful.
For businesses already working in spreadsheets, excel to tally and excel to tally import workflows help reuse prepared data instead of entering it again.
Edocsmart provides a structured workflow where users can upload their existing Excel files, configure mappings, review transactions, make corrections, and finally sync the prepared data into Tally Prime.
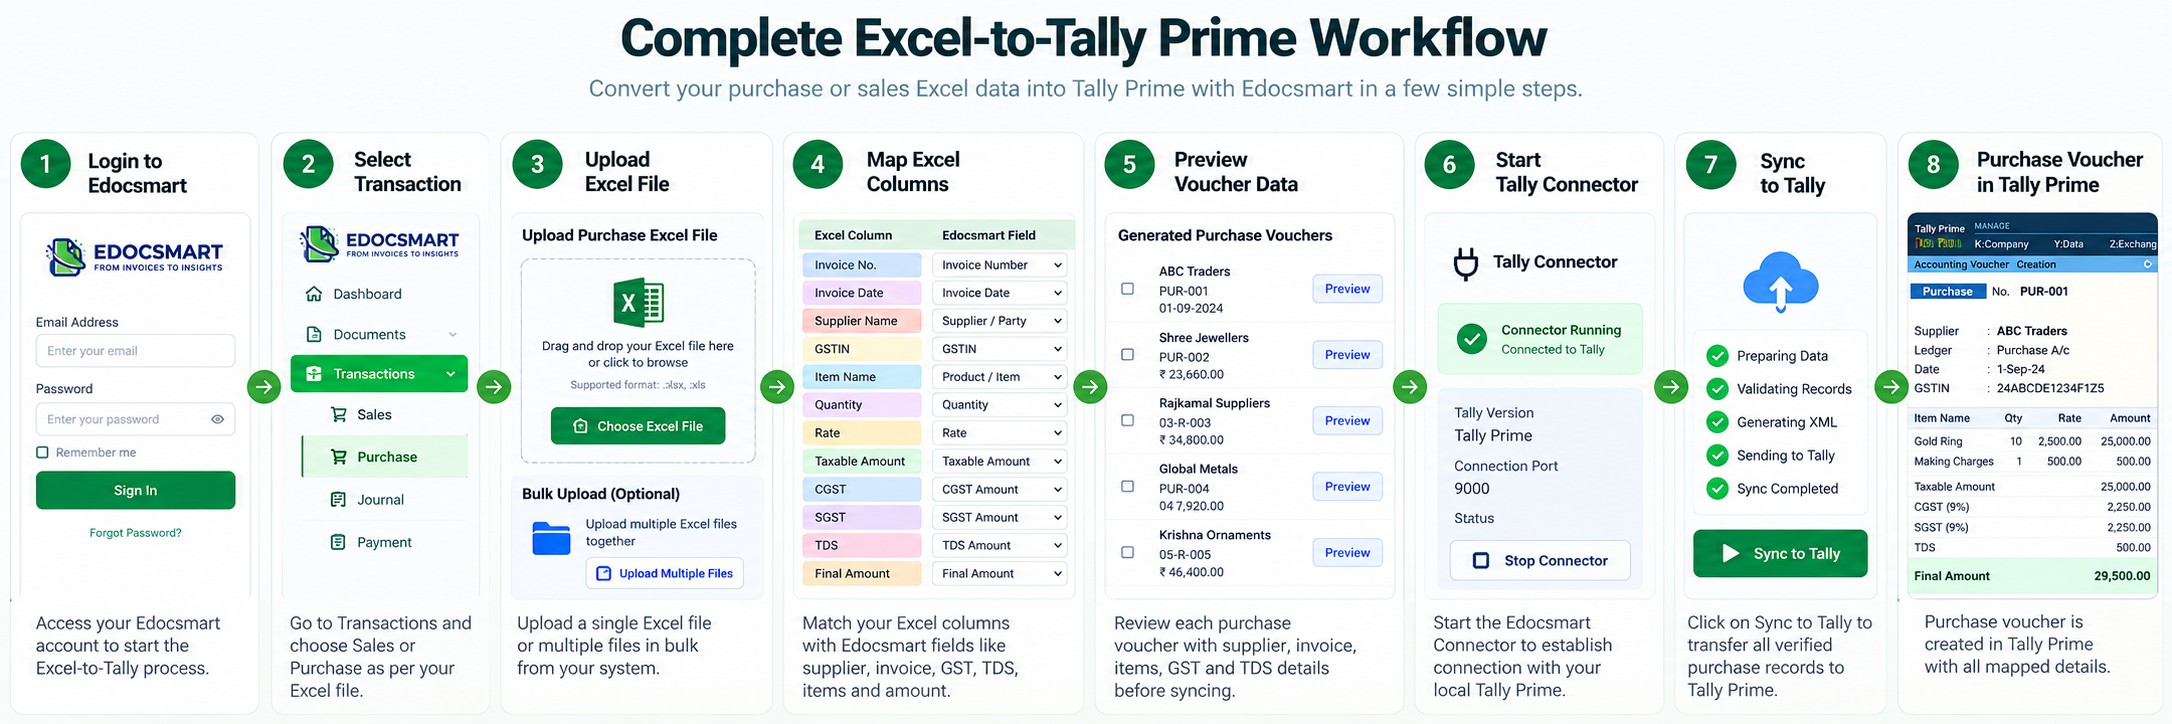
The complete workflow is simple to understand:
Login to Edocsmart → Open Transaction → Select Sales or Purchase → Upload Excel → Configure Mapping → Review Preview → Start Tally Connector → Sync to Tally → Voucher Created in Tally Prime
Let us understand the complete process step by step.
Why Import Excel Data into Tally Prime?
Many businesses already maintain important transaction data in Excel. Sales teams may prepare invoice sheets, purchase departments may manage purchase records, and accountants may maintain item, ledger, and transaction information in spreadsheets.
The problem starts when this existing information has to be entered into Tally Prime manually.
Manual entry means opening Tally, selecting the correct voucher, choosing ledgers, entering item details, checking quantities and rates, adding tax information, and repeating the same process for every transaction.
When there are hundreds of entries, this process takes more time and increases the possibility of human errors.
An Excel to Tally Prime import process allows businesses to use the data they have already prepared instead of entering it again from the beginning.
This is especially relevant for import excel in tally prime and excel import to tally prime requirements.
For the complete spreadsheet automation workflow, explore our Excel to Tally solution for importing, mapping, reviewing, and syncing Excel transactions with Tally.
With Edocsmart, Excel data passes through mapping, review, and verification before it is finally synchronized with Tally.
How to Import Excel to Tally Prime Using Edocsmart
Suppose an accountant has received a sales Excel file containing multiple transactions. Instead of manually creating vouchers one by one, the accountant can begin the process inside Edocsmart.
Step 1: Login to Edocsmart
The first step is to log in to Edocsmart using your account credentials.
After successful login, the user reaches the Edocsmart dashboard. This dashboard provides access to the available transaction and processing options.
From here, the user can begin the Excel to Tally Prime workflow without manually creating vouchers inside Tally.
Step 2: Open the Transaction Section
After logging in, click on the Transaction section.
Inside the Transaction area, the user can select the type of transaction that needs to be processed.
Depending on the Excel file, users can choose options such as:
- Sales
- Purchase
If the Excel file contains sales entries, select Sales. If the file contains purchase information, select Purchase.
This helps Edocsmart process the Excel data according to the selected transaction type.
The same process can function as an excel to tally converter workflow because the spreadsheet is prepared for the accounting structure before final sync.
Once the appropriate option is selected, the user can proceed to the file upload stage.
Step 3: Upload the Excel File
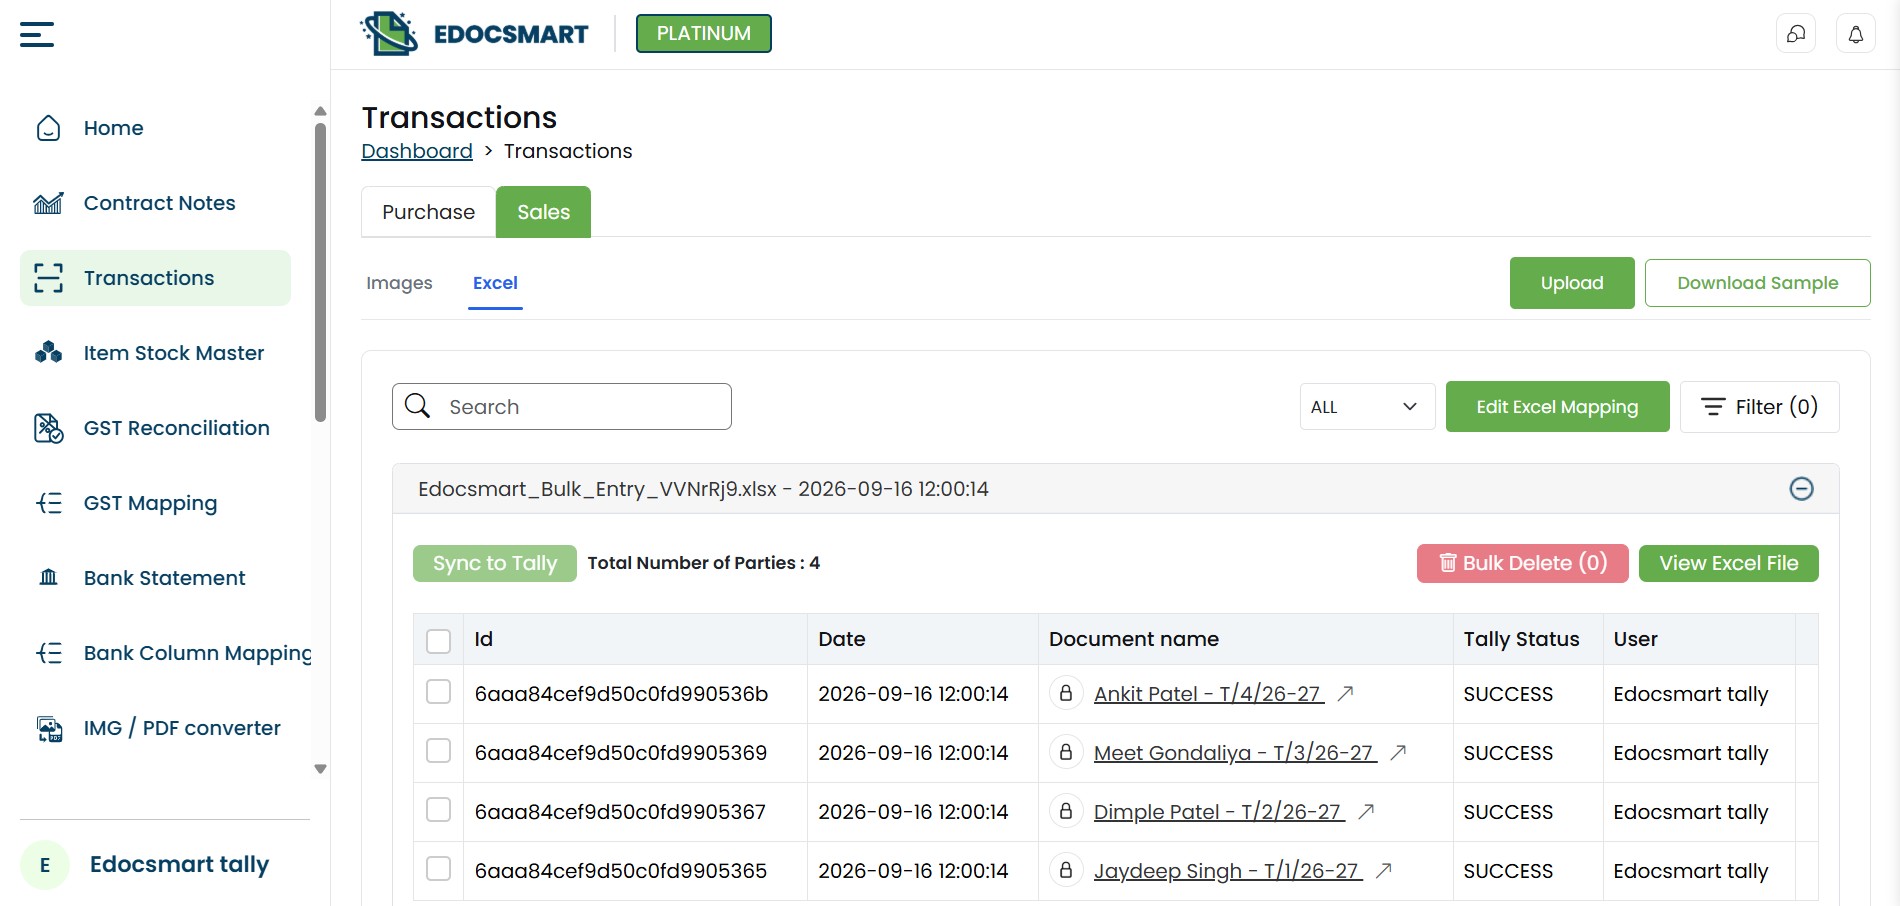
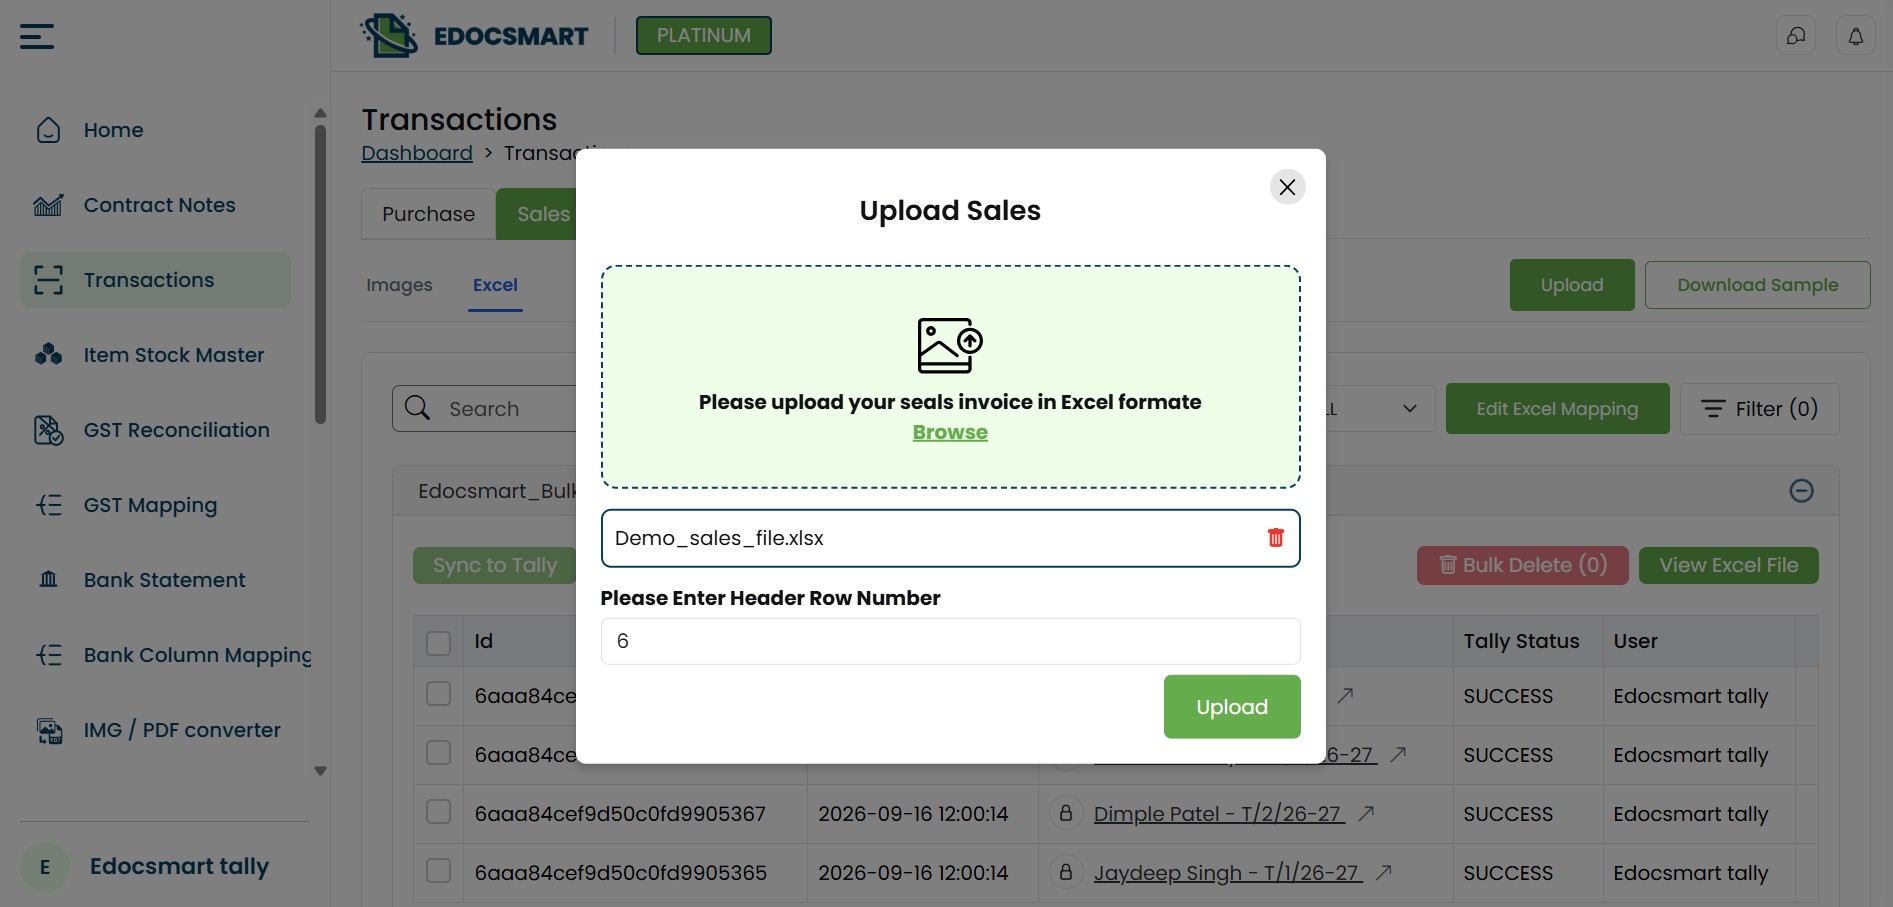
The next step is to upload the Excel file containing the required transaction data.
The user selects the file from the system and uploads it into Edocsmart.
Once the upload is successful, the Excel file becomes available inside the platform for further processing.
This is the point where your existing spreadsheet becomes the source for creating transactions that will later be synchronized with Tally Prime.
Using the uploaded sheet as the source supports excel data import to tally prime without manually rebuilding every voucher.
Instead of manually typing the same data again, Edocsmart uses the uploaded file as the base for the complete process.
Step 4: Upload Multiple Files in Bulk
In many real business situations, users may have more than one Excel file.
For example, a company may have separate files for different branches, different dates, multiple suppliers, or different batches of sales and purchase transactions.
Uploading every file individually can become repetitive.
Edocsmart provides a bulk upload feature, allowing users to upload multiple Excel files together.
This is useful when a business needs to process a larger number of files.
For example, if an accountant has ten purchase Excel files, all required files can be uploaded instead of repeatedly returning to the upload page for every document.
This makes the bulk Excel to Tally Prime process easier to organize.
It is particularly useful for bulk excel upload to tally and bulk excel data import tally when several files need to be processed together.
Step 5: Manage Uploaded Files Using the Accordion
After uploading the files, users can review them through the available accordion-style view.
The accordion helps users organize and check the uploaded files without displaying everything at once.
Users can expand the relevant section, check the uploaded Excel files, and confirm whether the correct documents have been selected.
If an incorrect file has been uploaded, users can remove it before proceeding.
Edocsmart also provides a bulk delete option.
This means that if multiple incorrect files are present, users can select them together and delete them instead of removing each one individually.
This gives users better control over their Excel files before mapping begins.
Step 6: Configure Mapping
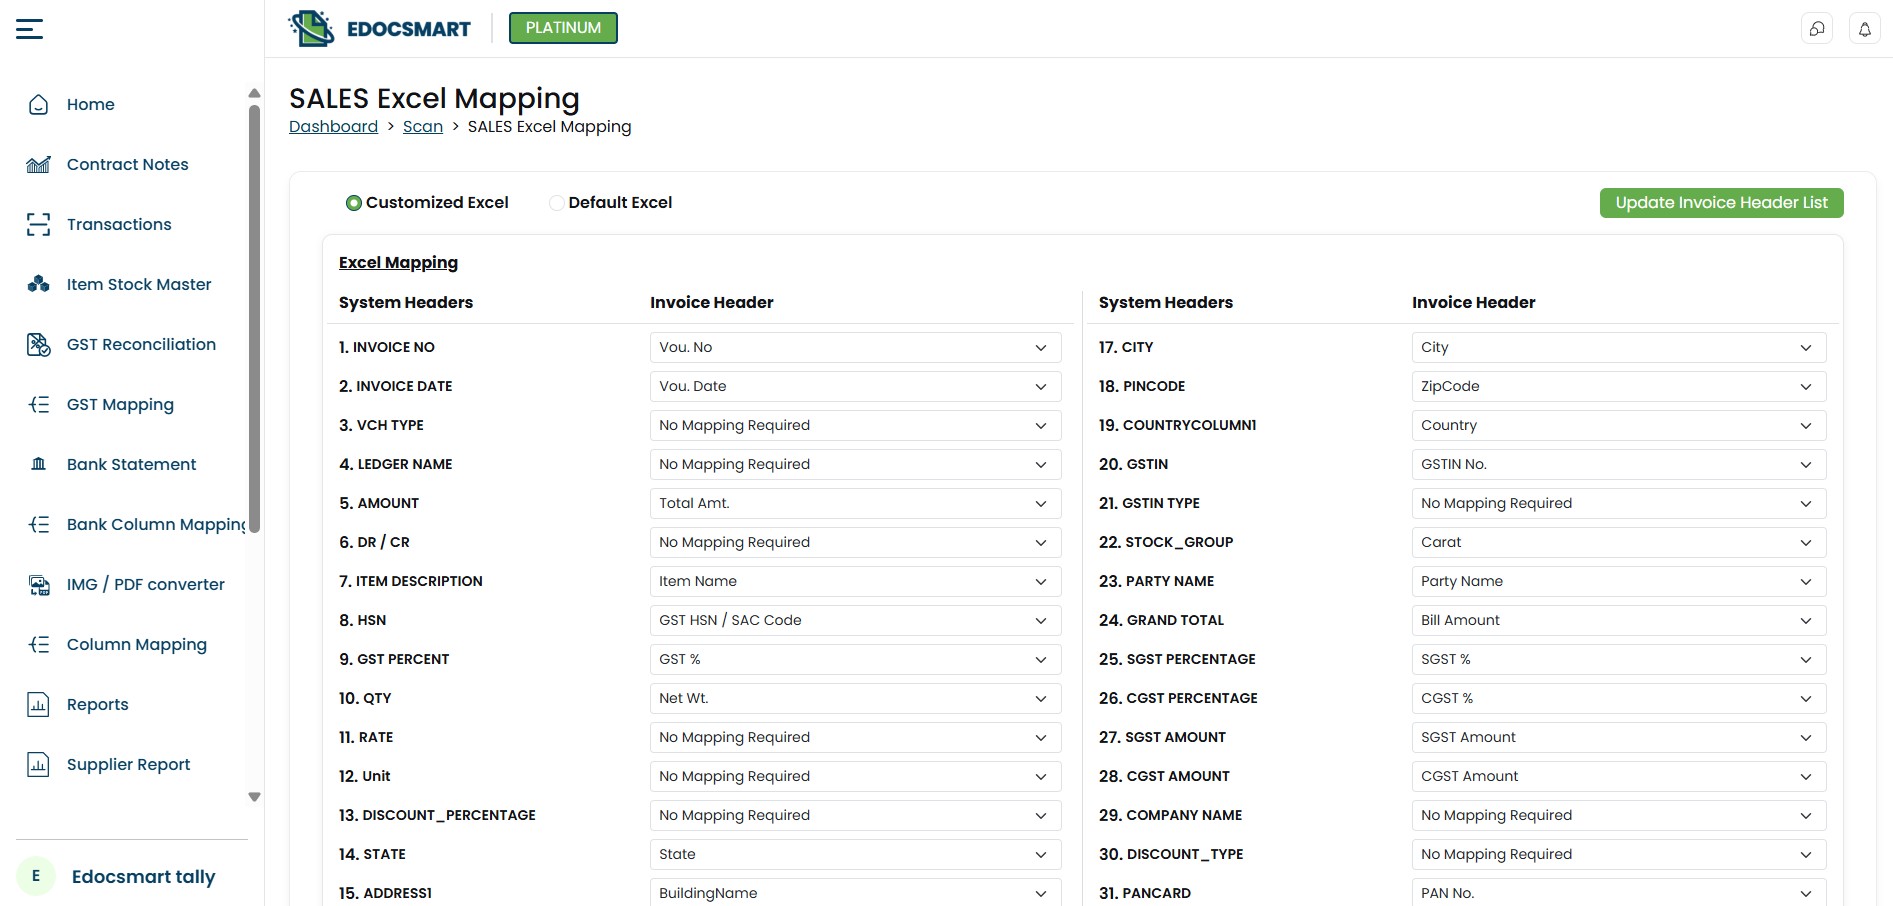
After confirming the uploaded file, the next important step is mapping.
Mapping tells Edocsmart how the columns in the Excel sheet should correspond with the fields required for the selected transaction.
Different businesses may use different Excel formats.
For example, one company may use the heading:
Customer Name
while another may use:
Party Name
Similarly, item names, invoice numbers, quantities, amounts, and other fields may also have different column names.
This is why the mapping process is required.
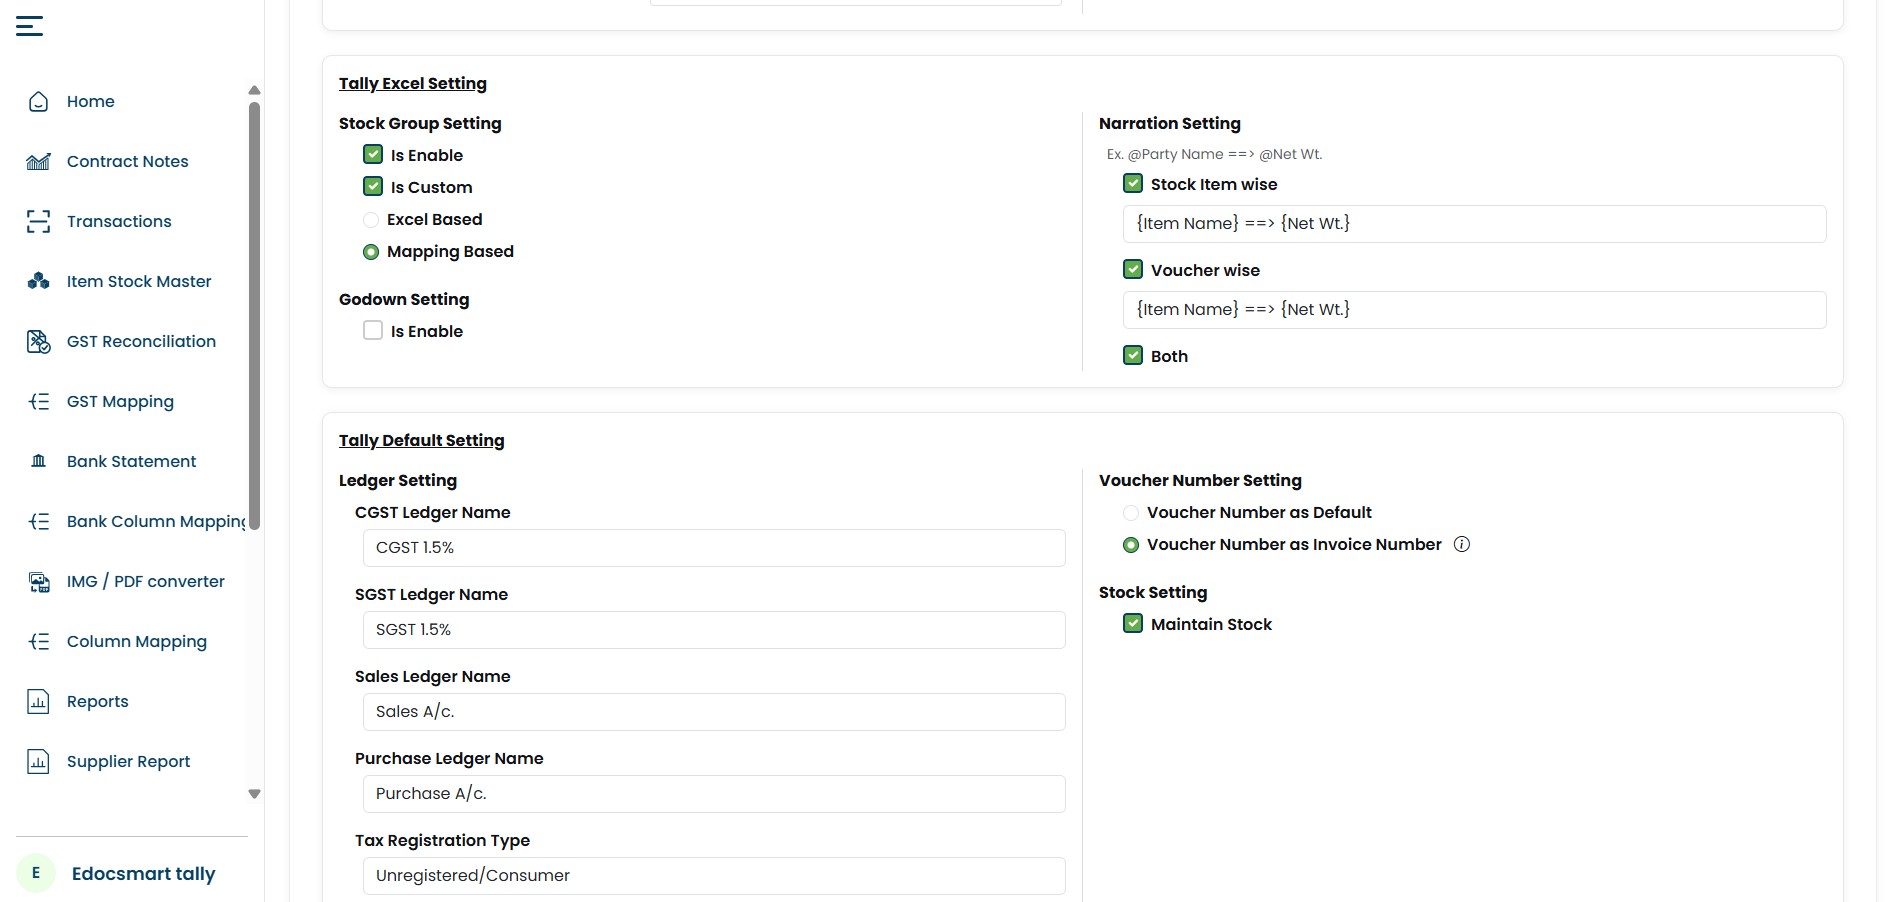
When a user uploads a particular Excel format for the first time, the user needs to select and map the required fields individually.
This helps Edocsmart understand which Excel column represents which transaction field.
First-Time Mapping and Reusable Mapping
The mapping process is especially important when a user is working with a specific Excel format for the first time.
During the first setup, all required fields need to be configured properly.
However, when the user later uploads another Excel file using the same structure, the existing mapping can be reused.
This means the user does not need to configure the complete mapping every time.
Reusable mappings make repeated processing suitable for automated excel import tally and ongoing monthly imports.
For example, suppose a business follows the same sales Excel format every month. The accountant maps the required columns during the first import.
When the next month's Excel file follows the same format, the existing mapping can be applied again.
This makes repeated Excel data import to Tally Prime more convenient.
If the structure of the Excel file changes, users should review the mapping to ensure the fields are still correctly connected.
Step 7: Set Ledger Mapping
After the main field mapping, users also need to configure ledger mapping.
Ledger mapping is important because accounting transactions depend on the correct ledger structure.
The information available in the Excel file needs to be connected with the relevant accounting ledger fields.
For example, a transaction may involve customer ledgers, sales ledgers, purchase ledgers, tax-related ledgers, or other accounting information.
During the first-time setup, users should carefully configure the required ledger mapping.
Once the mapping is correctly saved and the same Excel structure is used again, the process becomes easier during future imports.
Correct ledger mapping also helps ensure that the transaction is prepared properly before it reaches Tally Prime.
This verification layer is one reason businesses use an excel to tally import software workflow instead of sending raw spreadsheet rows directly into Tally.
Step 8: Configure Stock Mapping
If the Excel file contains inventory-related information, users may also need to configure stock mapping.
Stock mapping is used to connect the item-related information available in Excel with the required transaction fields.
The Excel sheet may contain data such as:
- Item name
- Quantity
- Rate
- Amount
- Stock-related information
Users need to configure these fields correctly during the mapping stage.
This is especially useful for businesses where sales or purchase transactions also involve inventory.
Before moving forward, users should verify that the required field mapping, ledger mapping, and stock mapping have been completed correctly.
Step 9: Review the Edocsmart Preview
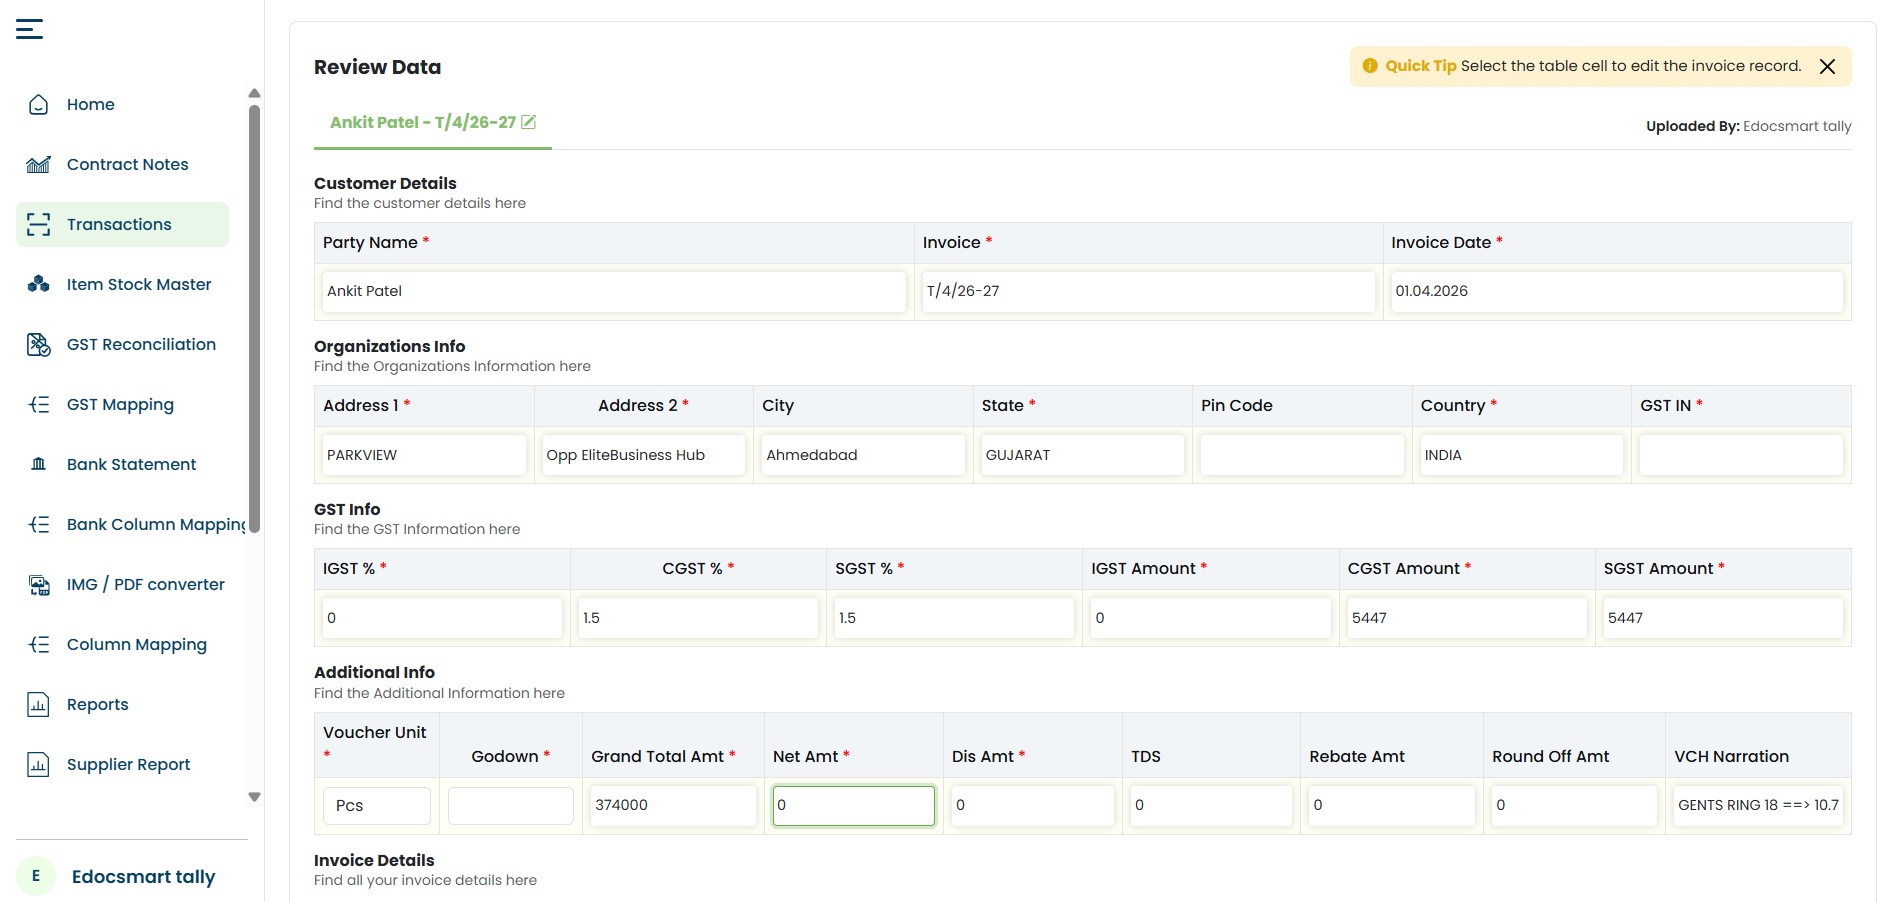
Once the mapping is completed, Edocsmart prepares the uploaded transaction and displays it in the preview section.
The preview stage is one of the most important parts of the entire process.
Instead of sending the Excel information directly to Tally Prime, users first get an opportunity to review the prepared data.
The accountant can check whether the transaction information looks correct and whether the required fields have been processed properly.
This verification step gives the user more control before the final synchronization.
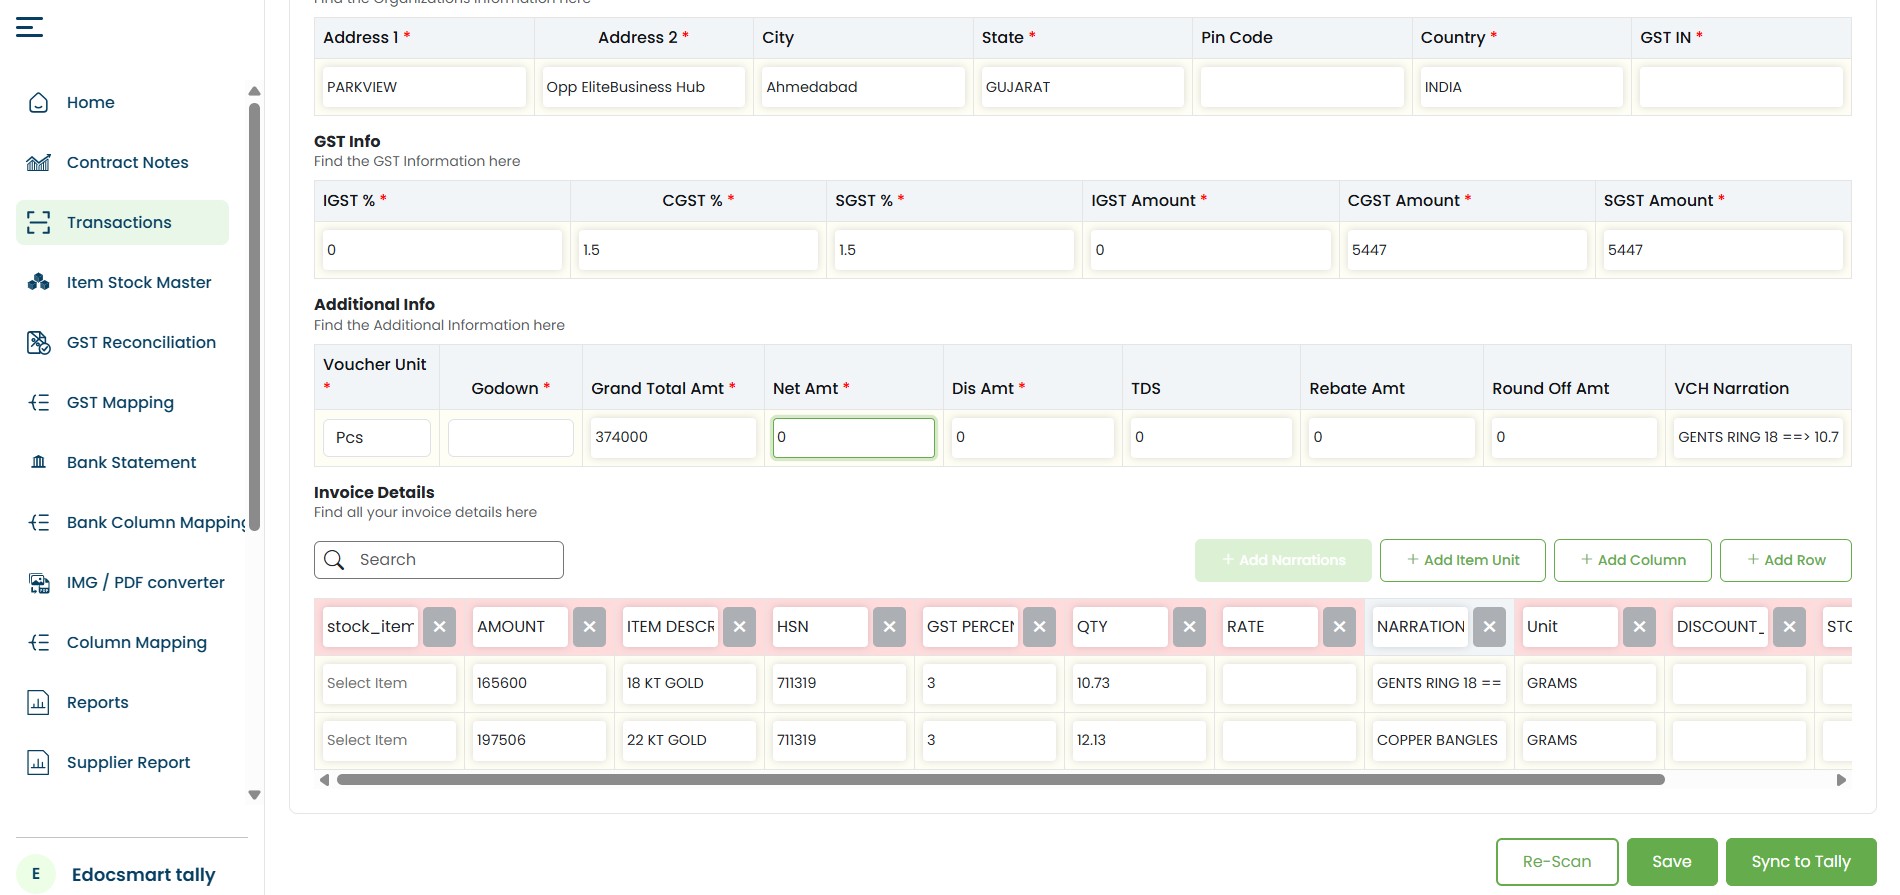
Step 10: Edit the Data Before Syncing
Suppose the accountant notices an incorrect value in the preview.
Maybe a field needs to be updated, or some additional information needs to be added.
The user can make the required changes directly during the preview stage.
This means users do not always need to go back to the original Excel file, make changes, upload it again, and repeat the entire process.
The workflow becomes:
Upload → Mapping → Preview → Review → Edit if Required → Sync to Tally
This gives users the opportunity to correct transaction information before it becomes a voucher in Tally Prime.
Step 11: Start the Edocsmart Tally Connector
Once the transaction has been reviewed and confirmed, the next step is to connect Edocsmart with Tally.
Edocsmart provides its own Tally Connector for this purpose.
The user needs to start or turn on the Tally Connector before beginning the final synchronization.
The connector helps transfer the prepared transaction information from Edocsmart to Tally Prime.
Instead of manually copying the data field by field, the prepared information can move through the connector.

Step 12: Sync the Data to Tally Prime
After the Tally Connector is active, the user can click Sync to Tally.
This is the final transfer stage.
The Excel file has already passed through upload, mapping, ledger mapping, stock mapping, preview, review, and correction.
Now the prepared transaction is sent to Tally Prime through the connector.
The complete process remains controlled because the user has already reviewed the data before synchronization.
Step 13: Verify the Voucher in Tally Prime
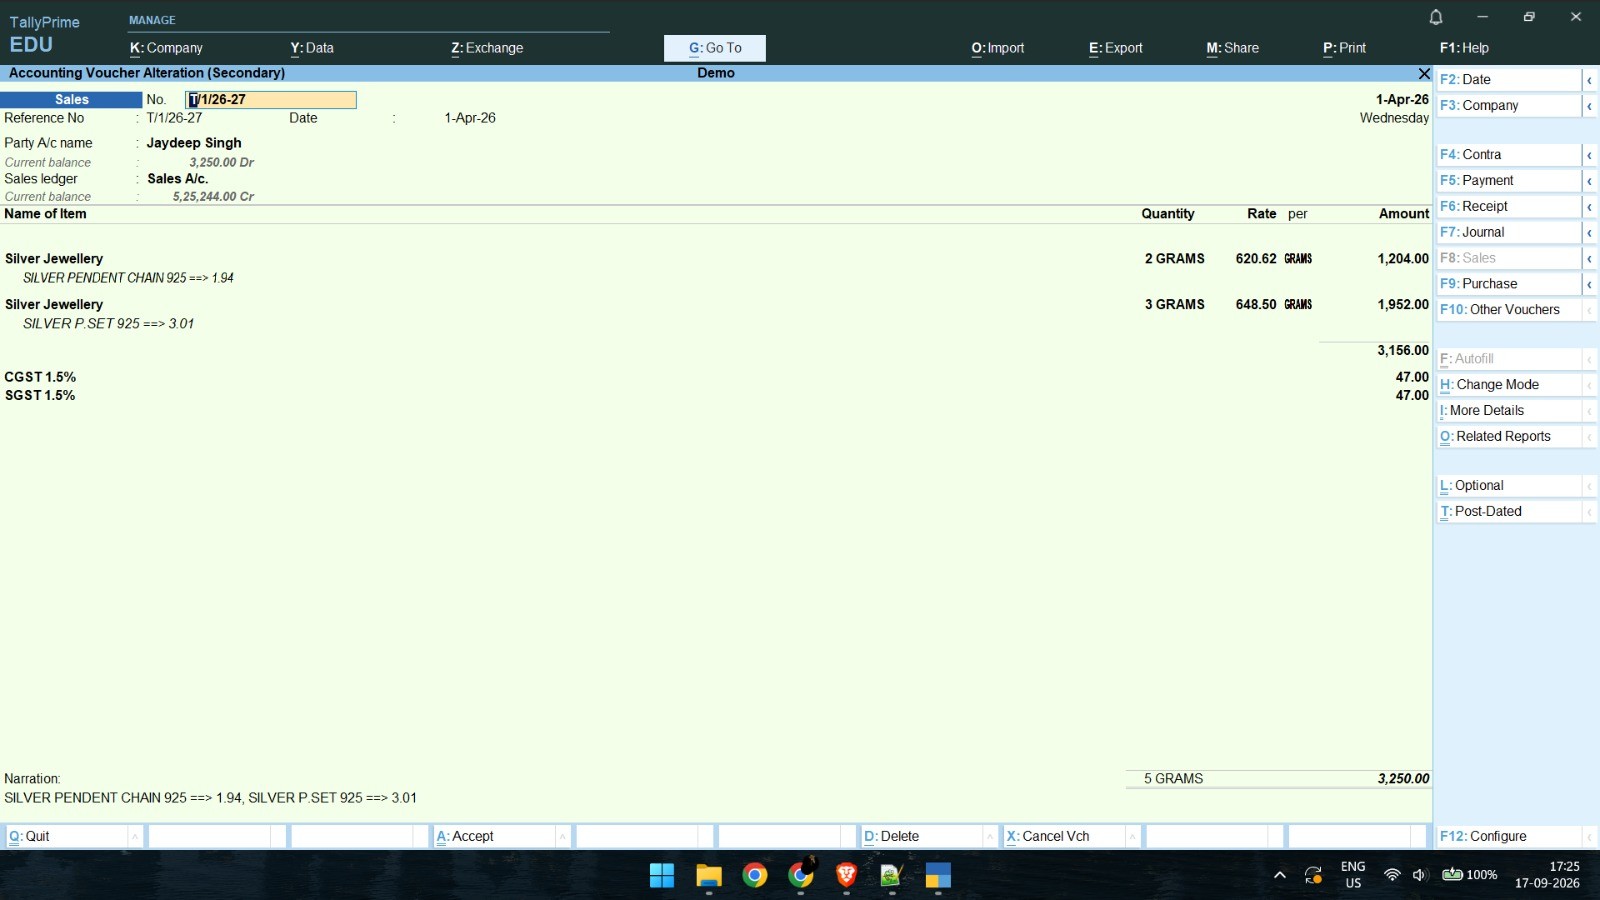
After successful synchronization, open Tally Prime and check the transaction.
The corresponding voucher is created inside Tally Prime based on the information processed through Edocsmart.
At this stage, the workflow completes the tally prime excel import process and can also serve as structured tally prime import software for prepared transactions.
Users should verify the final voucher to confirm that the transaction has been created as expected.
At this stage, the journey from Excel to Tally Prime is complete.
The information that originally existed as rows and columns in an Excel sheet has now been processed and converted into a Tally voucher.
Complete Excel to Tally Prime Workflow
The complete workflow can be summarized as:
Login to Edocsmart → Transaction → Select Sales or Purchase → Upload Excel → Bulk Manage Files → Mapping → Ledger Mapping → Stock Mapping → Preview → Review and Edit → Start Tally Connector → Sync to Tally → Voucher Created
The important thing is that the process does not simply send an Excel file directly into Tally without verification.
Users can manage files, configure mappings, check ledger and stock information, review the final transaction, make changes, and only then synchronize the data.
This creates a more structured approach to importing Excel data into Tally Prime.
Benefits of Using Edocsmart for Excel to Tally Prime
- Using an automated workflow can reduce the repetitive work involved in entering information that already exists in Excel.
- The bulk upload feature is useful when multiple Excel files need to be processed.
- The accordion view allows users to check and manage uploaded files, while bulk delete makes it easier to remove unwanted documents.
- Reusable mapping is another useful feature because users do not need to configure the same mapping repeatedly when the Excel format remains unchanged.
- Ledger mapping and stock mapping provide better control over accounting and inventory-related information.
- The preview stage is also important because users can verify and edit the transaction before sending it to Tally Prime.
Finally, the Edocsmart Tally Connector helps move the reviewed transaction into Tally, where the final voucher is created.
Together, these steps create a practical excel to tally software and tally excel import software workflow for accountants handling recurring files.
FAQS
1. How can I import Excel to
Tally Prime?
You can import Excel data to Tally Prime through Edocsmart by logging in, opening the Transaction section, selecting Sales or Purchase, and uploading your Excel file. After upload, configure the required field, ledger, and stock mappings. Review the generated preview, make changes if necessary, start the Edocsmart Tally Connector, and click Sync to Tally. After synchronization, verify the created voucher inside Tally Prime.
2. Can I upload multiple Excel
files together?
Yes. Edocsmart supports bulk Excel file uploads. This is useful when users need to process several sales or purchase files at once. Uploaded files can be reviewed through the available interface, and unwanted files can also be selected and removed using the bulk delete option before moving to the mapping stage.
3. Do I need to configure
mapping every time?
If you are using a particular Excel structure for the first time, you need to configure the required mapping. When you later upload another file that follows the same format, the existing mapping can be reused. If the Excel columns or structure change, it is recommended to review the mapping again before processing the file.
4. What is ledger mapping in
Excel to Tally Prime?
Ledger mapping connects relevant Excel data with the required accounting ledger information. It helps ensure that the uploaded transaction uses the appropriate ledger structure during processing. Users generally configure this during the initial setup and should verify it carefully before moving to the preview and synchronization stages.
5. Can I edit transaction data
before sending it to Tally?
Yes. After mapping, Edocsmart generates a preview of the prepared transaction. Users can review the information and make required changes before syncing it with Tally Prime. This allows corrections to be completed before the final voucher is created.
6. What happens after Sync to
Tally?
Once the Tally Connector is active and the user clicks Sync to Tally, the reviewed transaction data is transferred to Tally Prime. After successful synchronization, the corresponding voucher is created inside Tally. Users can then open Tally Prime and verify the final transaction.
Conclusion
Understanding how to import Excel to Tally Prime can make accounting work easier for businesses that already maintain their sales, purchase, ledger, or stock information in spreadsheets.
With Edocsmart, users can begin by uploading their existing Excel files instead of manually recreating every transaction.
The process includes file management, bulk upload, reusable mapping, ledger mapping, stock mapping, transaction preview, editing, and final synchronization.
Most importantly, users can review the transaction before it reaches Tally Prime.
Once the information is verified, the Edocsmart Tally Connector can be started and the transaction can be synced directly to Tally.
The final workflow is:
Excel → Edocsmart → Mapping → Preview → Verification → Tally Connector → Sync → Tally Prime Voucher
For accounting teams working regularly with Excel files, this creates a structured and practical way to move prepared data into Tally Prime while maintaining control over the complete process.