How to Import GST Invoice into Tally
Import GST invoices into Tally with Edocsmart by extracting supplier, item, HSN/SAC, and tax details, reviewing the data, and syncing verified entries directly into Tally.
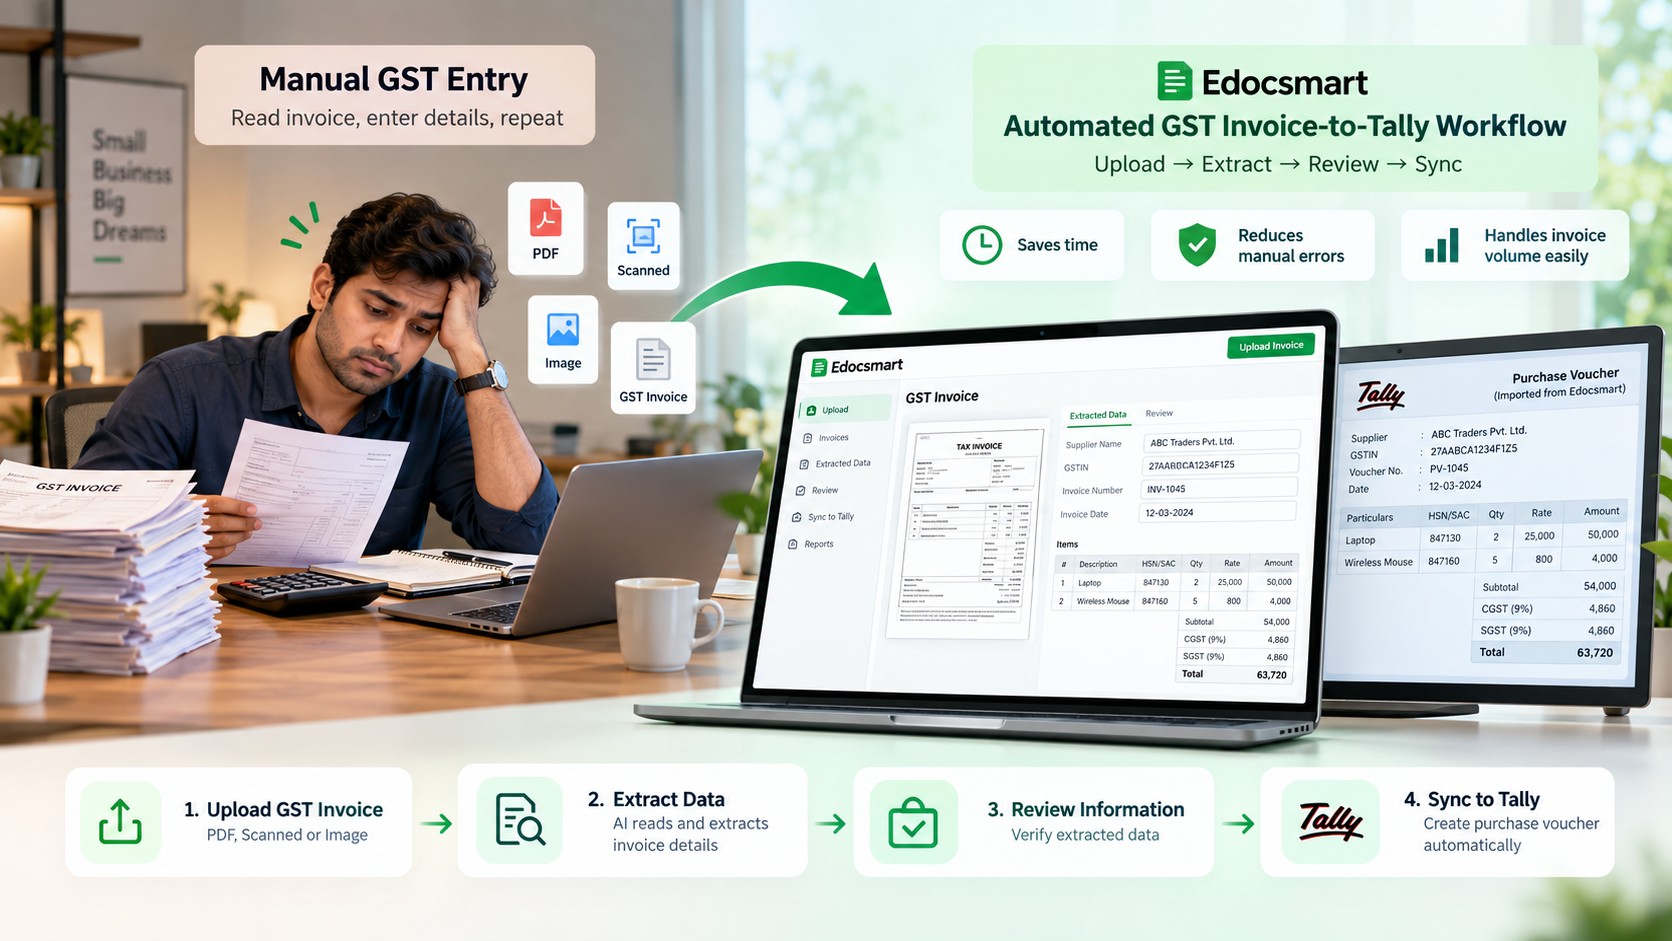
When someone starts a new business, the first few months often look very different from what they imagined.
A startup owner may begin the day by speaking with customers, checking orders, following up with suppliers, managing payments, solving operational issues, and planning how to grow the business. But by evening, another task is still waiting: accounting.
Imagine a small startup owner managing almost everything alone. There is no separate accounts team yet. Every supplier sends GST invoices in different formats—some arrive as PDFs over email, some as scanned copies, and a few are shared as invoice images.
At the end of the day, the owner opens Tally and starts entering them one by one.
Supplier name | GSTIN | Invoice number | Invoice date | Stock items | Quantity | Rate | CGST | SGST |Invoice total
Then the next invoice.
For a growing startup, this becomes a problem very quickly. The owner should ideally spend more time on customers, sales, products, and growth. Instead, a significant part of the day can disappear into repetitive invoice entry.
This is where a structured GST invoice to Tally workflow can help.
For startups trying to reduce repetitive invoice entry in tally, this creates a more practical path from document capture to accounting.
With Edocsmart, the invoice can first be uploaded, its information can be extracted into structured fields, reviewed by the user, and then synchronized with Tally through a configured connector.
The workflow changes from:
GST Invoice → Read Manually → Enter Every Field → Save in Tally
|
GST Invoice → Upload → Extract → Review → Sync to Tally
For a startup owner handling accounts alone, this can reduce repetitive work without removing the important verification step.
This is the core idea behind invoice automation for tally: reduce repeated typing while keeping review and approval with the user.
For a broader document-to-accounting workflow, explore our Invoice to Tally solution.
What Does Importing a GST Invoice into Tally Mean?
A GST invoice contains much more than a final bill amount.
It may include:
- Supplier name
- GSTIN
- Invoice number
- Invoice date
- Billing address
- State
- Item description
- HSN or SAC code
- Quantity
- Unit
- Rate
- Discount
- Taxable value
- CGST
- SGST
- IGST
- Net amount
- Grand total
When the invoice is entered manually, all of this information may need to be read and entered into the relevant accounting structure.
Importing a GST invoice into Tally through an automated workflow means using the invoice itself as the source of data.
In an invoice to tally software workflow, the original invoice becomes the source for extraction, verification, and synchronization.
The document is processed first, relevant information is extracted, the user verifies the details, and then the approved data is transferred into the configured Tally workflow.
Why GST Invoice Entry Becomes Difficult for Startup Owners
A large company may have a dedicated accounts department.
A startup may not.
The founder or owner may be doing the work of several people at the same time.
In the morning, they may be managing customers.
In the afternoon, they may be discussing stock with suppliers.
In the evening, they may be checking outstanding payments.
And at night, they may still be entering GST invoices into Tally.
The problem becomes bigger as the business grows.
Suppose the startup initially receives only five supplier invoices a week. Manual entry may not feel like a major issue.
A few months later, the same business may be processing 20 or 30 invoices every week.
Each invoice can contain several items.
The owner now has to spend more time checking GSTINs, HSN codes, quantities, rates, tax percentages, and totals.
Growth increases business opportunities, but it can also increase repetitive accounting work.
That is why GST invoice automation becomes more valuable as transaction volume increases.
For a growing startup, GST invoice automation can help keep tax-heavy invoice processing structured as the number of transactions increases.
How to Import GST Invoice into Tally Using Edocsmart
The Edocsmart workflow can be understood as a simple sequence:
Upload GST Invoice → Extract Information → Verify → Save or Sync → Tally
Let us go through the actual process.
Step 1: Login to Edocsmart
Start by opening Edocsmart and logging in using your account credentials.
Once the user is logged in, the main dashboard becomes available.
From the sidebar, go to:
Transactions → Purchase
This is where supplier purchase invoices can be processed.
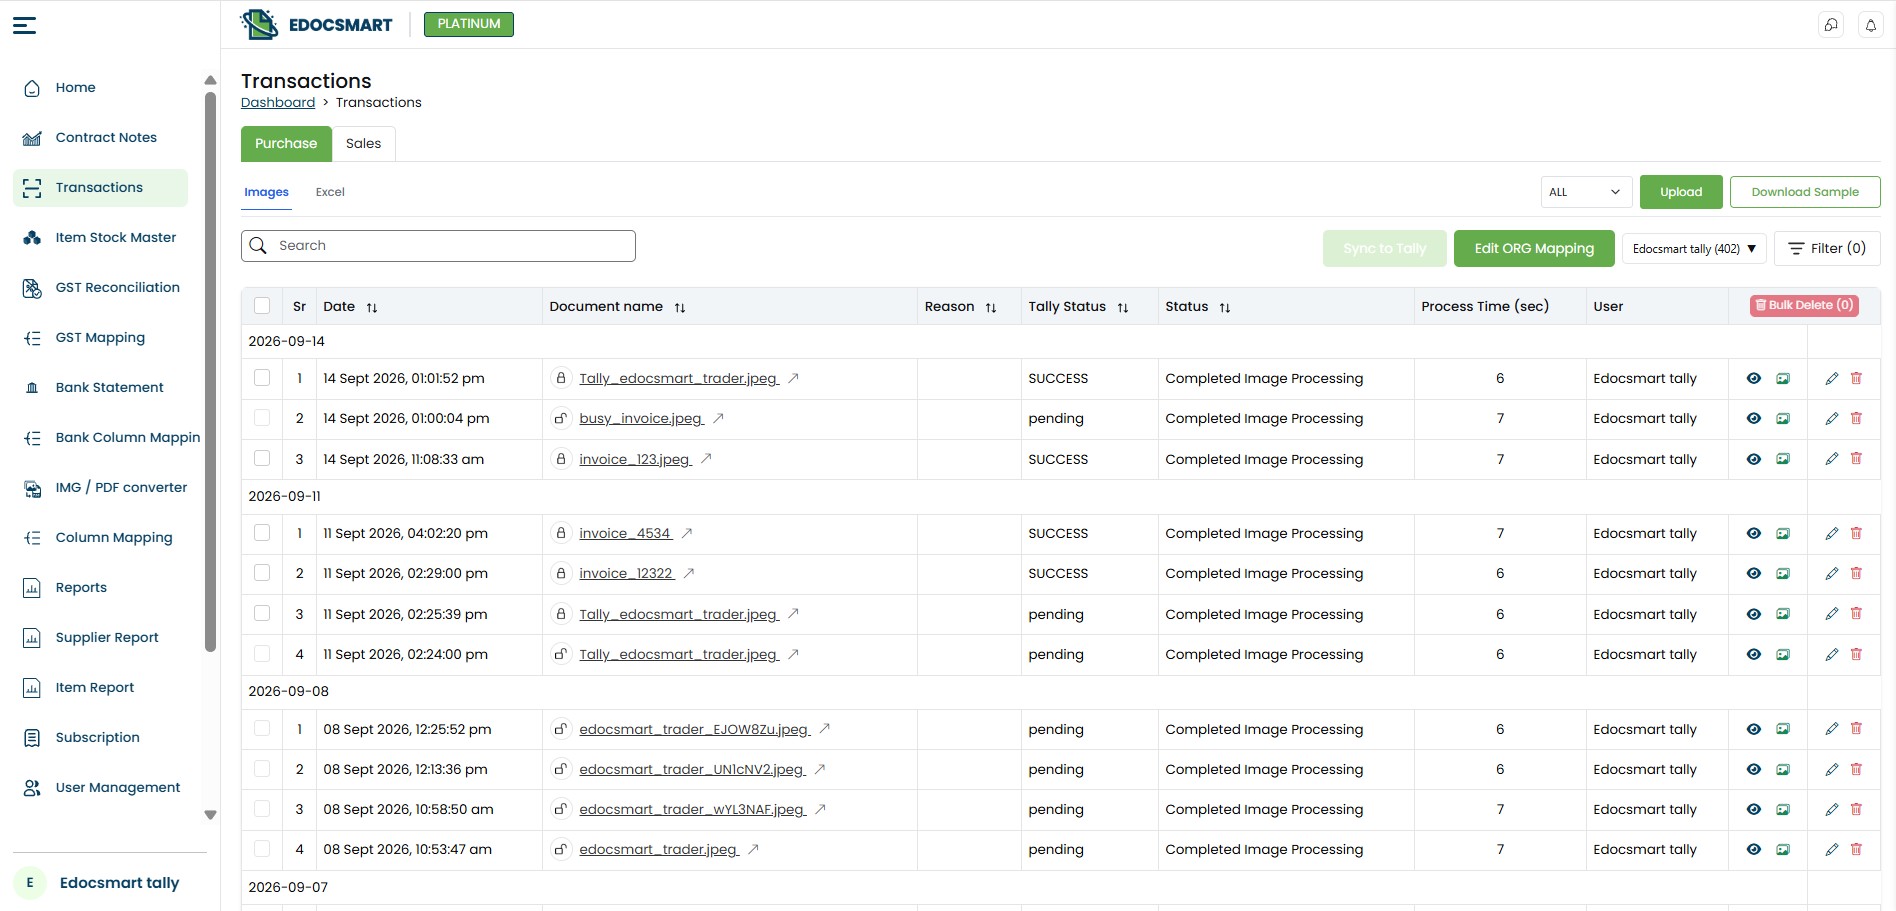
For a startup owner, this creates a single place to begin invoice processing instead of immediately opening Tally and manually creating every transaction.
This is the starting point for automatic purchase entry in Tally, where invoice data is prepared before it reaches the accounting system.
Step 2: Upload the GST Invoice
Inside the Purchase section, upload the GST invoice that needs to be processed.
Depending on the supported workflow, the invoice can be available in formats such as:
- JPEG
- Scanned invoice
- Invoice photograph
This is useful because suppliers do not always send invoices in one common format.
One supplier may send a proper PDF.
Another may share a scan.
A smaller vendor may simply send a clear photograph of the invoice.
Instead of treating each format as a completely different process, the invoice can first be brought into the same document-processing workflow.
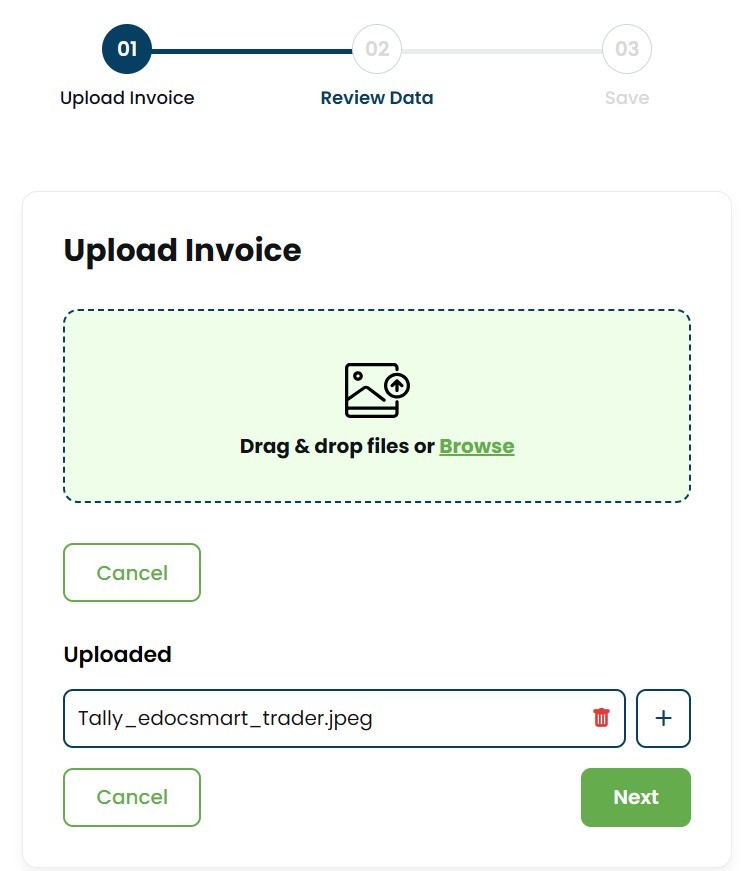
The same workflow can also support AI invoice processing for tally when invoices arrive as PDFs, scans, or images.
Step 3: Configure Mapping During the Initial Setup
Before invoice information can move properly into the accounting workflow, the relevant fields need to be mapped.
This is mainly an initial configuration.
For example:
Supplier Name → Party / Ledger
Invoice Number → Voucher Information
Invoice Date → Invoice Date
Item Description → Stock Item
HSN → HSN Field
GST Rate → Tax Structure
Invoice Amount → Purchase Value
The important part is that the user should not have to recreate the same setup for every GST invoice when the same configuration continues to apply.
Once the required mapping is configured correctly, it can be reused for subsequent invoices.
For a startup owner, this is important because automation should reduce repeated setup work, not create another repetitive task.
Step 4: Extract GST Invoice Data
After upload, Edocsmart processes the invoice and brings the available information into structured fields.
This is where the GST invoice stops being just a PDF or image and starts becoming usable accounting data.
This AI invoice data extraction stage converts supplier, item, tax, and amount information into structured fields for review.
The extracted information may include several categories.
Supplier Information
This can include:
- Supplier or party name
- GSTIN
- Address
- City
- State
- PIN code
Invoice Information
The system may display:
- Invoice number
- Invoice date
- Reference information
Item-Level Data
For each product or service, details may include:
- Description
- HSN or SAC
- Quantity
- Unit
- Rate
- MRP
- Discount
- Amount
GST Information
The invoice may contain:
- Taxable value
- GST percentage
- CGST
- SGST
- IGST
Final Amounts
The extracted information may also include:
- Gross amount
- Net amount
- Round-off
- Grand total
- Other configured values
This structured view makes it easier for the owner to check the invoice without manually creating every field from the beginning.
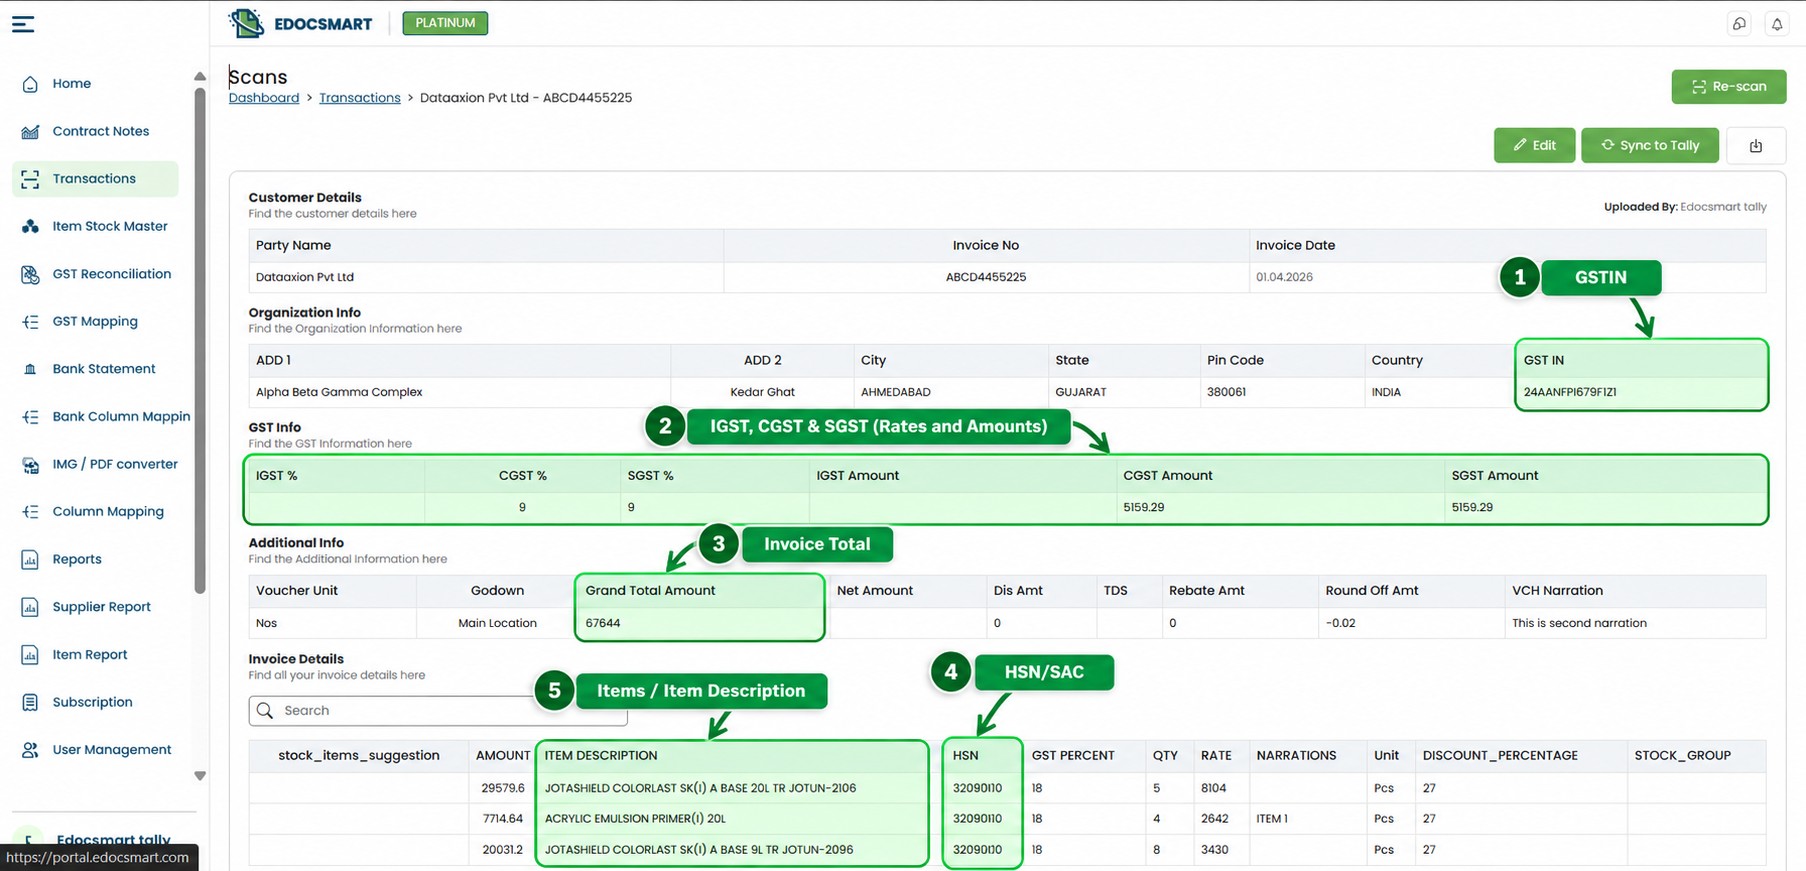
Step 5: Review GST Details Carefully
Automatic extraction reduces typing, but GST invoice information should still be verified.
Before moving further, the user can check:
- Is the supplier name correct?
- Is the GSTIN correct?
- Is the invoice number correct?
- Is the date correct?
- Are all item rows available?
- Is the HSN or SAC correct?
- Are quantities and rates correct?
- Is CGST or SGST captured correctly?
- Is IGST used where applicable?
- Does the grand total match the invoice?
This verification step is especially important for startup owners who may not have another person reviewing the accounting work.
Instead of manually entering the complete invoice, the owner focuses on checking whether the extracted information is correct.
That can be a much more manageable workflow.
This review-first approach is an important part of automatic invoice entry in tally because the user can verify tax and item details before synchronization.
Step 6: Save the Invoice for Later if Needed
A startup owner may not always have time to complete the entire accounting process immediately.
An invoice may arrive while the owner is handling a customer call, meeting a supplier, or managing operations.
In that situation, the extracted invoice information can be saved and processed later.
The workflow can be:
Upload → Extract → Review → Save
Later, when the owner is ready:
Open Saved Invoice → Verify → Sync to Tally
This gives more flexibility than forcing every invoice to be completed immediately.
Step 7: Click “Sync to Tally”
Once the invoice data has been checked, the user can select Sync to Tally.
This is the stage where the verified information moves from invoice processing toward the accounting system.
Without automation, the owner would now need to open Tally and manually re-enter the same supplier, item, GST, and amount details.
With the configured workflow, the structured data can instead be transferred through the connector.
Step 8: Set Up the Tally Connector
A connector is required for communication between Edocsmart and Tally.
The business may use the Edocsmart Tally Connector or another compatible connector depending on its setup.
During the initial implementation, the required structures need to be configured according to the company's Tally environment.
This may include:
- Purchase voucher template
- Supplier ledger configuration
- Stock-item structure
- GST-related fields
- Other required accounting mappings
The Edocsmart team may configure these templates based on the business requirement.
Once the connector and templates are correctly configured, future GST invoices can follow the same general process.
The configured setup can support a repeatable TallyPrime invoice automation workflow for applicable GST purchase invoices.
Step 9: GST Invoice Data Reaches Tally
After the user clicks Sync to Tally, the verified invoice information is transferred through the configured connector.
Depending on the setup, the information can be used for:
- Purchase voucher
- Supplier ledger
- Stock items
- HSN-related information
- GST values
- Other mapped accounting details
The important point is that the original invoice is not simply copied into Tally as an image.
The process is:
GST Invoice → Data Extraction → Verification → Mapping → Tally Connector → Accounting Entry
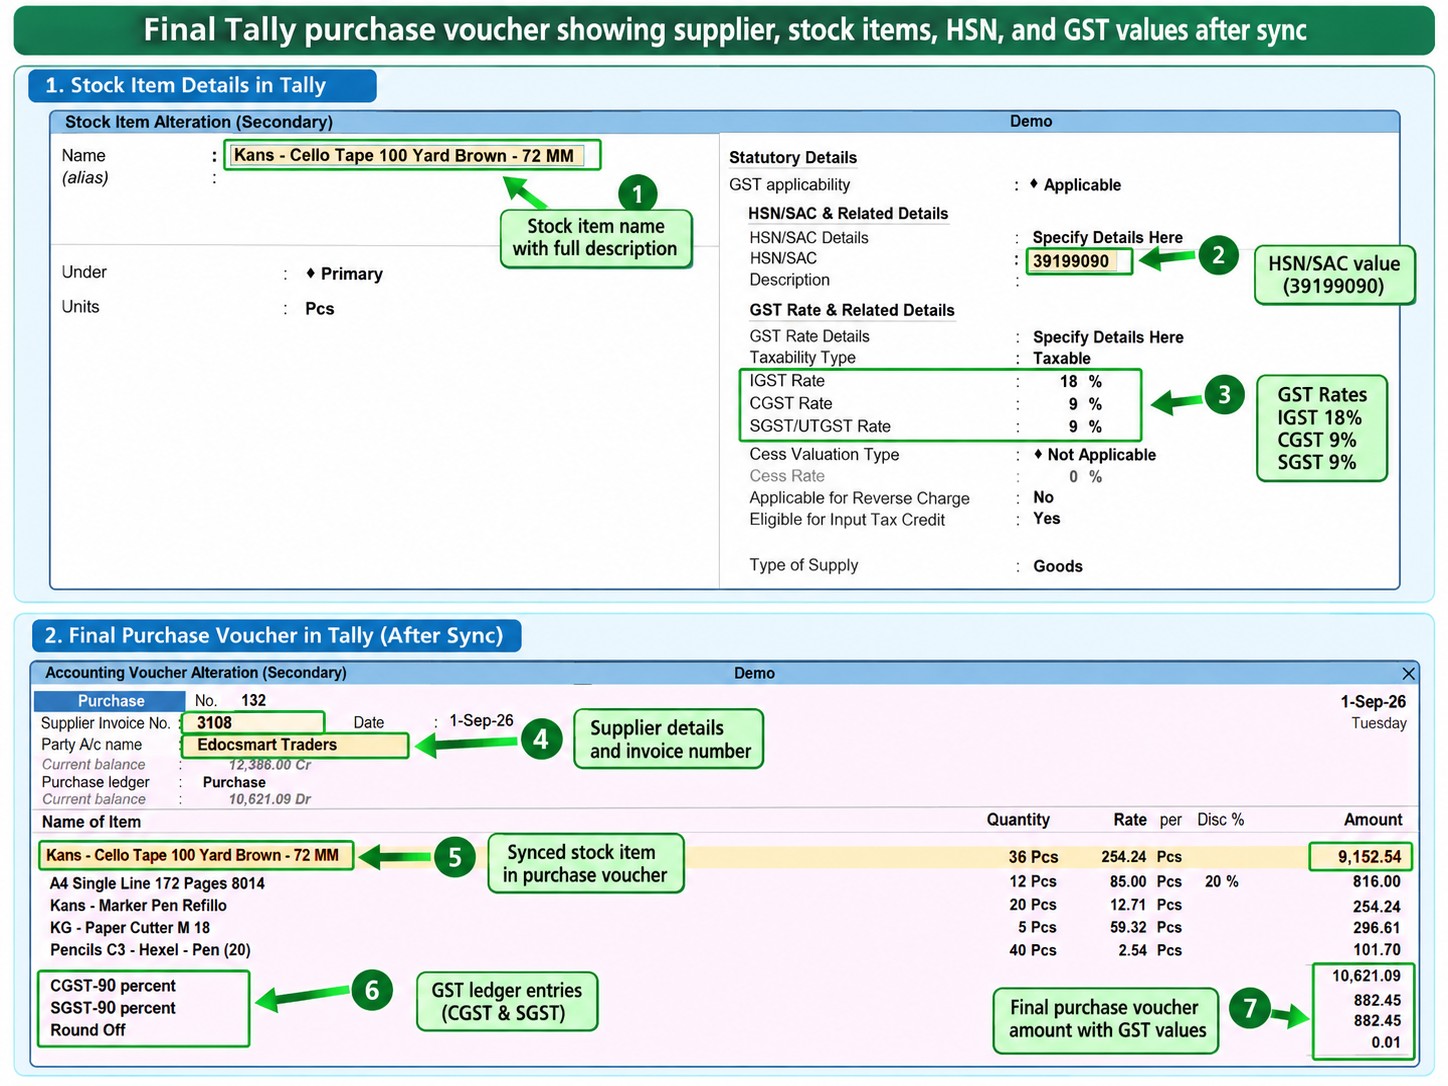 This is what turns invoice processing into a structured
workflow.
This is what turns invoice processing into a structured
workflow.It also supports tally purchase voucher automation by moving verified invoice information into the configured purchase-voucher structure.
A Startup Owner Example
Consider a founder running a small trading startup.
At the beginning, the owner receives around 10 purchase invoices every week.
They manage sales, suppliers, customer calls, banking, inventory, and accounting alone.
Every evening, the owner opens the invoices and starts entering them into Tally.
After a few months, business improves.
Now the startup receives 40 invoices every week.
That sounds like good growth, but the accounting workload has also multiplied.
One supplier invoice contains 15 stock items.
The owner has to enter the supplier details, 15 items, quantities, rates, HSN codes, GST values, and final amount.
Using Edocsmart, the same invoice can first be uploaded.
The system extracts the available information and presents it in structured fields.
The owner reviews the GSTIN, invoice number, items, rates, and taxes.
Suppose everything is correct except one quantity.
Instead of typing the entire invoice again, the owner only needs to correct that particular field.
Once reviewed, the invoice can be synced to Tally.
For someone managing a startup almost alone, this difference can matter.
Instead of handling every invoice manually, a structured Invoice to Tally process lets the owner focus more on verification and business operations.
Manual GST Invoice Entry vs Automated Workflow
The traditional workflow looks like:
Open Invoice → Read GST Details → Create Voucher → Enter Items → Enter Tax → Check Total → Save
The automated workflow becomes:
Upload Invoice → Extract Data → Verify GST Details → Sync to Tally
The owner still controls the accounting information.
What changes is the amount of repetitive data entry required before that information reaches Tally.
This is the practical value of tally invoice automation for a growing business with limited accounting resources.
FAQS
How can I import a GST invoice
into Tally?
A GST invoice can first be uploaded into an invoice-processing system such as Edocsmart. Relevant information such as supplier details, invoice number, item rows, HSN codes, GST values, and totals can be extracted and reviewed. After verification, the data can be synced with Tally using the configured connector and templates.
Can PDF GST invoices be
processed?
Yes. Supported PDF invoices can be uploaded for processing. The document information is extracted into structured fields so the user can review the GSTIN, invoice information, line items, tax values, and totals before moving the data into the configured Tally workflow.
Can scanned GST invoices also
be used?
Supported scanned invoices and invoice images can also be processed. The document should be clear enough for important fields to be identified and reviewed accurately before synchronization.
Do I need to configure mapping
for every invoice?
Mapping is mainly part of the initial setup. Once the relevant invoice fields and Tally structure have been configured, the same mapping can be reused where applicable instead of rebuilding it for every GST invoice.
Can I review GST information
before syncing?
Yes. Users can review important GST-related information such as GSTIN, HSN or SAC, GST percentage, CGST, SGST, IGST, taxable value, and invoice total before sending the transaction to Tally.
Can I save a GST invoice and
sync it later?
Yes. If additional checking or approval is required, the processed invoice can be saved and handled later. This can be useful for startup owners who need flexibility while managing several other business responsibilities.
Conclusion
For a startup owner, every hour matters.
When one person is managing customers, suppliers, payments, stock, operations, and accounting, repeatedly entering GST invoices can quickly become another major workload.
The invoice already contains the required information.
The challenge is getting that information into the accounting system without manually recreating the complete document.
With Edocsmart, the workflow can become:
Upload GST Invoice → Extract Data → Review GST and Item Details → Save or Sync → Tally
After the required mapping, connector, and Tally templates have been configured, the same process can be reused for applicable invoices.
For a growing startup, this means the owner can spend less time repeatedly entering invoice data and more time focusing on the work that actually helps the business move forward.