How to Import PDF Invoice in Tally Prime
Import PDF invoices into Tally Prime by extracting invoice data, reviewing key details, mapping fields, and syncing verified entries through Edocsmart.
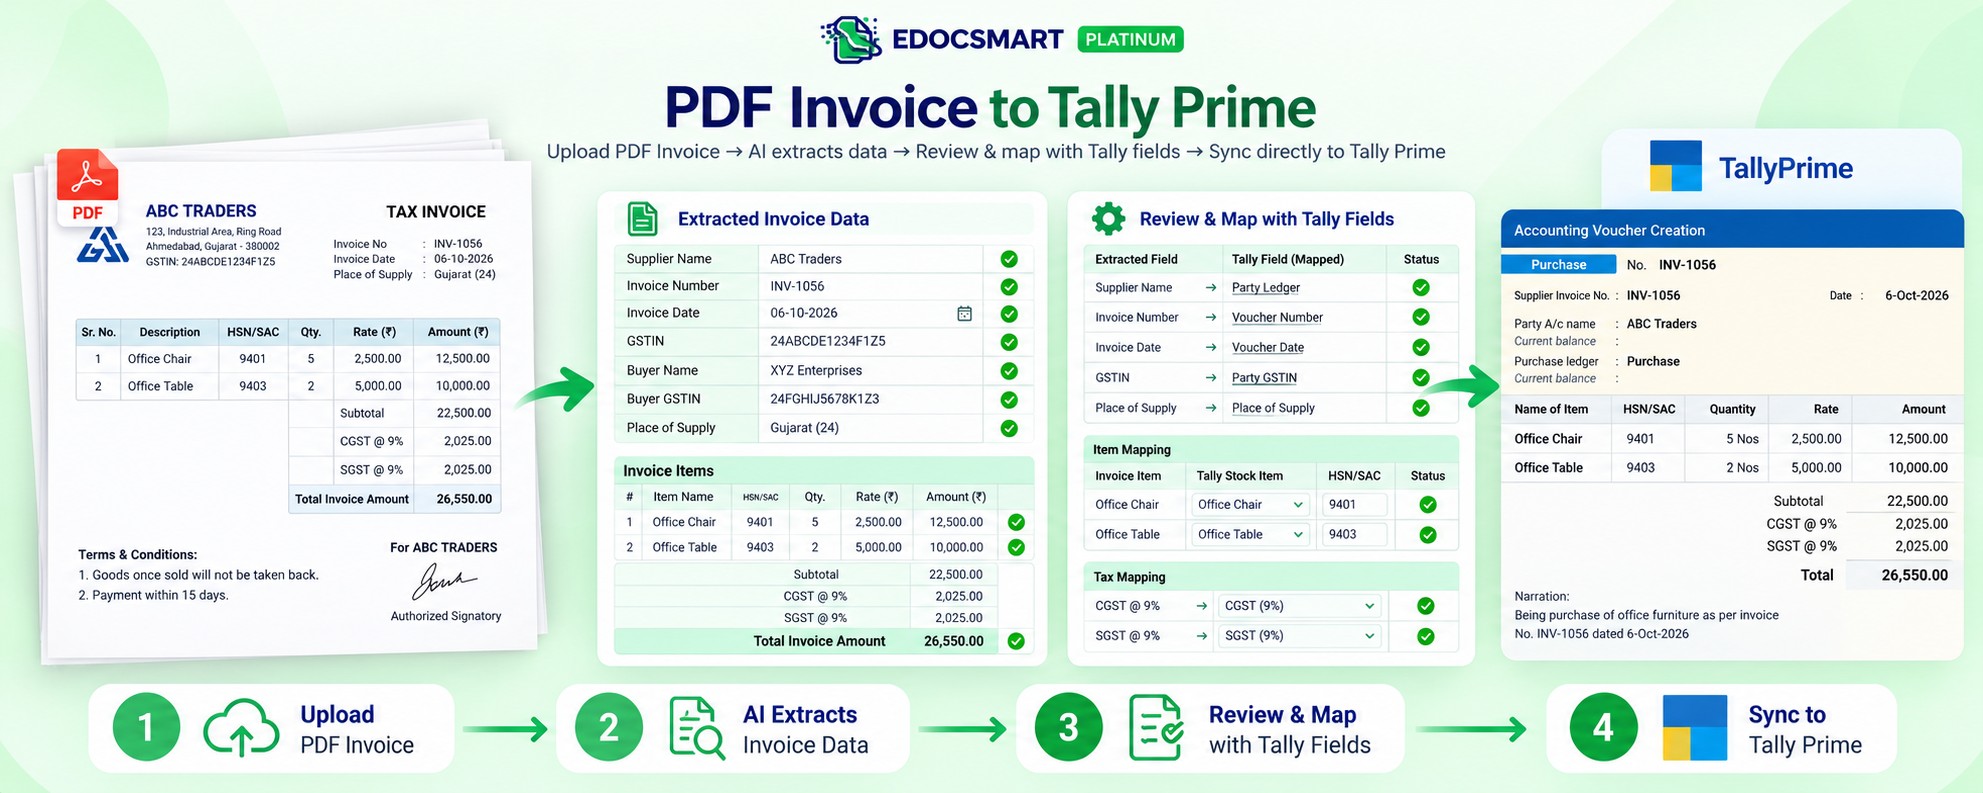
PDF invoices have become a standard part of everyday accounting. Suppliers send purchase bills by email, customers share invoices digitally, and GST invoices are often stored as PDFs for record-keeping. The information required for accounting is already present inside these documents—the problem is entering the same information into Tally Prime again.
A single PDF invoice may contain the party name, invoice number, date, GSTIN, address, HSN/SAC, item details, quantity, rate, discount, GST, taxable value, and final amount. When an accountant manually reads each field and recreates the transaction in Tally, the work becomes repetitive, especially when dozens or hundreds of invoices are involved.
A better approach is to extract the information already available in the PDF, verify it, map it with the correct Tally fields, and then synchronize the approved transaction.
With EdocSmart, the workflow for a PDF invoice to Tally Prime can be organized as:
PDF Invoice → Purchase or Sales → Upload → AI Extraction → Review → Mapping → Tally Connector → Sync to Tally Prime
Can You Import a PDF Invoice Directly into Tally Prime?
A PDF and a Tally voucher are two different things.
A PDF is primarily a visual document. Tally Prime requires structured accounting information. Therefore, simply having a PDF invoice does not automatically make it a Tally voucher.
For example, an invoice may display:
Supplier: ABC Traders
Invoice No: PUR-105
Date: 06-10-2026
GSTIN: 24ABCDE1234F1Z5
Item: Office Chair
Quantity: 5
Rate: ₹2,500
GST: 18%
Invoice Total: ₹14,750
For accounting purposes, these values need to be understood as individual fields:
Supplier → Party Ledger
Invoice No. → Voucher Number
Item → Stock Item
Quantity → Quantity
Rate → Item Rate
GST → Tax Information
Invoice Total → Voucher Amount
This is why a proper PDF to Tally import workflow first converts the information inside the document into structured data.
PDF Invoice → Structured Invoice Data → Verification → Tally Prime
The dedicated PDF to Tally workflow is designed around this process rather than simply changing the PDF into another file format.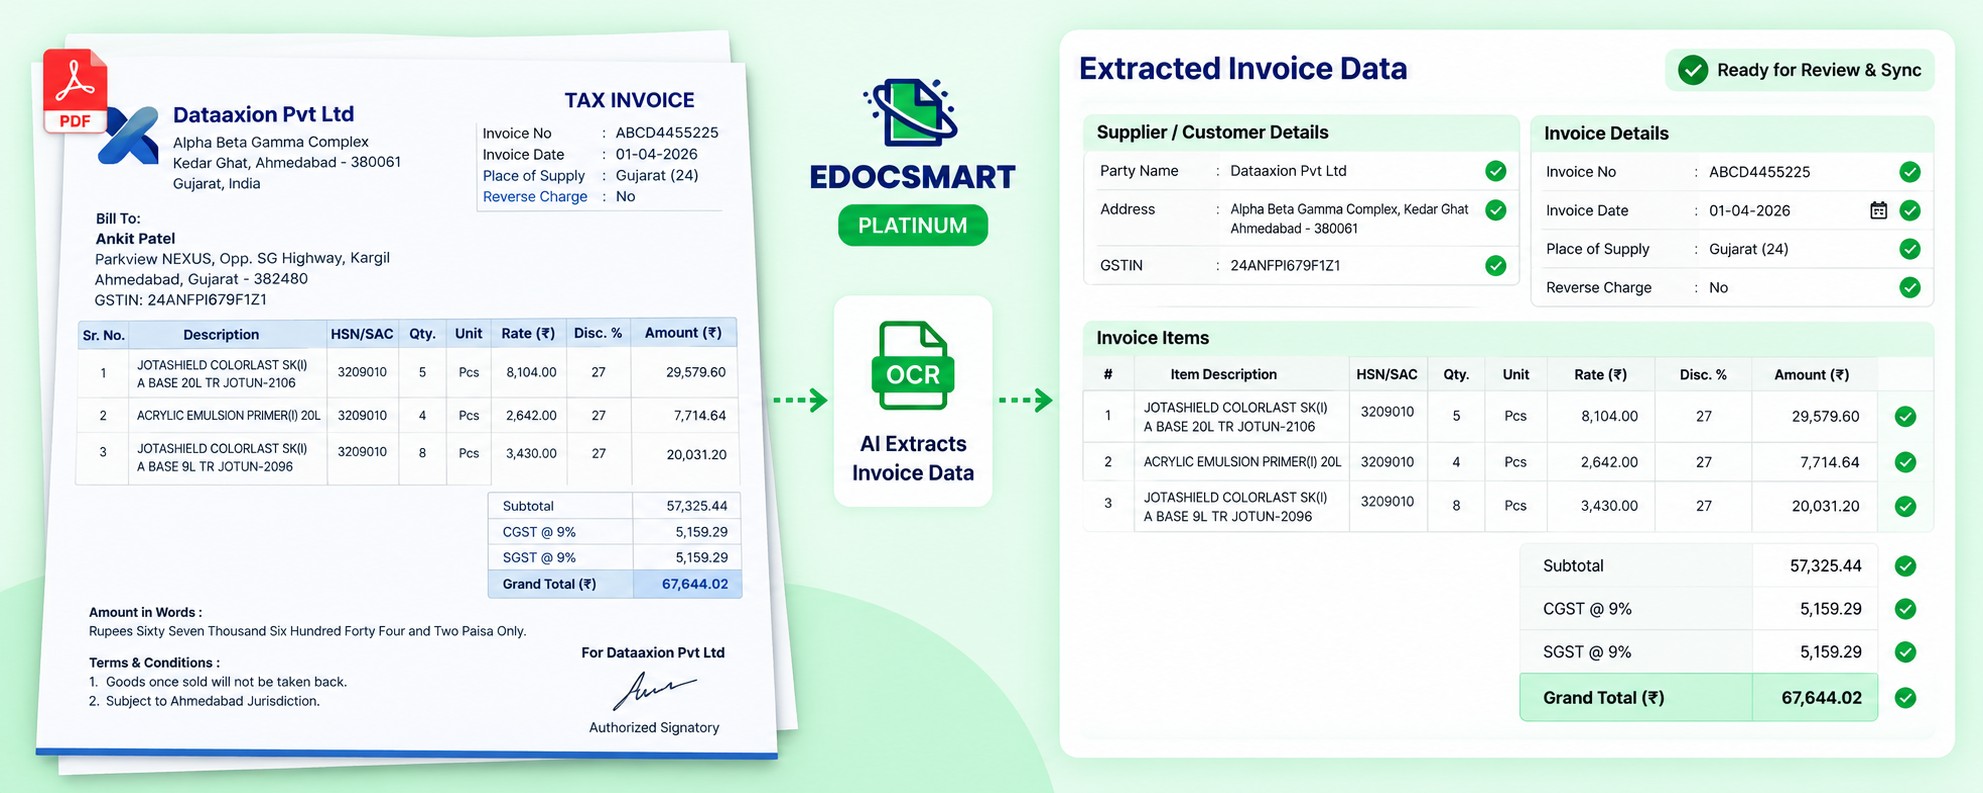
What Invoice Data Can Be Imported into Tally Prime?
A PDF invoice to Tally converter needs to identify more than the final invoice amount.
Depending on what is available in the source invoice, the extracted information can include supplier or customer details, invoice number and date, GSTIN, address, HSN/SAC, item description, quantity, unit, rate, discount, GST rate, taxable amount, CGST, SGST, IGST, and invoice total.
Item-level information is especially important.
If a purchase invoice contains ten products, the system needs to understand those ten rows as invoice items rather than treating the document as one large block of text.
This structured extraction creates the foundation for the next stage: review and Tally mapping.
Purchase PDF or Sales PDF: Select the Correct Transaction
Before uploading an invoice, identify whether it belongs to Purchase or Sales.
For a purchase invoice:
Transactions → Purchase
For a sales invoice:
Transactions → Sales
This is a small but important step when you import PDF into Tally Prime because the transaction should follow the correct accounting workflow from the beginning.
A supplier's purchase bill should not be processed as a sales transaction, and a customer sales invoice should not be treated as a purchase bill.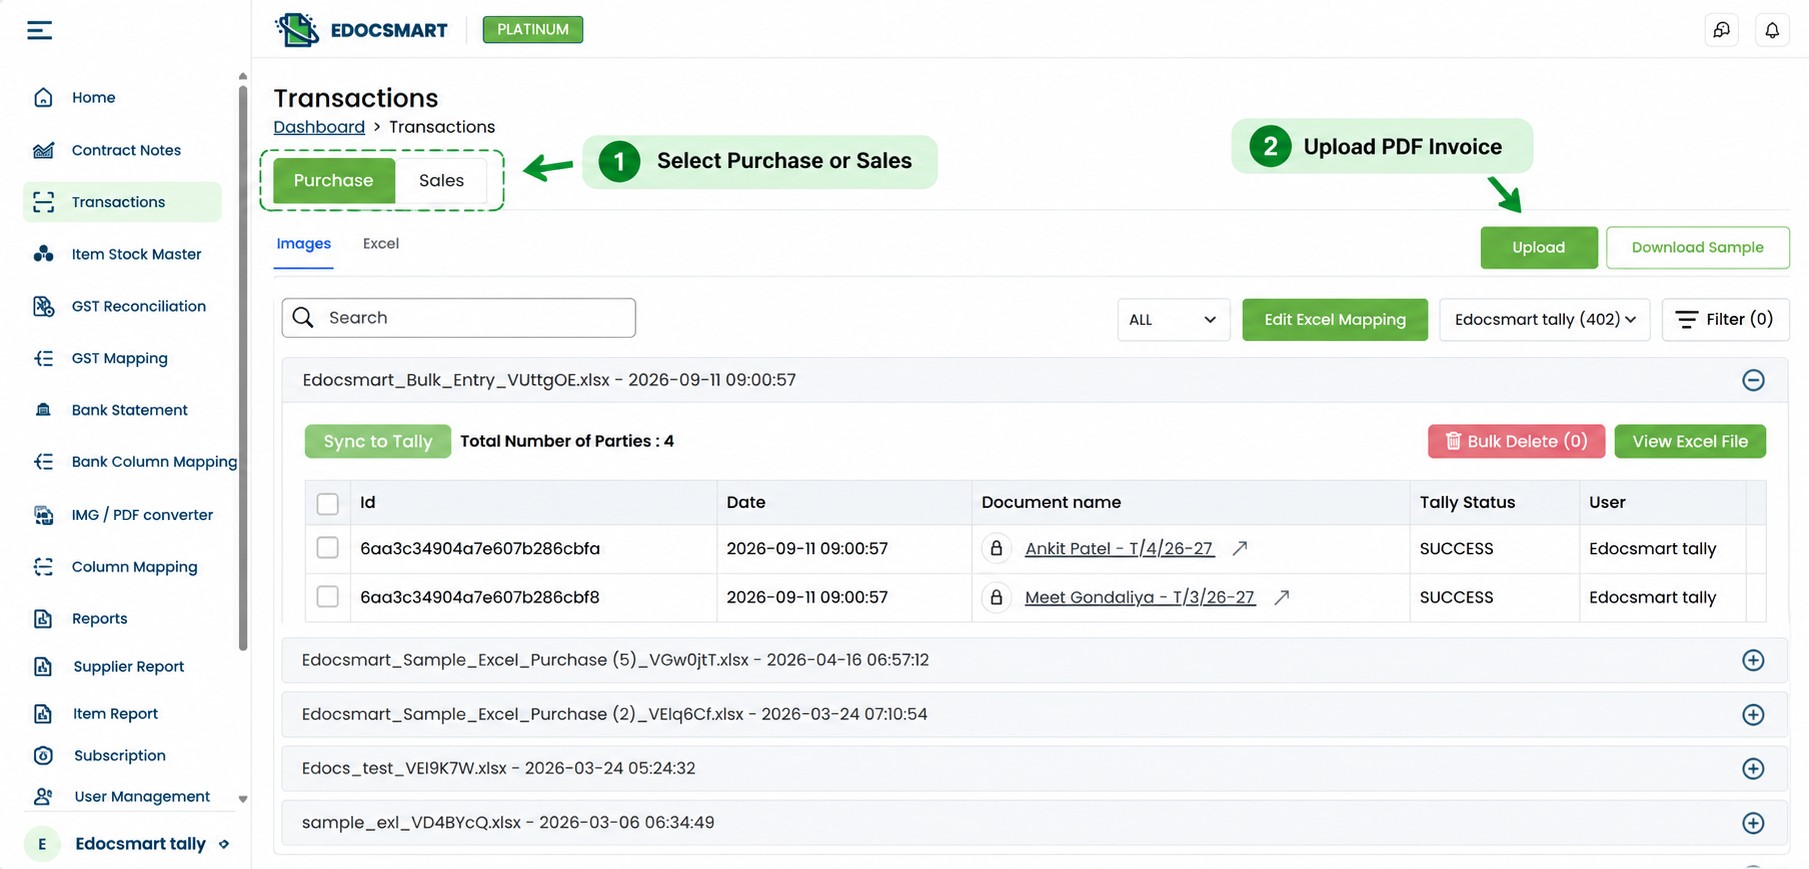 How to Import PDF Invoice in Tally Prime with EdocSmart
The actual import process can be completed in a few stages. Instead of manually rebuilding the invoice inside Tally, the PDF becomes the source document.
Step 1: Log In and Open the Correct Transaction
Start by logging in to EdocSmart.
Open Transactions and select the appropriate section based on the invoice.
For a supplier invoice, open Purchase.
For a sales invoice, use the corresponding Sales workflow.
This keeps the document connected with the correct transaction type before extraction begins.
Step 2: Upload the PDF Invoice
Upload the original invoice PDF.
Instead of manually entering the supplier, invoice number, GST, items, quantities, and values first, you provide the source invoice to EdocSmart.
This can be a useful starting point for businesses looking to convert invoice PDF to Tally without recreating every field manually.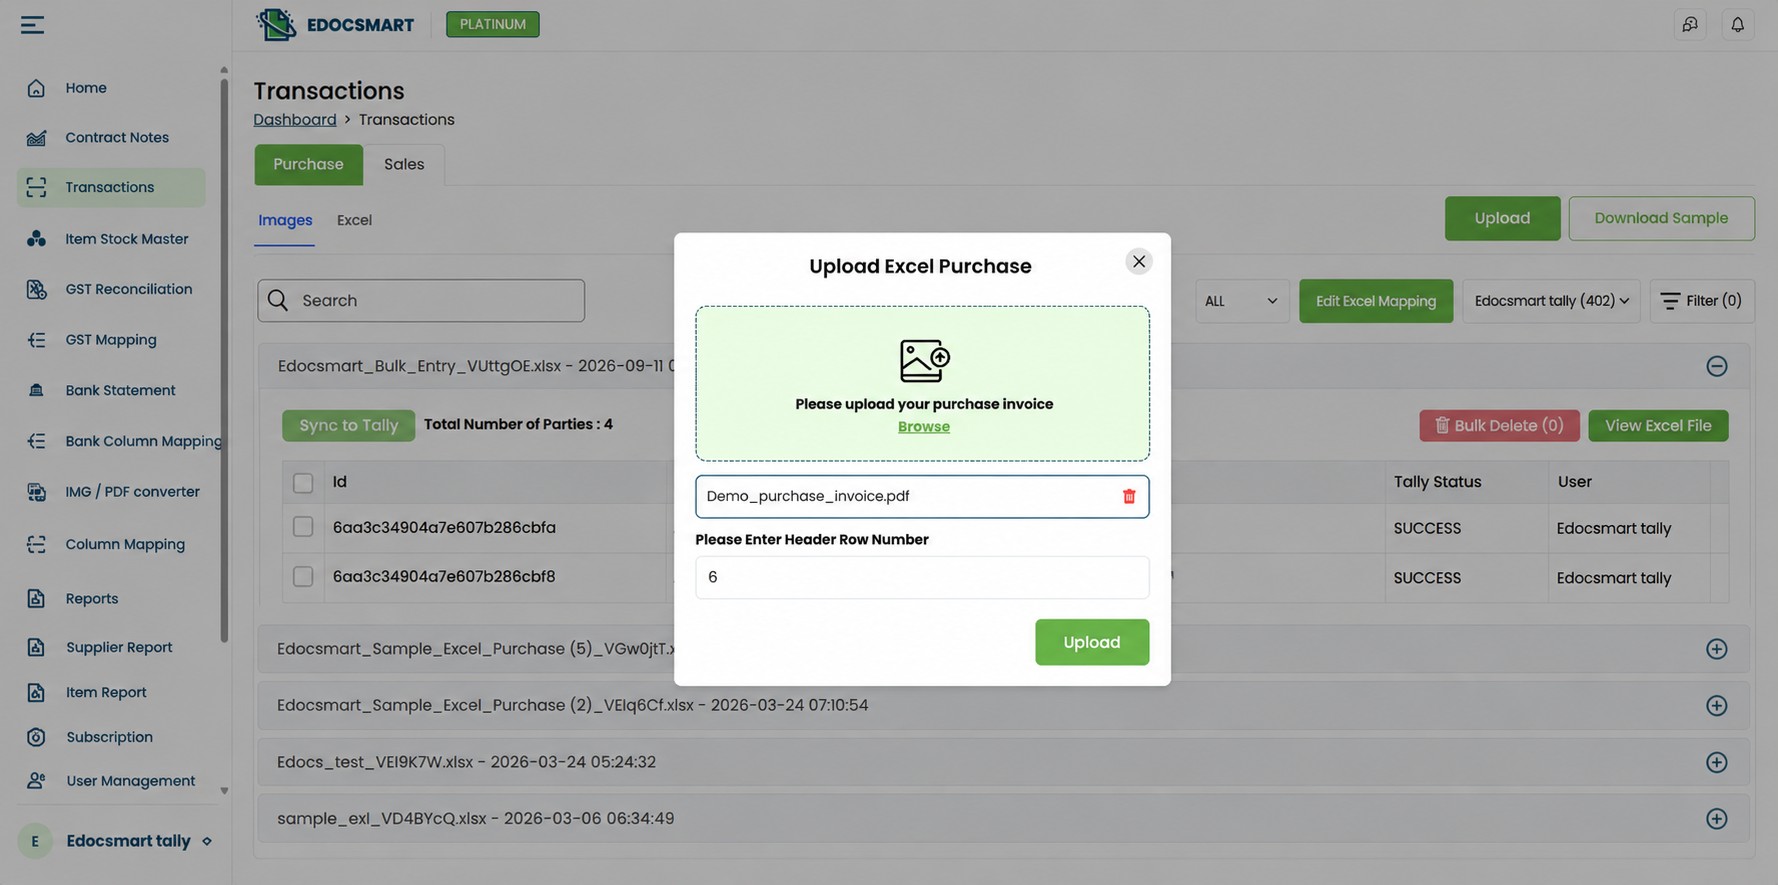
You Can Also Upload an Invoice from Mobile
Invoice processing does not always have to begin from the accounting desktop.
EdocSmart also provides a mobile app, allowing an invoice document to be uploaded from a phone.
This can be useful when a PDF invoice is available on mobile through email, WhatsApp, downloaded files, or another digital source.
The uploaded document can then continue through the extraction and review workflow.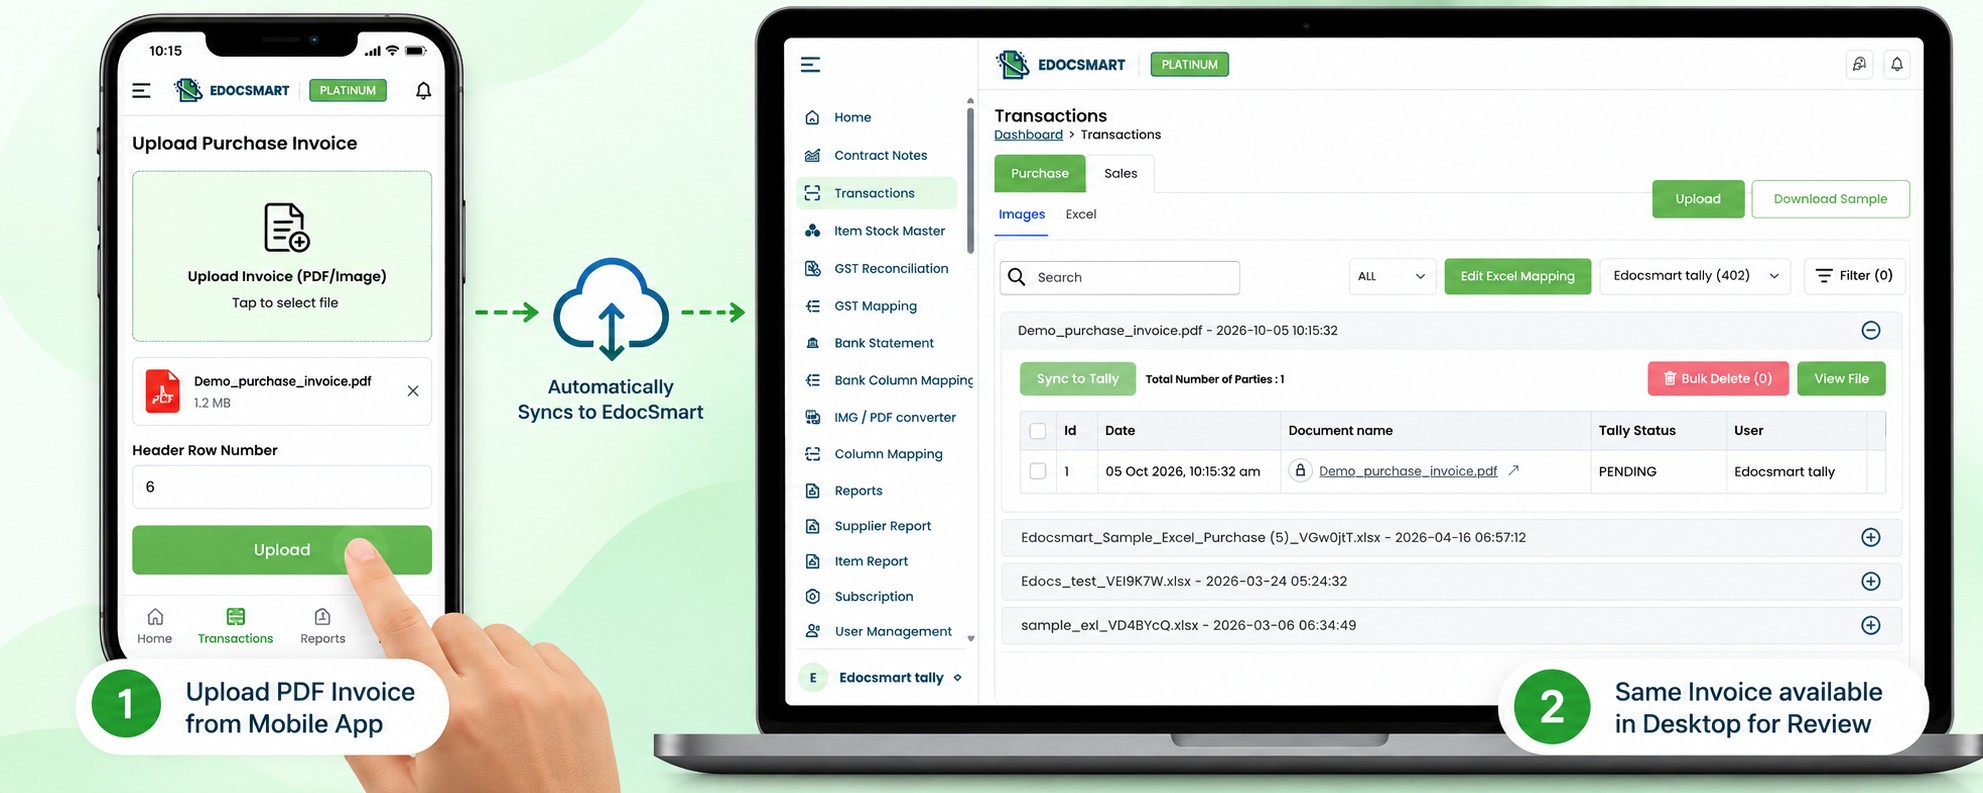
Step 3: Extract the Invoice Information
After the document is uploaded, EdocSmart processes the PDF and extracts the relevant invoice information.
Instead of displaying only the original document, the information is converted into structured fields.
For example:
ABC Traders → Supplier
PUR-105 → Invoice Number
06-10-2026 → Invoice Date
24ABCDE1234F1Z5 → GSTIN
Office Chair → Item
5 → Quantity
₹2,500 → Rate
18% → GST
₹14,750 → Invoice Total
This is the key difference between simply opening a PDF and using a PDF to Tally Prime converter.
The system needs to understand what the values represent before they can become accounting data.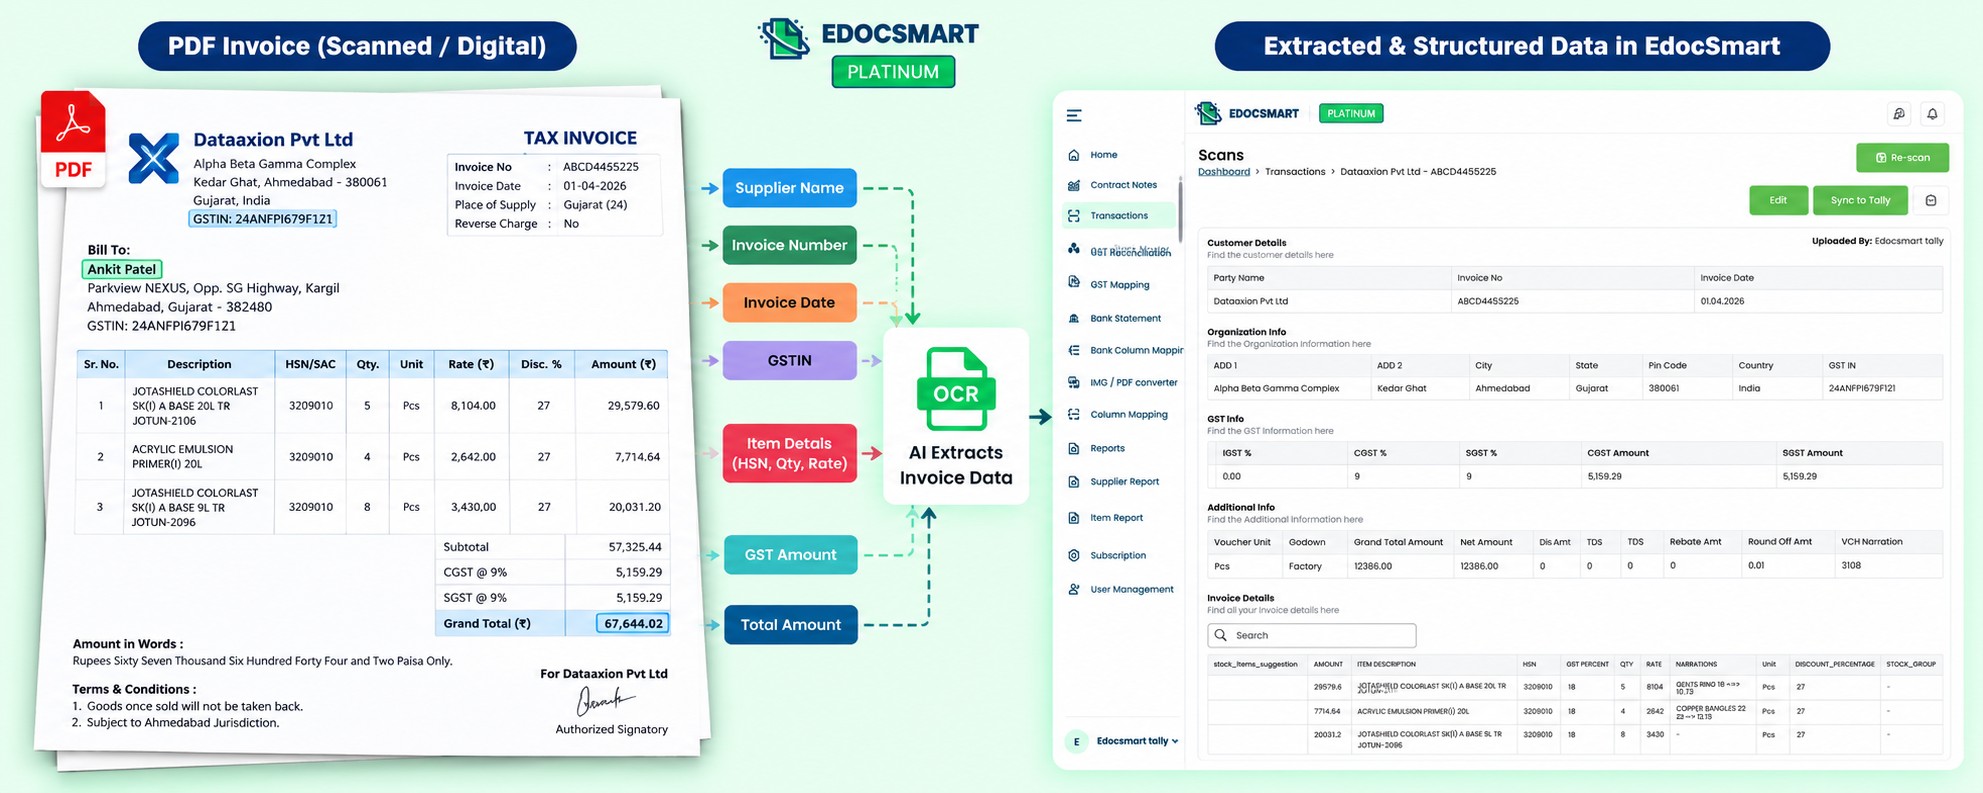
Step 4: Review the Extracted Invoice
The next stage is verification.
Automation should reduce repetitive typing, but important accounting information should still be checked before it reaches Tally Prime.
Review the party name, invoice number, invoice date, GSTIN, address, items, HSN/SAC, quantity, rate, GST values, taxable amount, and final total.
Most information may already be correctly extracted, but the review stage gives you an opportunity to identify and correct anything that needs attention.
For example, if an invoice contains a quantity of 10 but the extracted value requires correction, it should be fixed before synchronization.
The workflow therefore becomes:
Automatic Extraction → Human Review → Approved Accounting Data
rather than:
Automatic Extraction → Blind Posting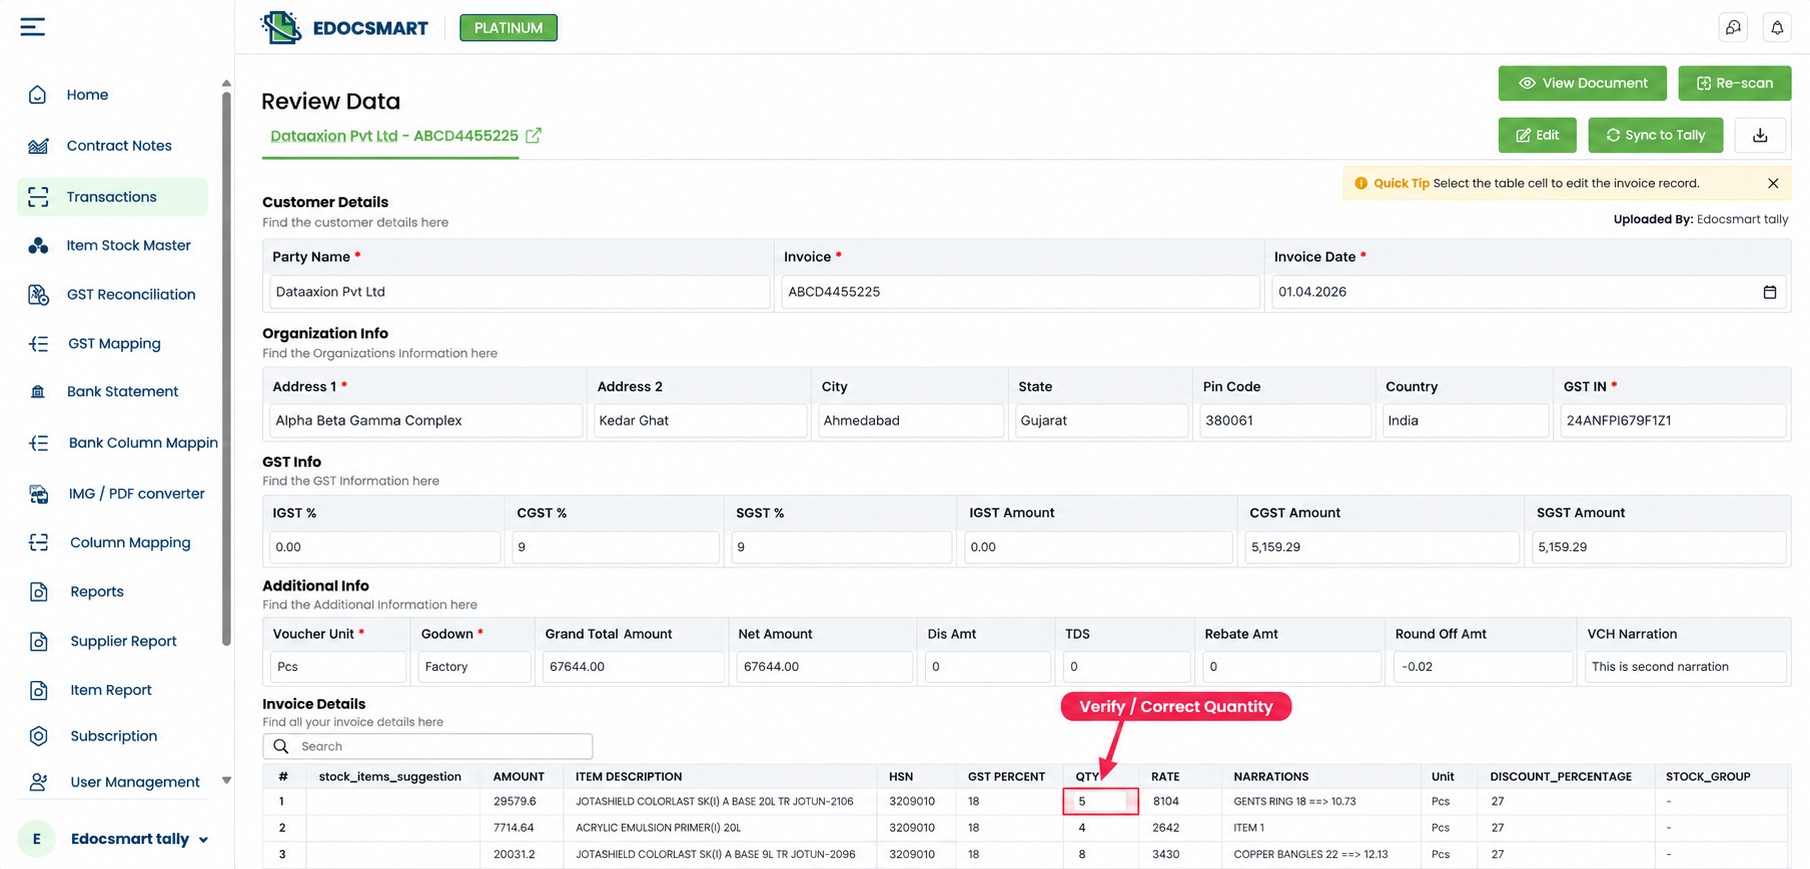
What If the PDF Name and Tally Name Are Different?
This is where mapping becomes useful.
The wording present on an invoice does not always match the master maintained in Tally.
For example, a PDF may contain:
Supplier: ABC INDUSTRIES PVT LTD
while the Tally ledger may be:
ABC Industries
Similarly, an invoice item may say:
CHAIR-MODEL-A12
while the corresponding Tally stock item may be:
Office Chair A12
The system therefore needs a relationship between the source value and its accounting destination.
Supplier → Party Ledger
Item → Stock Item
GST → Tax Structure / Tax Ledger
Invoice Number → Voucher Number
Invoice Amount → Voucher Amount
Mapping makes it possible to keep the original PDF format while still preparing the data according to the organization's Tally setup.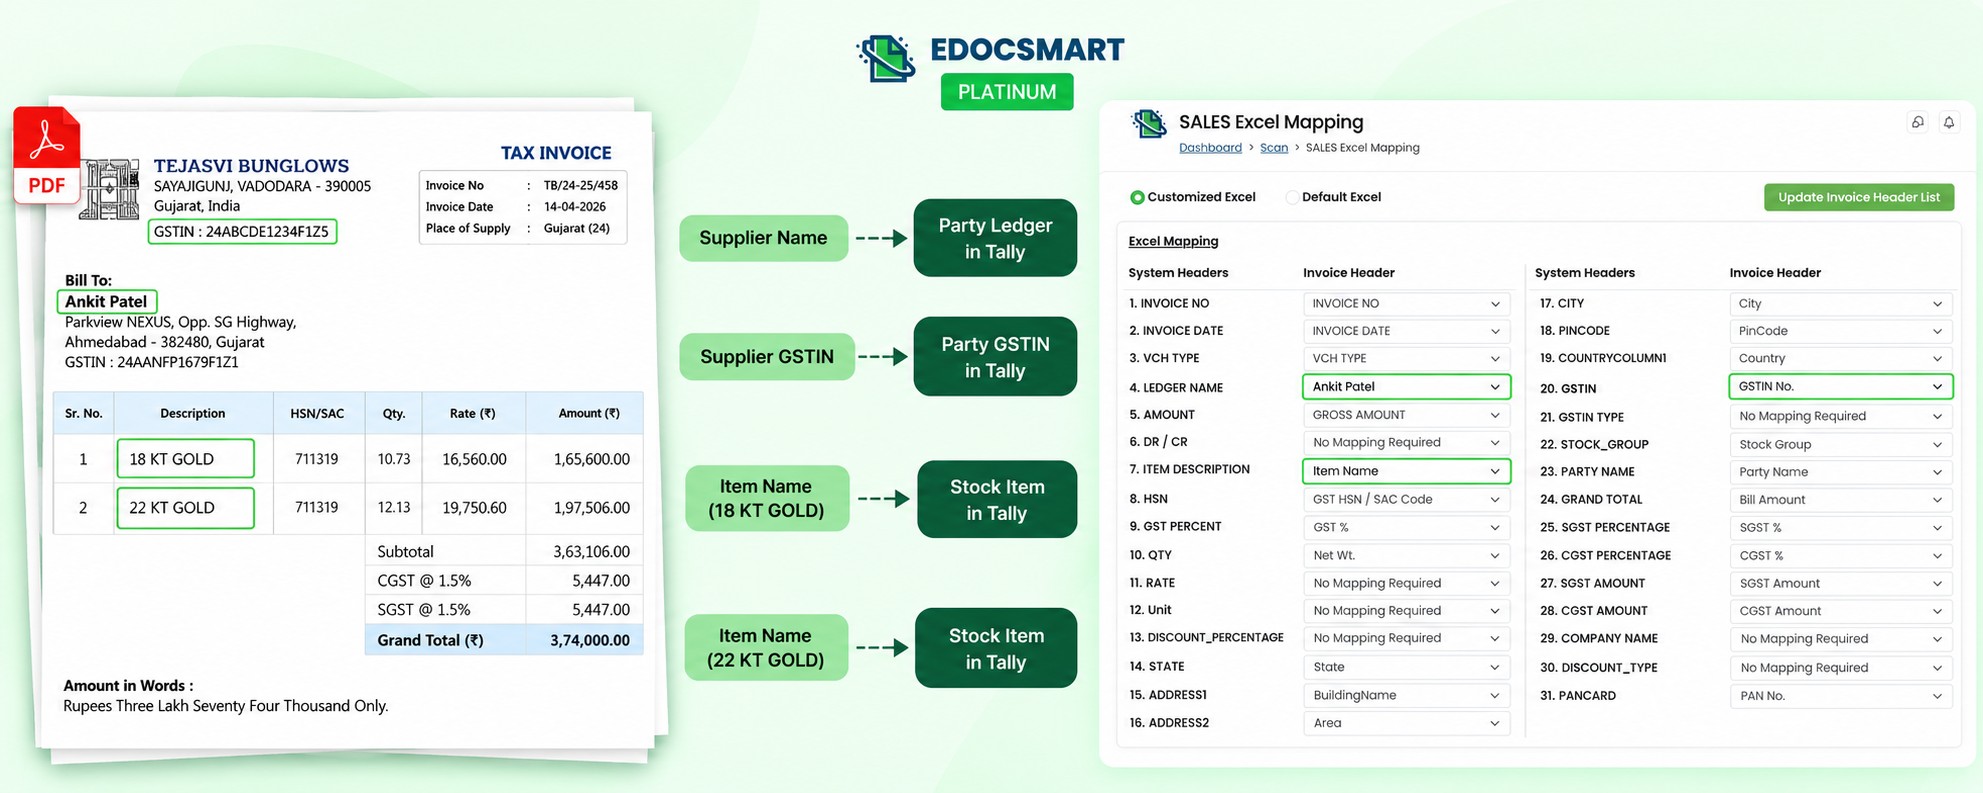
Why You Do Not Need to Map Every Invoice Again
Mapping is mainly a configuration step.
If the same source structure and Tally setup continue to apply, the configuration can be reused instead of rebuilding the mapping for every invoice.
Suppose you regularly receive purchase invoices from the same supplier.
After the appropriate supplier, stock, tax, and voucher relationships have been configured, future invoices following the same setup can use that configuration.
This is particularly useful when processing recurring supplier invoices.
The accountant can focus more on checking the actual transaction rather than repeatedly configuring the same relationship.
Step 5: Keep the Tally Connector Running
Reviewing the invoice inside EdocSmart does not by itself place the transaction into the local Tally installation.
Before synchronization, the configured Tally Connector needs to be active.
EdocSmart provides its own Tally Connector for this connection. If another compatible connector is being used, the required configuration should already be completed.
The connector acts as the bridge:
EdocSmart → Tally Connector → Local Tally Prime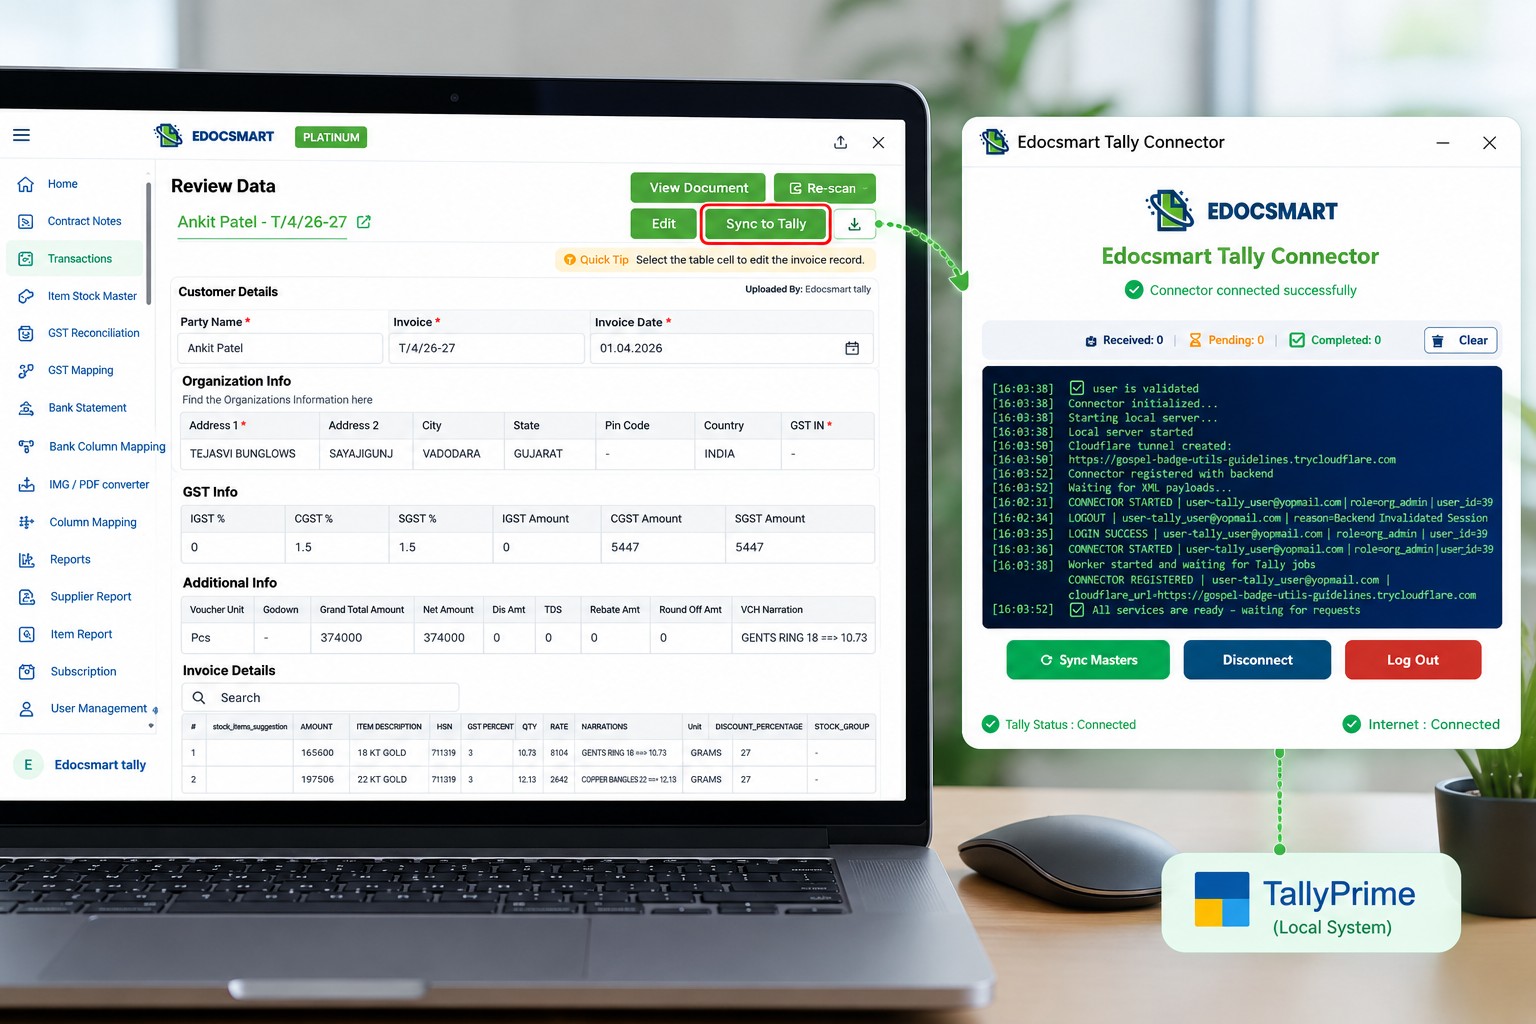
Step 6: Click Sync to Tally
Once the invoice information has been reviewed and the connector is ready, the verified transaction can be synchronized.
Click Sync to Tally.
Depending on the configured workflow, the synchronized information can help create or update relevant accounting information such as the purchase or sales voucher, party ledger, stock items, GST details, party address, and item-level tax information.
The exact result depends on the organization's Tally configuration.
This is the point at which PDF invoice to Tally Prime processing becomes an actual accounting transaction rather than only document extraction.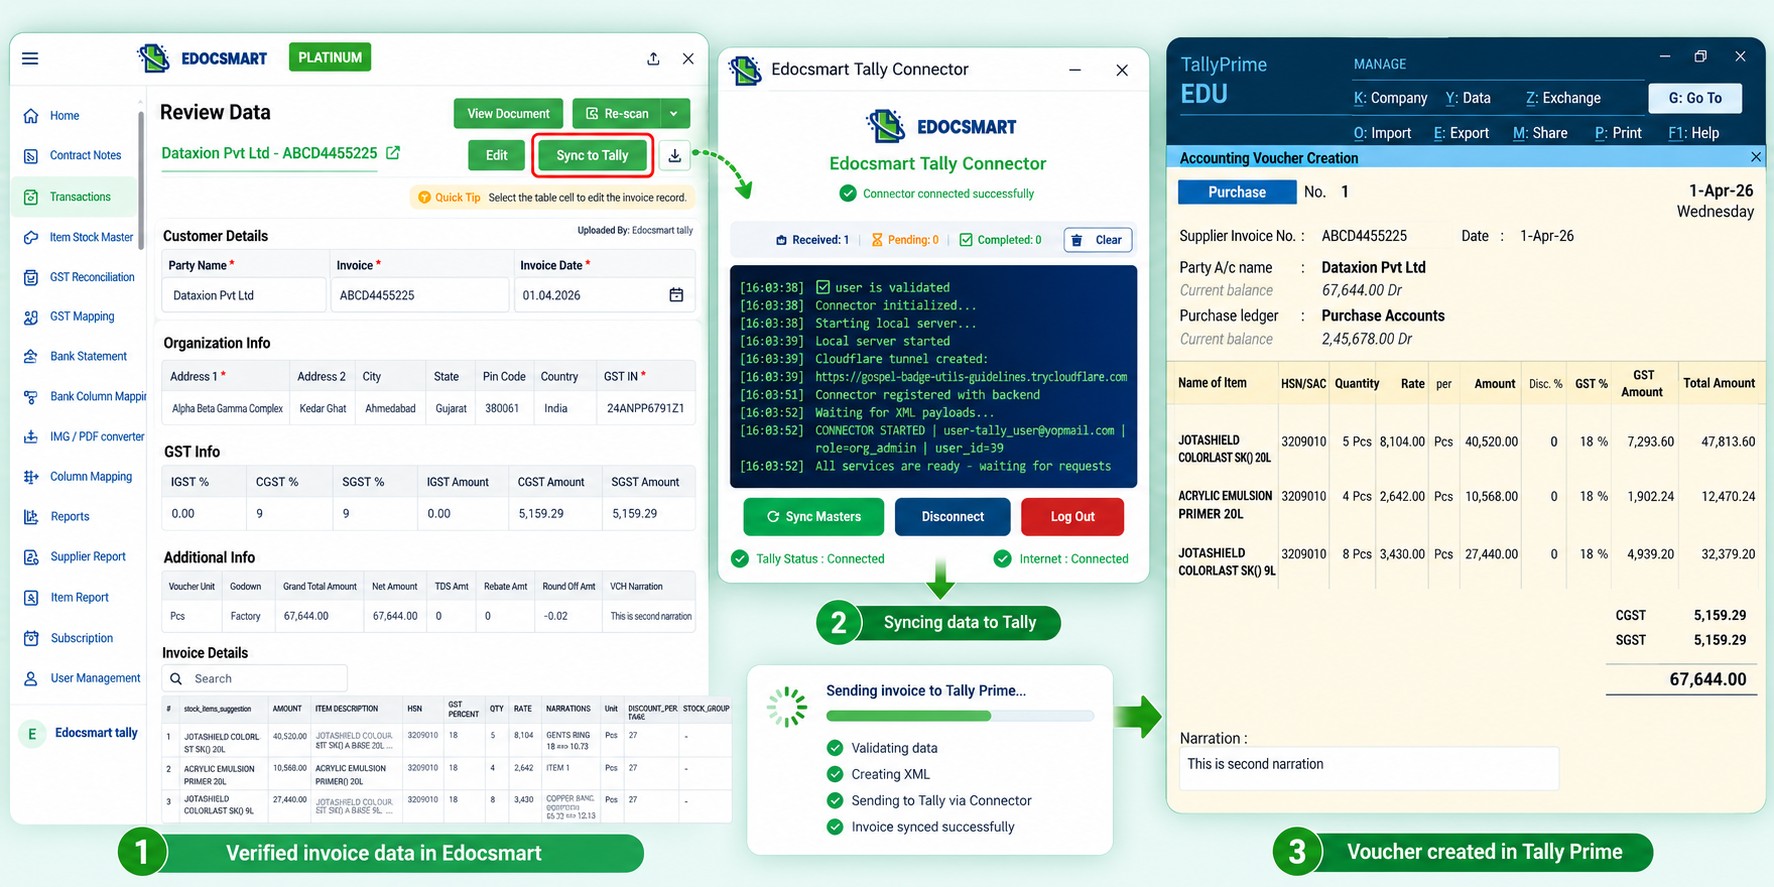
What Does the Final Entry Look Like in Tally Prime?
After synchronization, the final transaction should reflect the verified invoice information according to the configured Tally setup.
For a purchase invoice, the resulting voucher may contain the supplier ledger, voucher number, invoice date, stock items, quantities, rates, HSN/SAC details, GST information, and final invoice amount.
This is why verification before synchronization matters.
The final Tally transaction is created from the structured and approved data—not simply from the visual appearance of the PDF.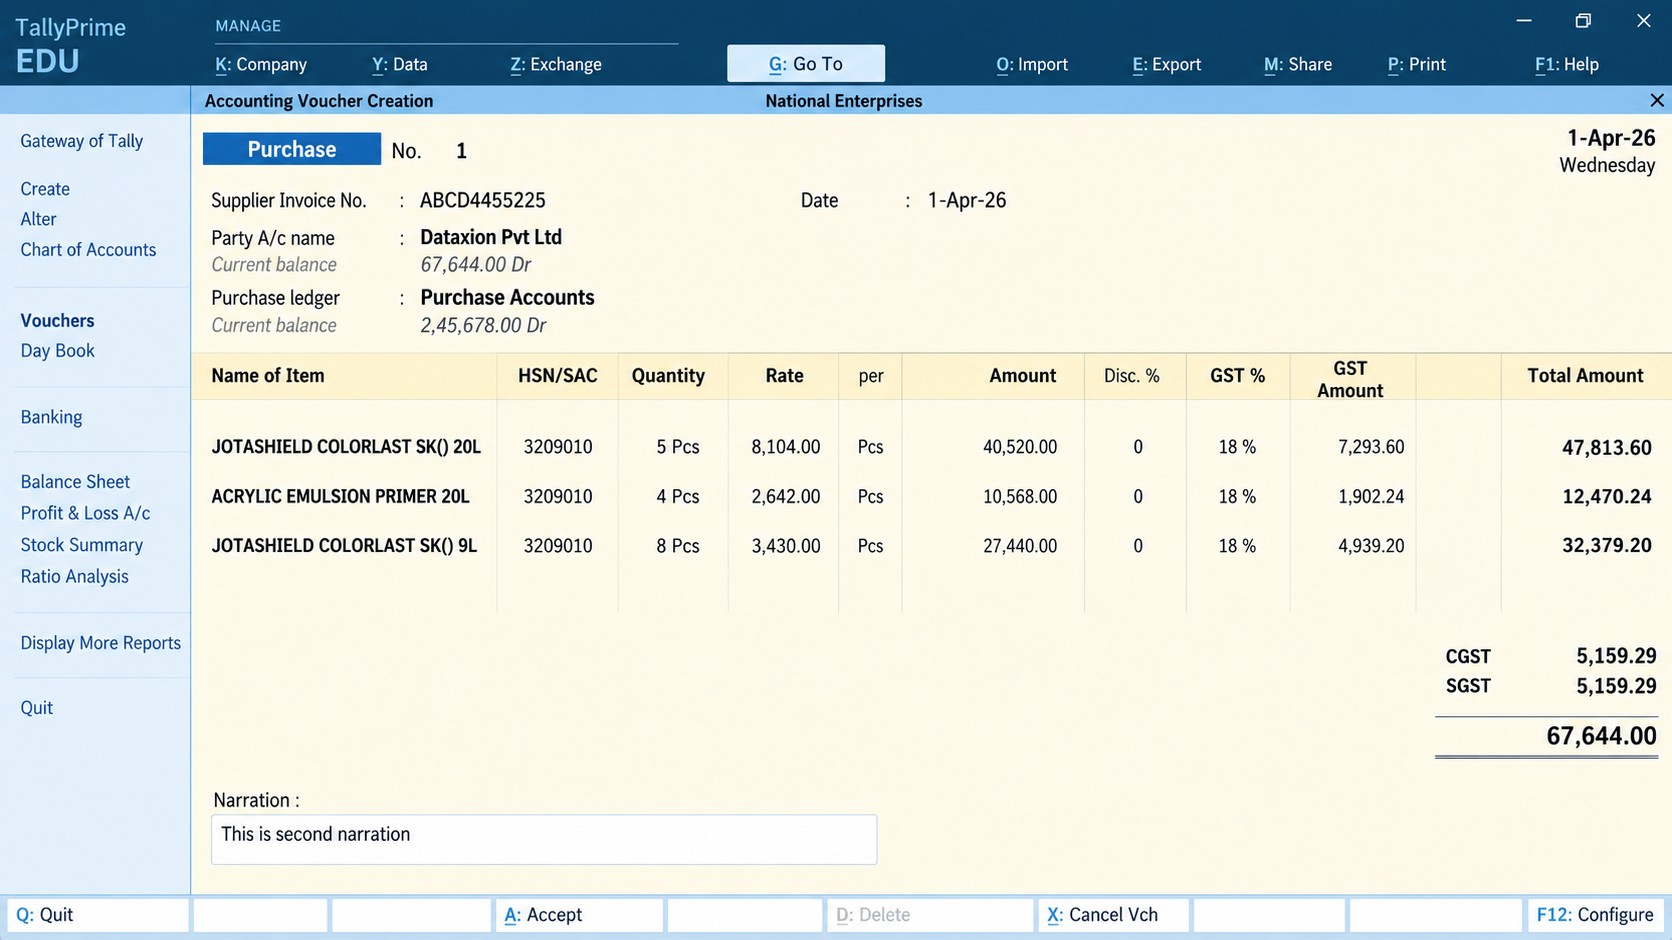
Example: Importing One Purchase Invoice PDF into Tally Prime
Consider a supplier invoice with the following information:
Supplier: Shree Enterprises
Invoice Number: SE-1048
Date: 06-10-2026
Item: Industrial Bearing
Quantity: 20
Rate: ₹750
Taxable Amount: ₹15,000
GST: 18%
Invoice Total: ₹17,700
First, the invoice is uploaded under Purchase.
EdocSmart extracts the supplier, invoice, item, quantity, rate, GST, and amount information.
The accountant then reviews the extracted data.
If Shree Enterprises and Industrial Bearing are already mapped with the corresponding Tally ledger and stock item, the existing configuration can be used.
The Tally Connector is kept active.
After verification, Sync to Tally is selected.
The approved invoice information then reaches Tally according to the configured purchase-voucher workflow.
This example shows why convert PDF to Tally automatically should not mean skipping accounting checks. Automation handles repetitive extraction and transfer, while the user remains responsible for verifying the transaction.
How to Import Multiple PDF Invoices Faster
Processing several invoices does not mean the entire configuration needs to start from zero each time.
Where the same mapping and accounting setup apply, the existing configuration can be reused across subsequent invoices.
For businesses handling many supplier bills, this can significantly reduce repetitive setup and data entry.
Instead of:
Invoice 1 → Type Everything
Invoice 2 → Type Everything
Invoice 3 → Type Everything
the workflow becomes:
Upload → Extract → Review → Sync
and then repeats for the next invoice using the applicable existing configuration.
This makes a PDF to Tally software workflow particularly useful for regular invoice processing.
Common Problems to Check Before Importing a PDF Invoice
Even with automation, a few practical issues should be checked.
An incorrect party mapping can send the transaction to the wrong ledger. A wrong quantity or rate can change the taxable amount and invoice total. An incorrect GST value can affect tax treatment. A disconnected Tally Connector can prevent synchronization. Missing or incorrectly configured stock items and ledgers can also require attention before the transaction is completed.
Duplicate invoice numbers should also be reviewed carefully to avoid unintended duplicate accounting entries.
The objective is not just faster importing—it is faster importing with verification.
PDF Import vs Manual Invoice Entry in Tally Prime
With manual entry, the accountant reads the invoice and types most of the information again.
PDF → Read → Find Ledger → Type Fields → Add Items → Enter GST → Check → Save
With a structured PDF to Tally workflow:
PDF → Upload → Extract → Review → Sync
The major difference is where the accountant spends time.
Manual entry is typing-focused.
Automated invoice processing is review-focused.
That distinction becomes more valuable as invoice volume increases.
Checklist Before Clicking Sync to Tally
Before the final synchronization, quickly verify the important accounting information: correct transaction type, party ledger, invoice number, invoice date, GSTIN, stock items, HSN/SAC, quantity, rate, taxable amount, GST values, final invoice total, mapping, and Tally Connector status.
A short verification at this stage can prevent a correction from becoming necessary after the voucher reaches Tally.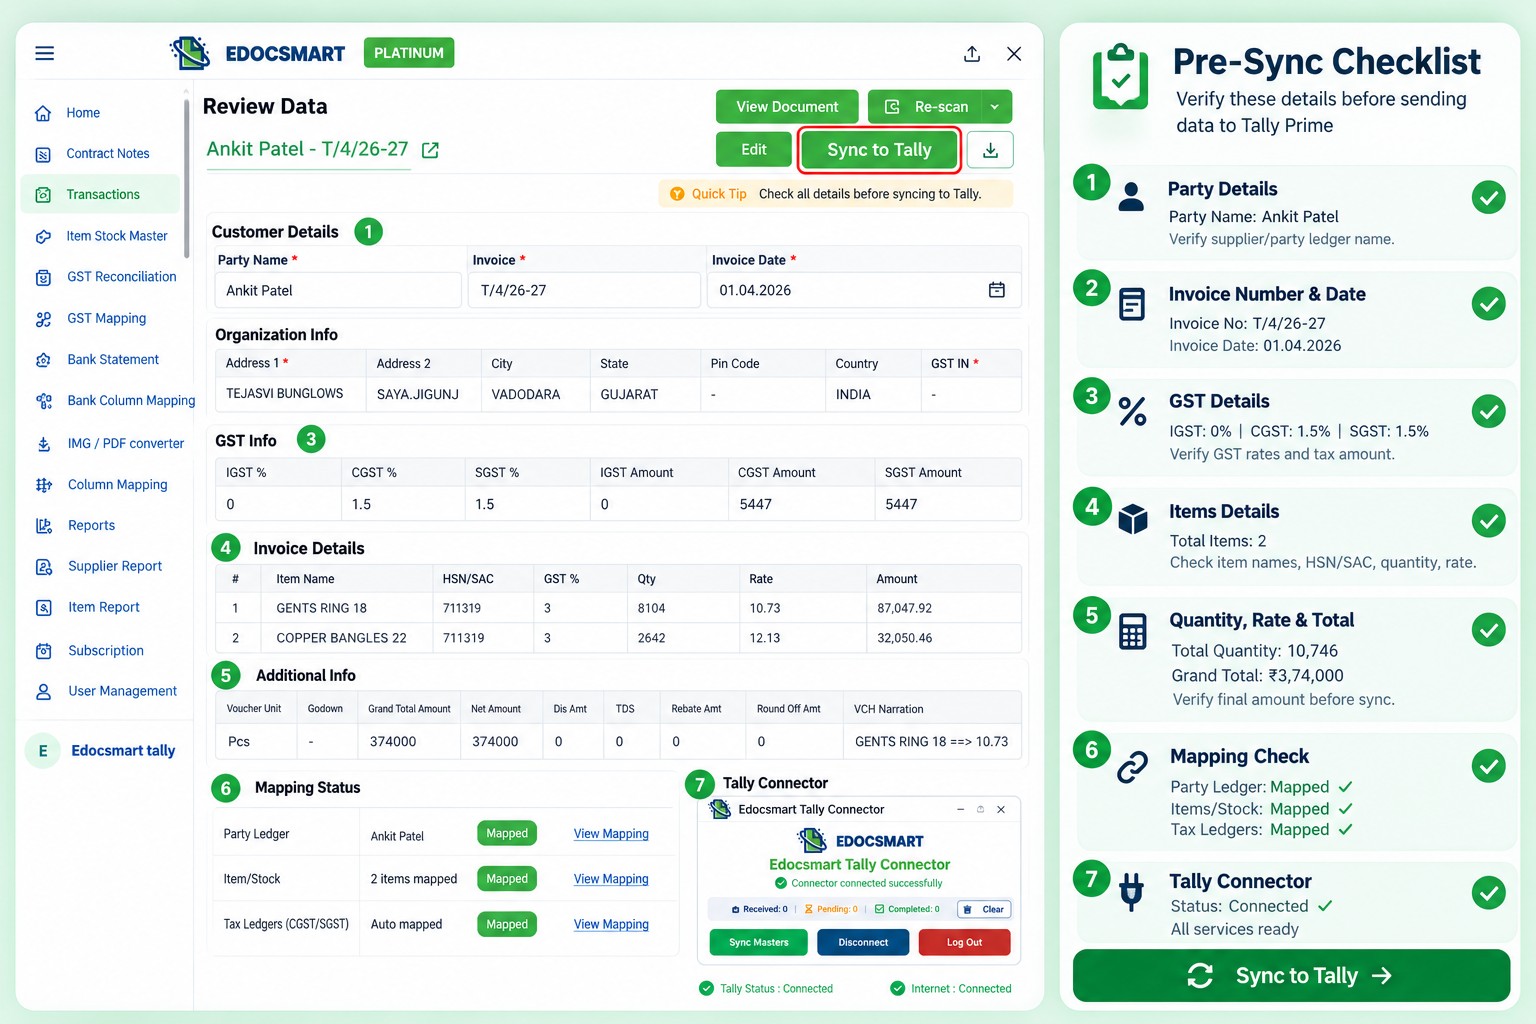
Why PDF Invoice Import Is Useful for Regular Accounting
The biggest benefit is not simply eliminating a few keystrokes.
A structured PDF purchase invoice to Tally or PDF sales invoice to Tally workflow changes how accounting teams handle source documents.
The original invoice remains the source.
AI handles extraction.
Mapping connects source values with accounting masters.
The accountant verifies the result.
The connector transfers the approved transaction.
This creates a workflow where automation supports the accountant rather than removing the verification step.
Frequently Asked Questions
How do I import a PDF invoice into Tally Prime?
Upload the invoice to EdocSmart under the appropriate Purchase or Sales transaction, allow the invoice information to be extracted, review the data, verify the required mapping, keep the Tally Connector running, and then use Sync to Tally.
How can I import a purchase invoice PDF into Tally Prime?
Open Transactions → Purchase in EdocSmart and upload the supplier invoice. After extraction, review the supplier, invoice, GST, item, quantity, rate, and total information before synchronizing the verified transaction with Tally.
How can I import a sales invoice PDF into Tally Prime?
Use the corresponding Sales workflow for a sales invoice. The document can then be processed, reviewed, mapped, and synchronized according to the configured sales setup.
How can I check PDF invoice data before importing it into Tally?
Use the Review Data screen to verify important information such as the party, invoice number, date, GSTIN, items, quantities, rates, taxes, and invoice total. Any required corrections should be made before synchronization.
How do I connect PDF invoice fields with Tally ledgers and stock items?
Mapping connects values from the invoice with the corresponding Tally masters. For example, a supplier can be mapped with a party ledger and a product can be mapped with the appropriate stock item.
How can I reuse mapping for future PDF invoices?
If the same source structure and Tally configuration continue to apply, the existing mapping can be reused rather than configured again for every invoice.
How do I send a reviewed PDF invoice to Tally Prime?
Keep the configured Tally Connector active and use the Sync to Tally option after the invoice has been reviewed and approved.
How can I import multiple PDF invoices without repeating the complete setup?
Where the same mapping and configuration apply, the existing setup can be reused for subsequent invoices. Each invoice should still be reviewed before synchronization.
How can I correct an incorrectly extracted invoice value?
Review the extracted fields before synchronization and edit any value that requires correction. The corrected information should then be verified before it is sent to Tally.
How can I avoid duplicate invoice entries while importing PDFs?
Review the invoice number and existing transaction information before synchronization. Duplicate invoice numbers should be checked carefully before another voucher is created.
Conclusion
Learning how to import PDF invoice in Tally Prime is not about turning a PDF file directly into a voucher without checking it.
A reliable workflow separates document processing from accounting verification:
PDF Invoice → Purchase or Sales → AI Extraction → Review → Mapping → Tally Connector → Sync to Tally Prime
With EdocSmart, information already available in a purchase or sales PDF can be extracted into structured fields instead of being manually typed again from the beginning.
The accountant can review the party, invoice, GST, item, quantity, rate, tax, and total information, correct anything that requires attention, and then synchronize the approved transaction through the configured Tally Connector.
For businesses processing PDF invoices regularly, this shifts the work from repetitive data entry toward verification—while keeping control over what finally reaches Tally Prime.