How to Import Sales Excel Data into Tally Prime
Learn how to import sales Excel data into Tally Prime automatically using Edocsmart. This step-by-step guide explains how to upload Excel sales invoices, map columns to Tally fields, review invoice-wise transactions, match stock items, connect the Edocsmart Tally Connector, and synchronize sales vouchers with Tally Prime.
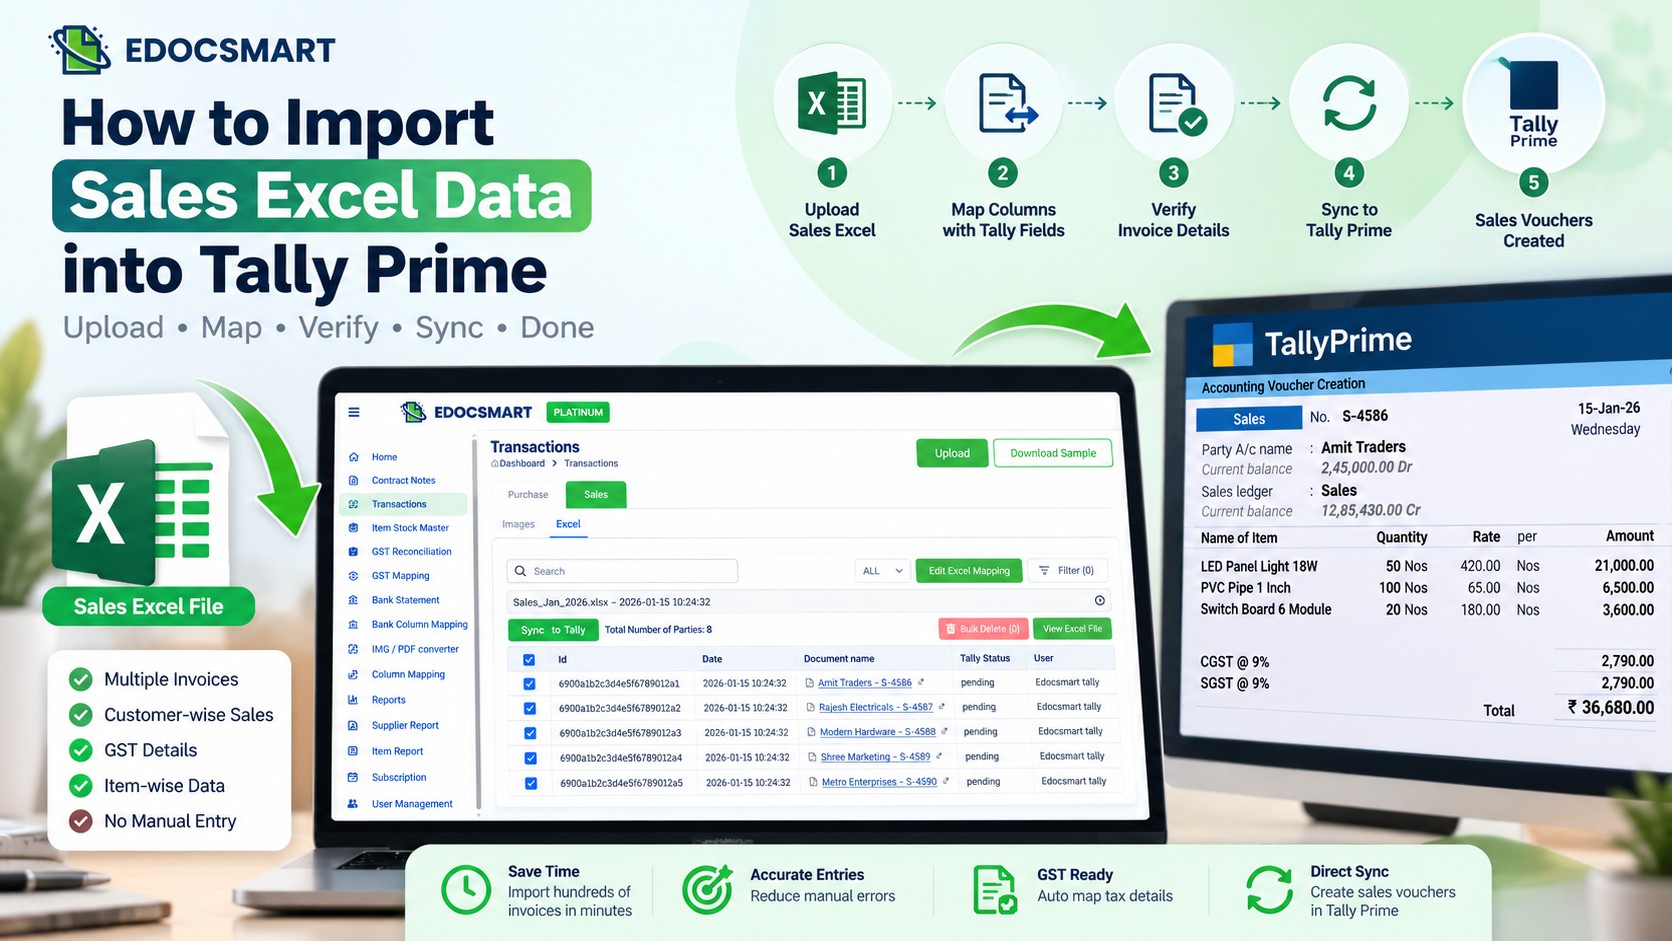
Imagine a business that processes hundreds of sales invoices every month. The sales team maintains transaction data in Excel, but the accounting team still has to enter each invoice manually into Tally Prime. Every customer name, invoice number, stock item, quantity, tax amount, and ledger needs to be checked before saving the voucher.
As transaction volumes increase, this process becomes time-consuming. Even a small data-entry mistake can result in incorrect sales reports, mismatched tax calculations, or additional reconciliation work.
What if you could convert your sales Excel data into Tally Prime vouchers without manually entering every transaction?
With eDocs Smart, businesses can upload sales Excel files, map their spreadsheet headers to accounting fields, review invoice-wise documents, and sync verified entries to Tally Prime through the eDocs Smart Tally Connector.
In this guide, we will explain how to import sales Excel data into Tally Prime, configure the required mappings, handle stock item differences, and sync up to 100 entries in a single batch.
Why Import Sales Excel Data into Tally Prime?
Excel is widely used to maintain sales registers, billing data, customer transactions, and item-wise sales details. However, manually transferring this information into accounting software can create operational challenges.
Common problems include:
- Repetitive data entry: Entering every sales invoice separately consumes valuable time.
- Incorrect invoice details: Mistakes in invoice numbers, dates, quantities, or amounts can affect accounting records.
- Stock item mismatches: The item name in an Excel file may differ from the stock item name configured in Tally Prime.
- Inconsistent accounting settings: Different transactions may require different ledgers, tax treatments, or voucher configurations.
- Difficult verification: Reviewing every manually entered voucher becomes increasingly challenging as transaction volumes grow.
Automating the Excel-to-Tally workflow helps reduce repetitive work and makes the import process more structured.
Businesses looking to simplify this process can explore Excel to Tally automation, which supports an upload, mapping, verification, and synchronization workflow.
What Do You Need Before Importing Sales Data?
Before starting, make sure you have the following:
- A sales Excel file containing the required transaction information.
- Access to your eDocs Smart account.
- Tally Prime installed and configured with the relevant company data.
- The eDocs Smart Tally Connector downloaded and configured on the system that can connect to Tally Prime.
- The required customer ledgers, stock items, sales ledgers, tax ledgers, and other accounting masters configured in Tally Prime, wherever applicable.
Your Excel structure can vary depending on your business requirements. Common columns include invoice number, invoice date, customer name, stock item, quantity, rate, taxable amount, GST details, and total invoice value.
The exact fields required depend on your voucher configuration and accounting workflow.
Step 1: Open the Sales Section in EdocsSmart
Start by logging in to your eDocs Smart account.
Navigate to the Transactions section and select Sales. Within the Sales section, click the Excel option to begin importing your sales spreadsheet.
This takes you to the Excel-based sales transaction workflow.
The objective is to process your spreadsheet through a defined sequence rather than manually recreate every transaction in Tally Prime.
Recommended internal link: Learn more about the complete Excel to Tally workflow
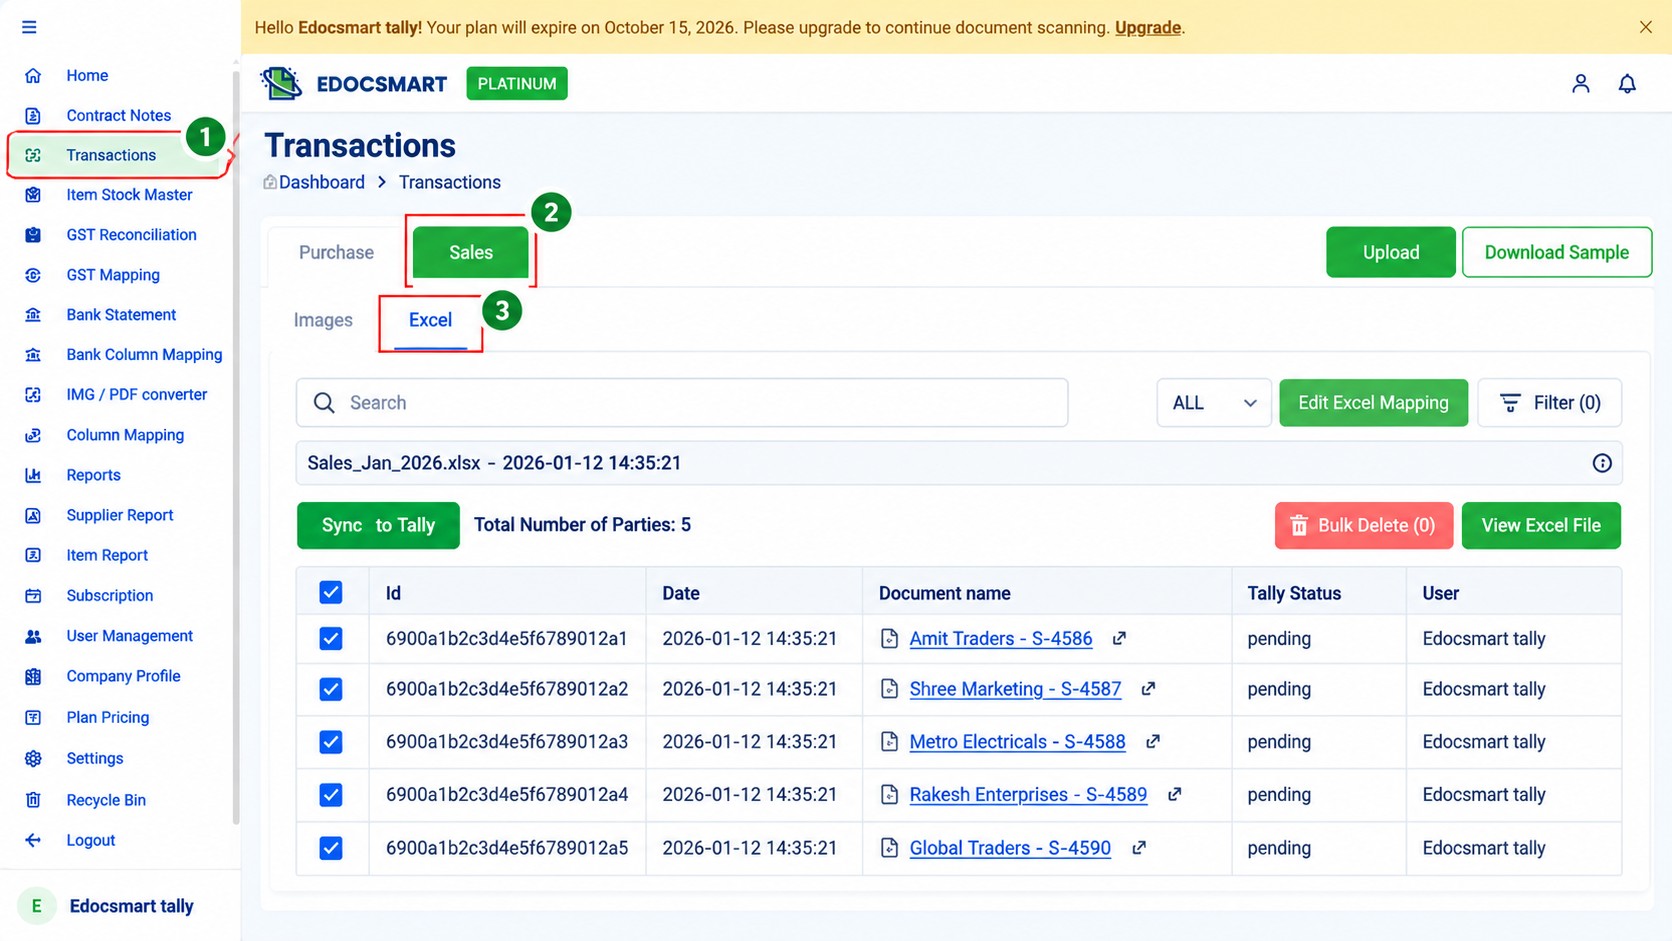
Step 2: Upload Your Sales Excel File
Once you open the Excel import option, upload your sales Excel file and proceed to the next step.
For a first-time user, eDocs Smart redirects the workflow to the mapping window after the file is uploaded and the user clicks Next.
This is an important stage because every business may maintain its sales data differently.
For example, one spreadsheet may use the column name Customer Name, while another may use Party Name. Similarly, invoice numbers, product descriptions, quantities, and taxable values may have different header names across businesses.
Instead of requiring every business to redesign its existing spreadsheet, the mapping window lets you associate the Excel columns with the corresponding eDocs Smart fields.
Step 3: Map Excel Headers to eDocs Smart Fields
Header mapping establishes the relationship between the columns in your Excel file and the fields required for processing sales transactions.
Suppose your Excel spreadsheet contains these headers:
|
Excel header |
Corresponding field |
|
Bill No. |
Invoice Number |
|
Bill Date |
Invoice Date |
|
Party Name |
Customer / Ledger |
|
Product Description |
Stock Item |
|
Qty |
Quantity |
|
Unit Price |
Rate |
|
Taxable Value |
Taxable Amount |
|
GST Amount |
Tax Amount |
|
Net Total |
Invoice Total |
These are illustrative examples. Select the actual corresponding fields available in your eDocs Smart mapping window.
During this stage, review the available customization options and configure them according to your accounting practices. Depending on the supported settings and your workflow, these may relate to transaction fields, ledger selection, inventory handling, tax treatment, or other voucher details.
Why is mapping important?
Correct mapping helps eDocs Smart interpret your spreadsheet consistently. If a column is mapped to the wrong field, the resulting document may contain incorrect information even when the original Excel file is accurate.
Take time to review the mappings before processing the file.
If your business requires a specialized accounting flow, such as additional fields for a purchase or sales process, you can contact the eDocs Smart team to discuss the customization requirements and establish a suitable workflow.
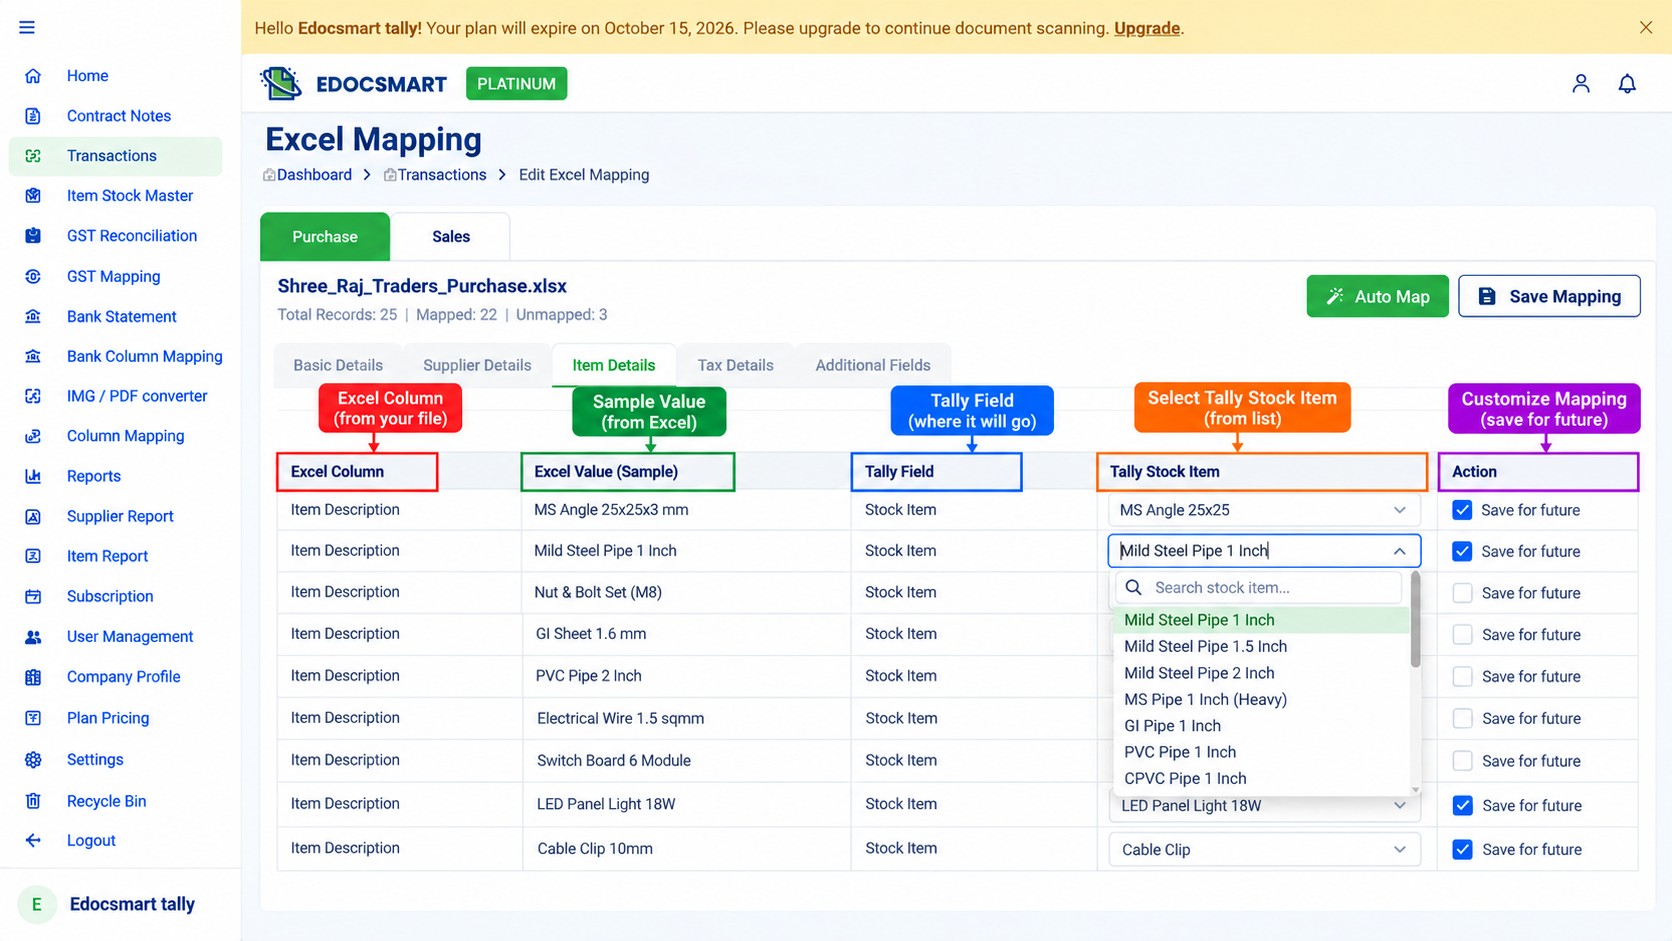
Step 4: Create Separate Documents for Individual Invoices
After completing the required configuration, continue processing the uploaded Excel file.
Edocsmart uses invoice numbers to separate the sales transactions into individual documents. This makes it easier to work with invoice-level records rather than treating the entire spreadsheet as one large transaction.
For example, suppose your Excel file contains:
|
Invoice Number |
Customer |
Total |
|
INV-101 |
Customer A |
₹12,000 |
|
INV-102 |
Customer B |
₹18,500 |
|
INV-103 |
Customer C |
₹9,750 |
The workflow creates separate documents for INV-101, INV-102, and INV-103.
Each document can then be reviewed individually before synchronization.
This separation is especially useful when one Excel file contains multiple sales invoices. It allows the accounting team to identify a particular transaction, inspect its details, and verify whether it has been processed according to the configured settings.
Make sure the invoice numbers in your source file are consistent. Correct invoice identification is essential for reliable transaction separation.
Step 5: Verify the Generated Sales Documents
Before sending transactions to Tally Prime, review the documents generated by eDocs Smart.
This verification step allows you to confirm whether the uploaded Excel data has been interpreted according to your mapping and accounting configuration.
Check the following details:
- Invoice number and invoice date.
- Customer name and corresponding ledger.
- Stock item names and quantities.
- Item rates and applicable amounts.
- Tax details and ledger treatment.
- Discounts, round-off values, and invoice totals, where applicable.
- Any additional fields required by your configured workflow.
For example, if the original Excel file contains a quantity of 10 but the generated document shows 1,000, the discrepancy should be investigated before synchronization.
Similarly, if a customer name or sales ledger is incorrect, correct the relevant mapping or configuration before proceeding.
The goal is to verify first and synchronize second. This creates an opportunity to identify data or configuration issues before the entries reach Tally Prime.
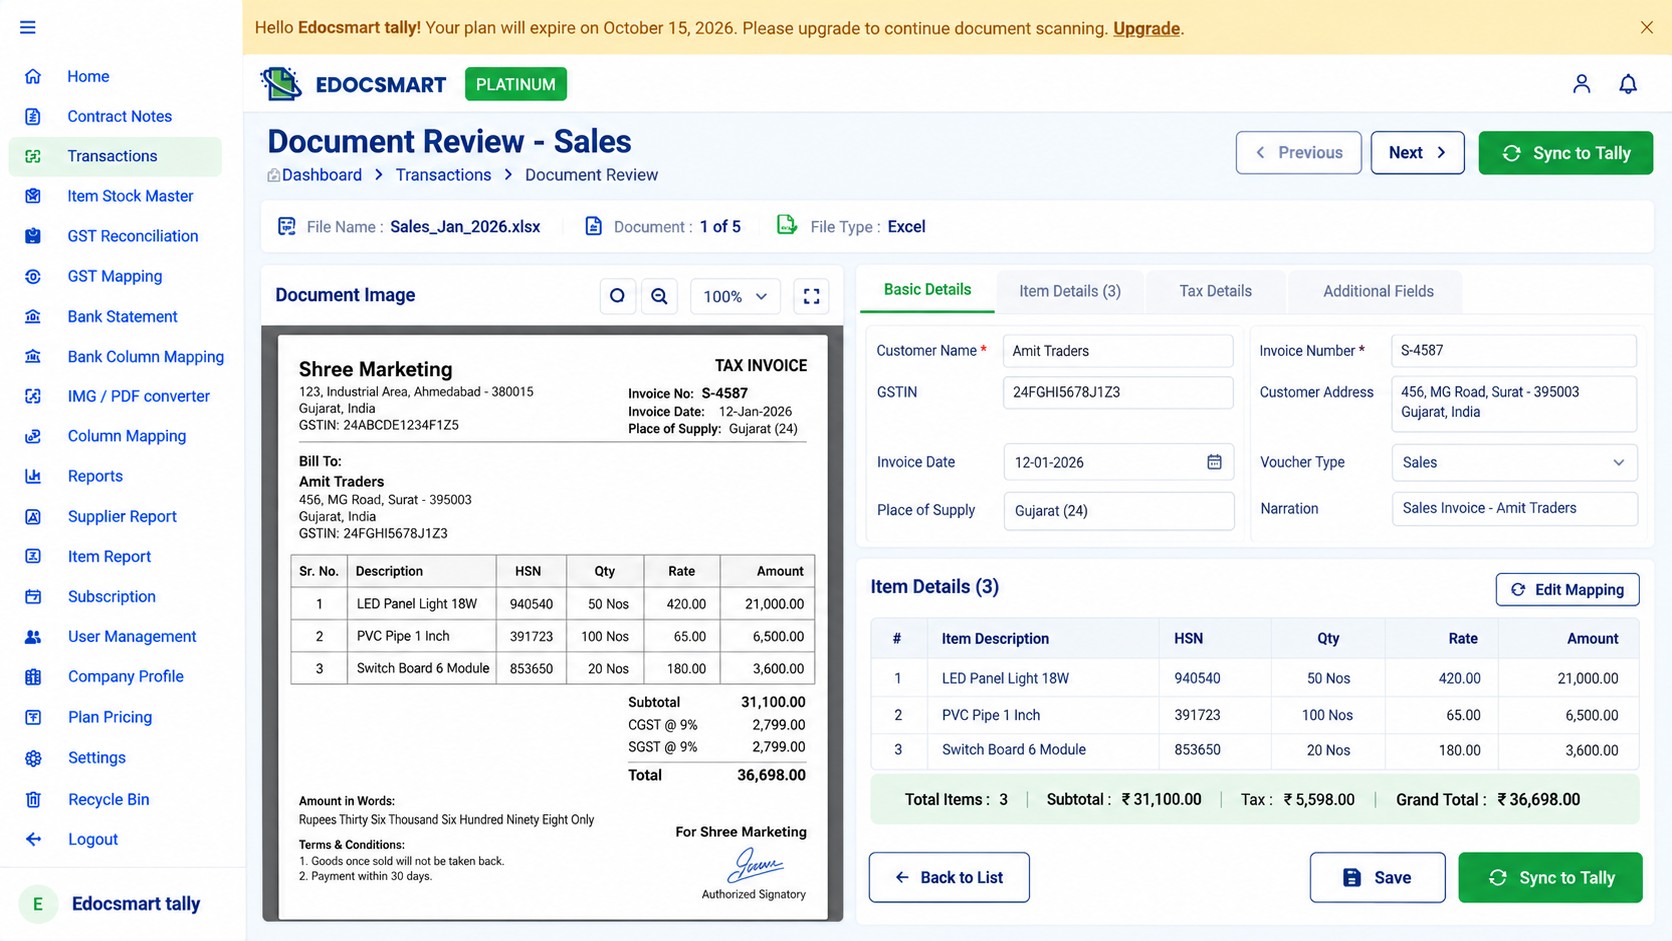
Step 6: Handle Stock Item Name Differences with Mapping
Stock item mapping is particularly important for businesses that maintain inventory in Tally Prime.
Consider this scenario: your Excel invoice contains the item name Premium Cotton Shirt, but the corresponding stock item in Tally Prime is configured as Cotton Shirt - Premium.
Although both names refer to the same product, the names do not match exactly.
If the transaction is processed without resolving the difference, the stock item may not be associated with the intended inventory master.
eDocs Smart provides a stock item selection dropdown for the relevant mapping workflow. You can select the appropriate stock item from the available list and establish the intended association.
For example:
|
Excel item name |
Tally Prime stock item |
|
Premium Cotton Shirt |
Cotton Shirt - Premium |
|
Office Chair Black |
Office Chair - Black |
|
Wireless Mouse |
Mouse Wireless |
Once the mapping is configured and retained by the workflow, the same association can be reused for subsequent transactions where applicable.
This reduces repetitive mapping work when the same Excel item names appear in future invoices.
However, always verify that the selected item is correct. Similar product names may refer to different sizes, units, models, or stock categories.
Step 7: Download and Configure the Edocsmart Tally Connector
After reviewing your documents, the next step is to prepare the connection with Tally Prime.
eDocs Smart uses its Tally Connector to facilitate synchronization between the web application and the local Tally environment.
Follow this process:
- Download the eDocs Smart Tally Connector.
- Install or launch the connector according to the provided setup instructions.
- Log in to the connector using the same credentials associated with your eDocs Smart account.
- Ensure that Tally Prime is running and the intended company is open.
- Verify that the connector can communicate with the Tally environment.
The connector acts as the bridge between the online transaction workflow and the accounting application running on your system.
Before syncing, confirm that you are connected to the correct Tally company. Sending transactions to the wrong company can create avoidable accounting discrepancies.
Step 8: Sync Tally Masters Before Importing Transactions
The eDocs Smart Tally Connector includes a Sync Master option.
Using this option, you can synchronize supported basic masters from Tally Prime with eDocs Smart. These may include relevant customer ledgers, stock items, and other accounting masters supported by the integration.
Why is this useful?
Suppose your sales invoice refers to a customer ledger that already exists in Tally Prime. Synchronizing the relevant masters helps make the available accounting information consistent with the mapping workflow.
It is particularly useful when handling stock item differences, because you can select the intended Tally stock item from the available list rather than relying only on the name in the spreadsheet.
A practical workflow is to synchronize the relevant masters, complete the required mappings, and verify the sales documents before starting the transaction sync.
Keep in mind that master synchronization and transaction synchronization serve different purposes. Sync Master updates supported master information; it does not replace the process of syncing your sales vouchers.
Step 9: Sync Up to 100 Sales Entries to Tally Prime
Once your documents have been verified and the connector is ready, you can use the Sync to Tally button in eDocs Smart.
The workflow supports synchronizing up to 100 entries in a single batch, subject to the applicable workflow and configuration limits.
The process is straightforward:
- Select the verified sales documents you want to synchronize.
- Click Sync to Tally.
- Allow the Tally Connector to process the synchronization requests.
- Monitor the connector logs as the transactions are processed.
- Verify the resulting sales vouchers in Tally Prime.
As synchronization begins, the connector logs start recording the processing activity. These logs help you observe what is happening during the sync and investigate any reported errors.
At the same time, sales vouchers begin appearing in Tally Prime as the transactions are successfully processed.
After synchronization, review the relevant vouchers in Tally Prime and confirm that invoice details, customer ledgers, stock items, taxes, and totals are correct.
Remember that selecting 100 entries for a batch does not automatically guarantee that every entry will be successful. Connection problems, missing masters, invalid configurations, or other accounting errors can affect individual transactions. Review the connector logs and verify the final accounting records.
Image placement: Use an authentic connector screenshot showing the Sync to Tally action or processing logs, followed by a Tally Prime screenshot displaying the resulting sales vouchers. Hide credentials and confidential business information.
Best Practices for Importing Sales Excel Data
To make the Excel-to-Tally workflow more reliable, follow these recommendations:
Maintain consistent invoice numbers. Use a clear invoice numbering structure so transactions can be identified and separated correctly.
Review header mapping carefully. Ensure every important Excel column is associated with the intended field.
Verify stock items and ledgers. Similar names do not necessarily indicate identical accounting masters.
Check totals before synchronization. Compare the generated documents with the source invoices, including applicable taxes and adjustments.
Synchronize the correct company. Confirm that Tally Prime is connected to the intended company before importing entries.
Review connector logs. Investigate failed or incomplete transactions instead of assuming that the entire batch succeeded.
Test your configuration first. When introducing a new spreadsheet format or accounting workflow, validate a small set of transactions before processing a larger batch.
These
practices help maintain more consistent accounting records and reduce avoidable
rework.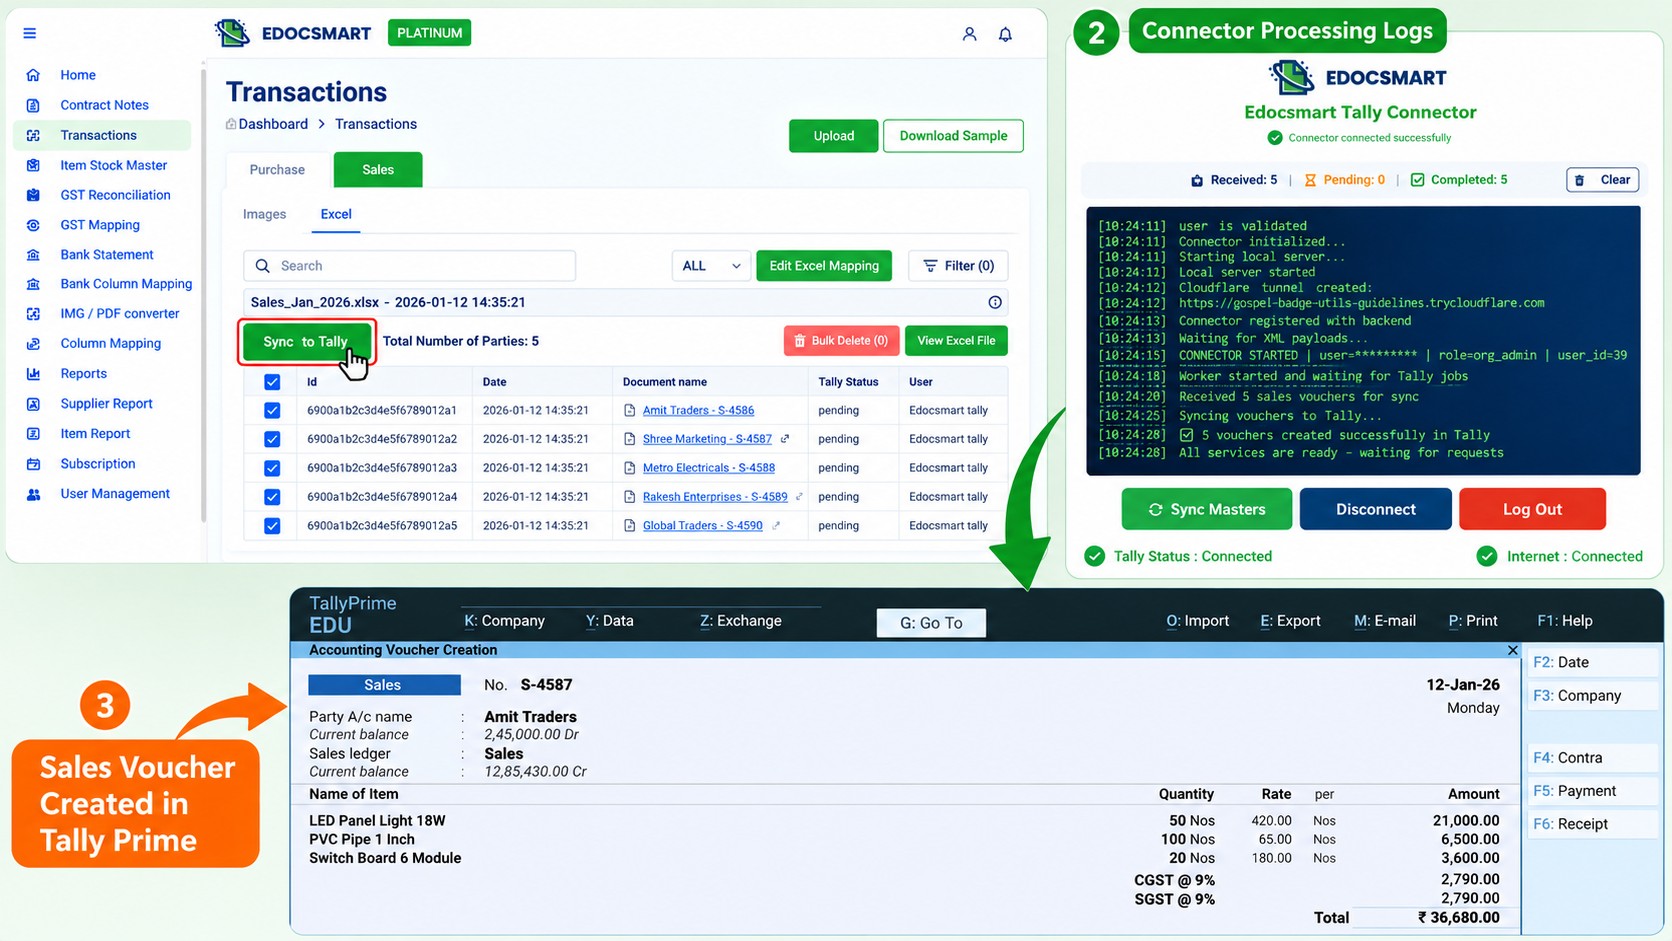
Frequently Asked Questions (FAQs)
1. How to import sales Excel data into Tally Prime automatically?
To import sales Excel data into Tally Prime, upload your Excel file to Edocsmart, map the columns to the correct accounting fields, and review the generated sales documents. Then connect Tally Prime using the Edocsmart Tally Connector, select the required transactions, and sync them to Tally.
2. How to map Excel columns with Tally Prime fields?
Upload your sales Excel file and open the column mapping option in Edocsmart. Match Excel headers such as Invoice Number, Customer Name, Invoice Date, Item Name, Quantity, Rate, and GST with the corresponding fields. Review the mapping before processing the file to avoid incorrect voucher entries.
3. How to import multiple sales invoices from Excel into Tally Prime?
You can upload an Excel file containing multiple sales transactions to Edocsmart. The software processes the records into invoice-wise documents for review. After checking customer details, item information, and tax values, you can select the required documents and synchronize them with Tally Prime.
4. What is the role of the Tally Connector in Excel-to-Tally automation?
The Edocsmart Tally Connector establishes a connection between Edocsmart and Tally. It helps transfer prepared accounting transactions into Tally and supports synchronization of applicable masters. The connector must be running and connected to the correct Tally company before synchronization.
5. How to match Excel item names with existing Tally stock items?
Use the stock item mapping option to match imported Excel item descriptions with the appropriate stock items available in Tally. For example, an Excel description such as “LED Light 18W” can be mapped to its corresponding Tally stock item. Review the selection carefully to prevent incorrect inventory entries.
6. How to verify sales vouchers after importing Excel data into Tally Prime?
Open the imported sales vouchers in Tally Prime and compare them with the original Excel records. Check invoice numbers, dates, customer ledgers, stock items, quantities, rates, GST calculations, and final amounts. Also confirm that the vouchers were created in the correct company and accounting period.
7. What are the common reasons for Excel-to-Tally sales import errors?
Common reasons include incorrect column mapping, missing customer ledgers, unmatched stock items, invalid invoice dates, incorrect GST details, and differences in voucher totals. Connection problems between Edocsmart and Tally can also interrupt synchronization. Reviewing the source data, mappings, and connector status helps identify these issues.
Conclusion: Simplify Sales Excel Import into Tally Prime with eDocs Smart
Importing sales Excel data into Tally Prime does not have to involve manually recreating every invoice.
With eDocs Smart, you can upload your sales spreadsheet, map Excel headers to the required fields, create separate invoice-wise documents, review the generated records, map stock items, and synchronize up to 100 entries in a single batch through the Tally Connector.
The combination of configurable mappings, document-level verification, master synchronization, and connector logs provides a structured approach to moving sales data into your accounting system.
If your team regularly manages sales transactions in Excel, explore Excel to Tally to understand how the workflow can fit into your accounting process.
Ready to simplify your sales accounting workflow? Visit Edocsmart and explore the Excel-to-Tally solution for your business.
For specialized accounting requirements, contact the eDocs Smart team to discuss a customized workflow aligned with your transaction structure and accounting practices.