How to Import Sales Excel into Tally
Import sales Excel data into Tally by mapping customer, invoice, item, quantity, rate, GST, and amount details, then reviewing and syncing verified sales entries through Edocsmart.
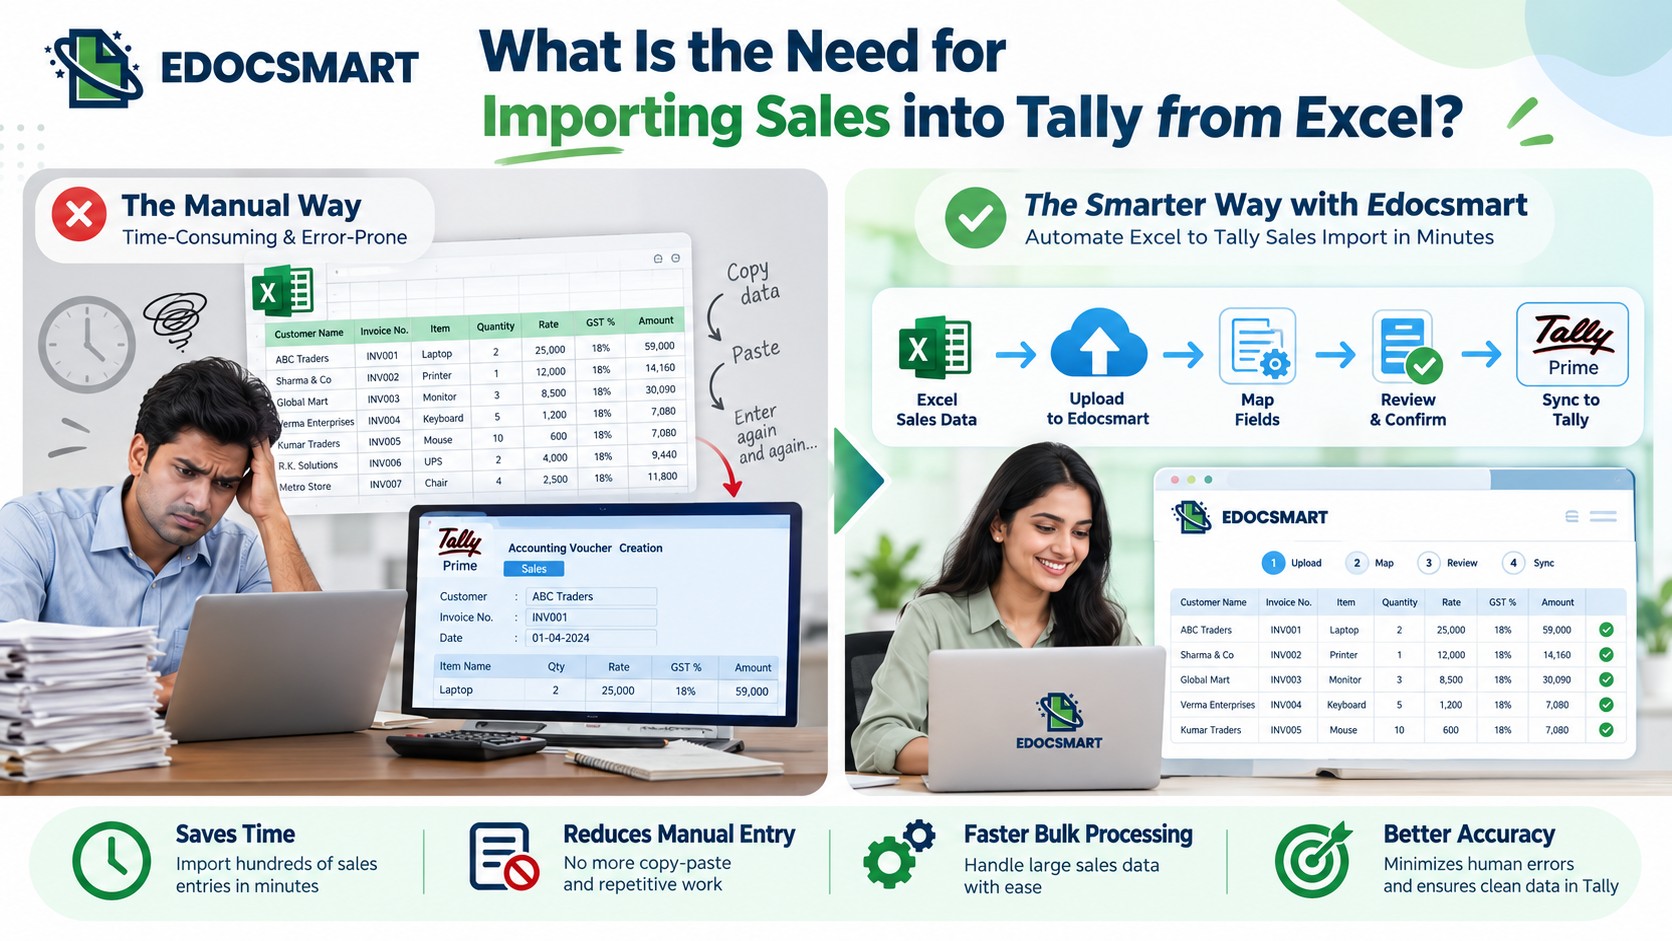
Steps for Importing Sales Excel into Tally
When a business deals with a huge number of invoices daily, managing them can become challenging. Many businesses already have their sales data in Excel, such as invoice numbers, customer information, GST data, product data, taxable values, and final amounts. If the same data is entered manually into Tally again, it can be time-consuming and lead to repetitive accounting work.
To import sales Excel data into Tally, businesses can use their existing spreadsheet data more efficiently. The sales voucher data can be prepared in the Excel file, checked, mapped to the required fields, and then processed for Tally instead of creating one sales voucher at a time. This Excel to Tally Import process makes it easier to work with existing sales data.
It can be helpful for accountants, retailers, wholesalers, distributors, manufacturers, or companies that frequently manage bulk sales transactions.
What Is the Need for Importing Sales into Tally from Excel?
Because it can be easily organized and updated, Excel is widely used to maintain sales records. However, businesses also require the same transactions within Tally for accounting and reporting.
If hundreds of sales records are already entered into Excel, it is not necessary to enter each invoice manually. Some businesses may find value in processing multiple transactions in a structured manner using an Excel-to-Tally workflow.
Users can use their current sales data in Excel, map the required columns, view the data, and send it to Tally via Edocsmart. This approach avoids rebuilding the same records manually and supports Excel import to Tally through a review-based process.
Data That Can Be Imported into Sales
Depending on the business and accounting requirements, a sales Excel file can contain various types of data. Common fields include:
Invoice number
Invoice date
Name of the customer or party
GSTIN
Sales ledger
Product or service name
Quantity
Rate
Taxable amount
CGST, SGST, or IGST
Discount
Final invoice amount
These fields should be organized correctly to make the import process easier and ensure consistency between the data in the Excel file and the data in Tally.
How To Import Sales Excel into Tally, Workflow
Typically, the first step is to prepare the Excel file, and then the necessary sales data is transferred through a carefully managed workflow.
Step 1: Sign In to Edocsmart
The Excel to Tally process starts by signing in to the Edocsmart platform. For users comparing Excel to Tally software, the workflow begins with the existing sales file rather than a fixed template.
Once the user logs in, they can access the Excel-to-Tally workflow from the dashboard.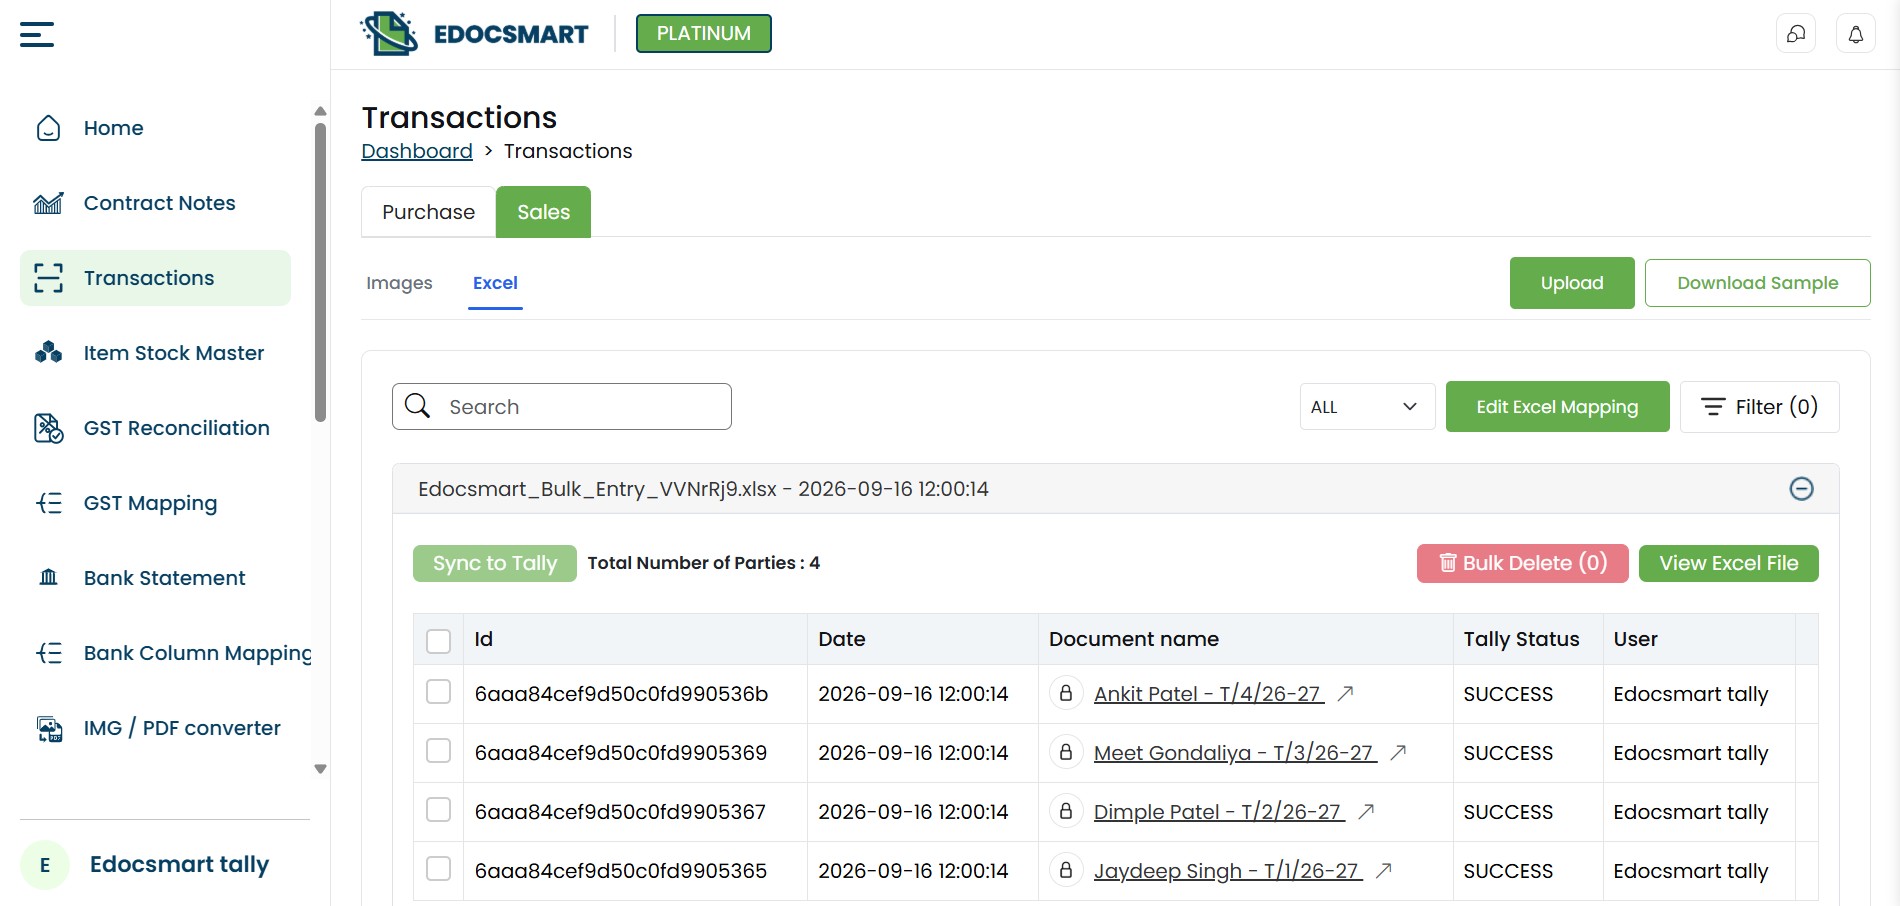
Step 2: Upload the Sales File
The next step is uploading the Excel file to Edocsmart. This Bulk Excel Upload to Tally process allows businesses to work with the Excel structure they already use. It also supports bulk Excel import to Tally when several sales files need to be handled together.
One of the major advantages of the workflow is that the client does not have to maintain one rigid Excel structure.
Different businesses may use Excel sheets with different headers.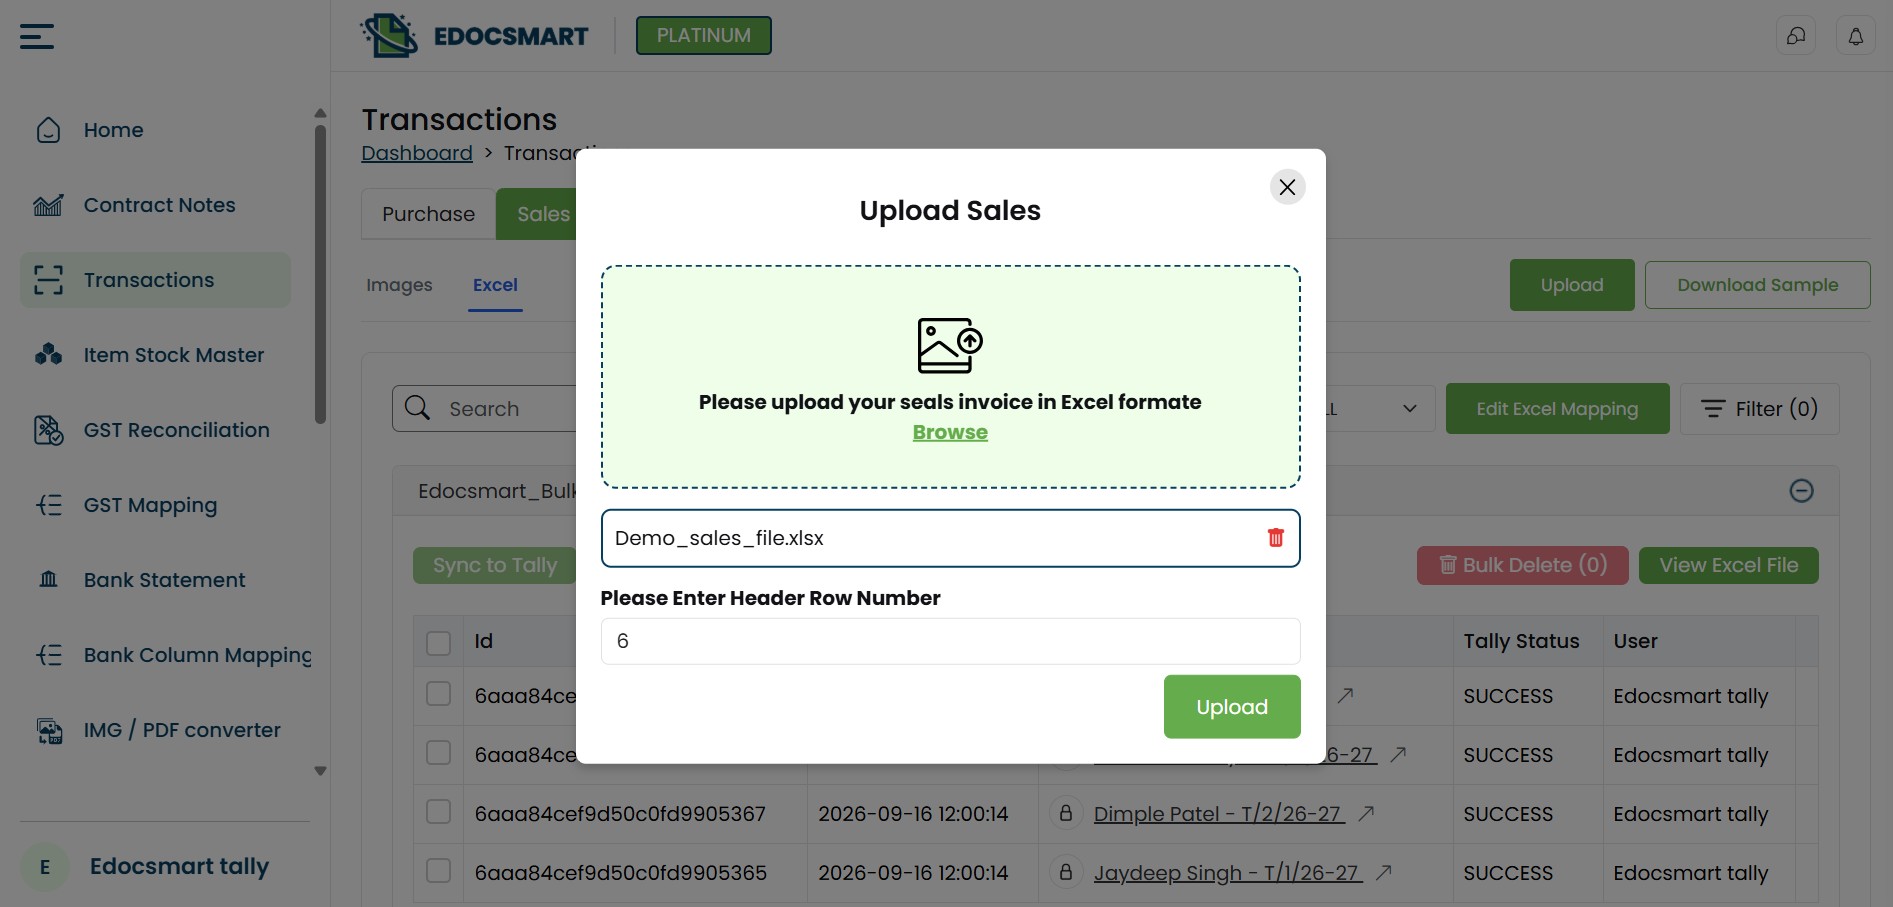 Another business may use completely different names for the same information.
Therefore, Edocsmart uses a mapping process instead of forcing every client to redesign their existing Excel files.
Step 3: Map Excel Headers with Edocsmart Headers
After the Excel file is uploaded, the user moves to the mapping stage.
Edocsmart maintains a predefined set of standard or default fields required for accounting and Tally voucher creation.
The headers available inside the uploaded Excel file are mapped with the corresponding Edocsmart fields.
The user only needs to tell the system which Excel column represents which Edocsmart field.
This mapping layer is important because different clients can maintain completely different Excel formats while Edocsmart converts the information into one standardized internal structure. In this way, the mapping stage acts like an Excel to Tally converter for different spreadsheet layouts.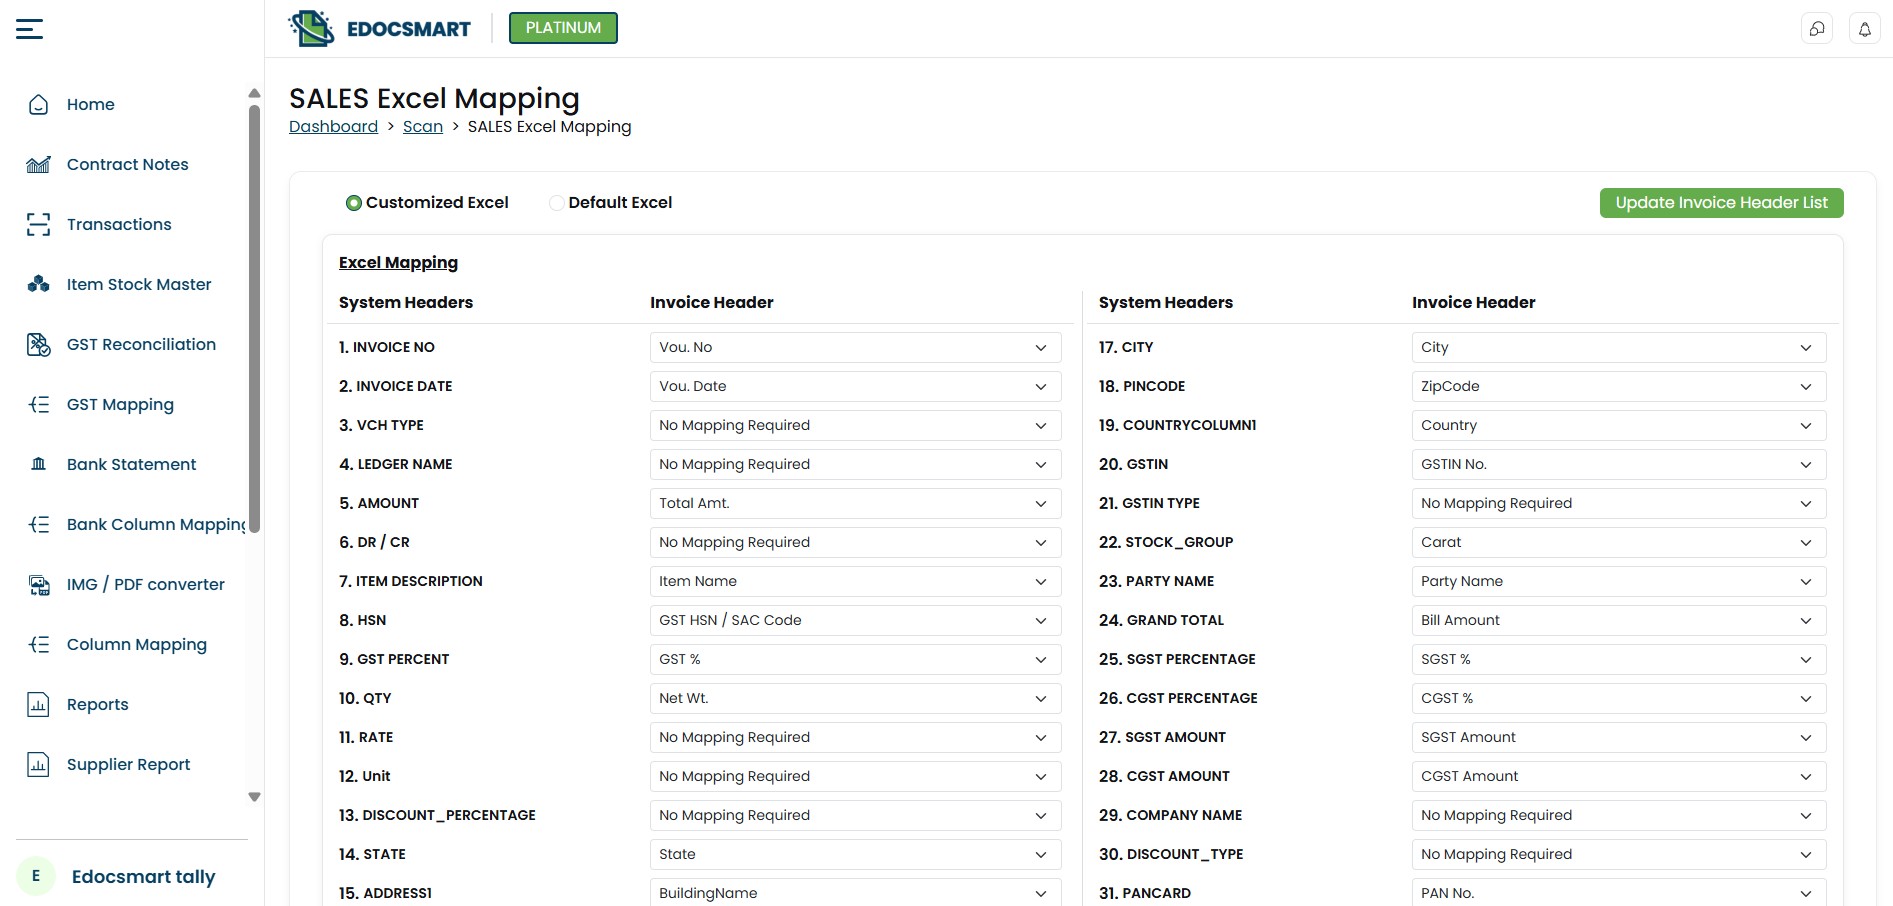 Once all required columns are mapped correctly, the mapping process is completed.
Step 4: Edocsmart Creates Individual Voucher Documents
After mapping is completed, Edocsmart starts processing the Excel data.
Suppose an uploaded Excel file contains 500 voucher records.
Excel Voucher Import Tally: Instead of treating the entire Excel sheet as one document, Edocsmart creates separate documents for the individual vouchers available in the file. This is a useful part of the Excel to Tally import workflow when one spreadsheet contains many voucher records.
Depending on the uploaded data, these documents may represent different transaction types, such as:
Purchase vouchers
Sales vouchers
Accounting vouchers
Inventory-related transactions
Ledger-related transactions
Creating separate documents makes the information easier to review, manage, verify, and eventually sync with Tally.
Step 5: Verify the Generated Documents
Once all voucher documents are generated, the user can review the information before sending it to Tally.
Because the information is being taken directly from the mapped Excel columns, there is no need to manually retype every transaction.
This significantly reduces the possibility of manual data-entry errors.
However, verification remains an important step.
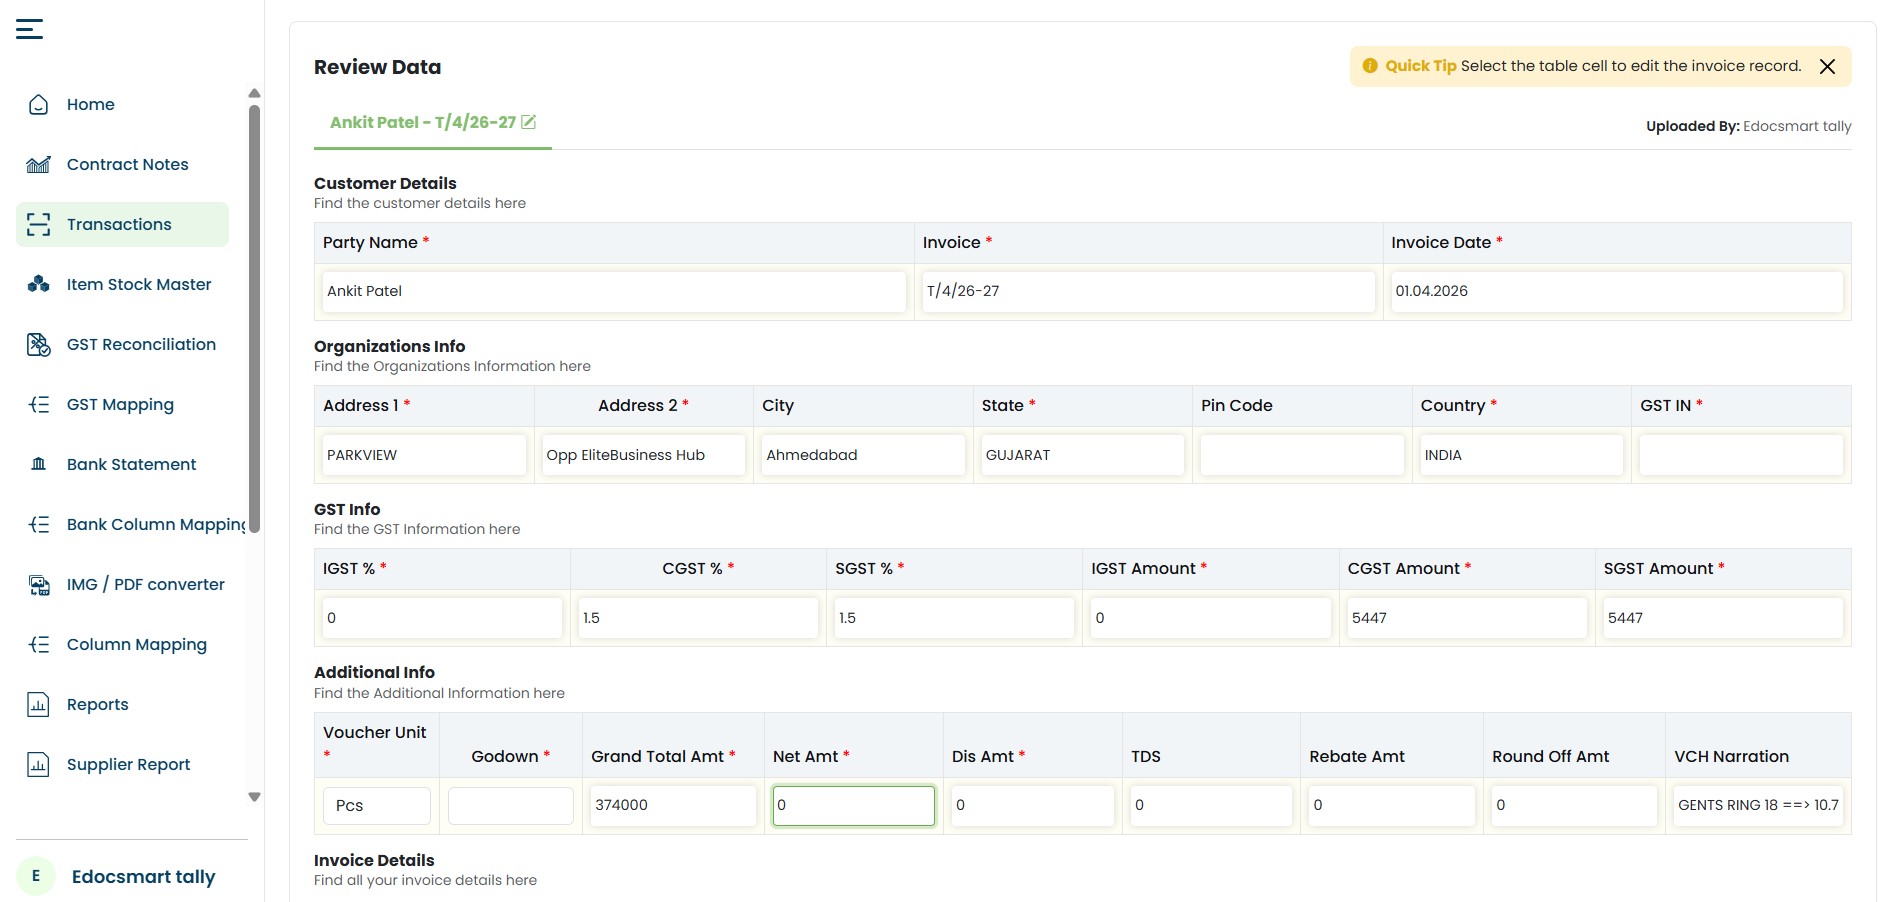
Once the user confirms that the generated documents contain the expected information, the data is ready to be transferred into Tally. The verified records can then move through a Tally Excel import software style workflow without manual re-entry.
Step 6: Click “Sync to Tally”
After verification, Edocsmart provides a Sync to Tally option.
This is where the actual transfer from the cloud-based Edocsmart platform to the user's locally running Tally system begins.
The user simply clicks:
Instead of manually creating every voucher inside Tally, Edocsmart prepares the required accounting information and sends it through its connector.
But there is an important component working between Edocsmart and Tally.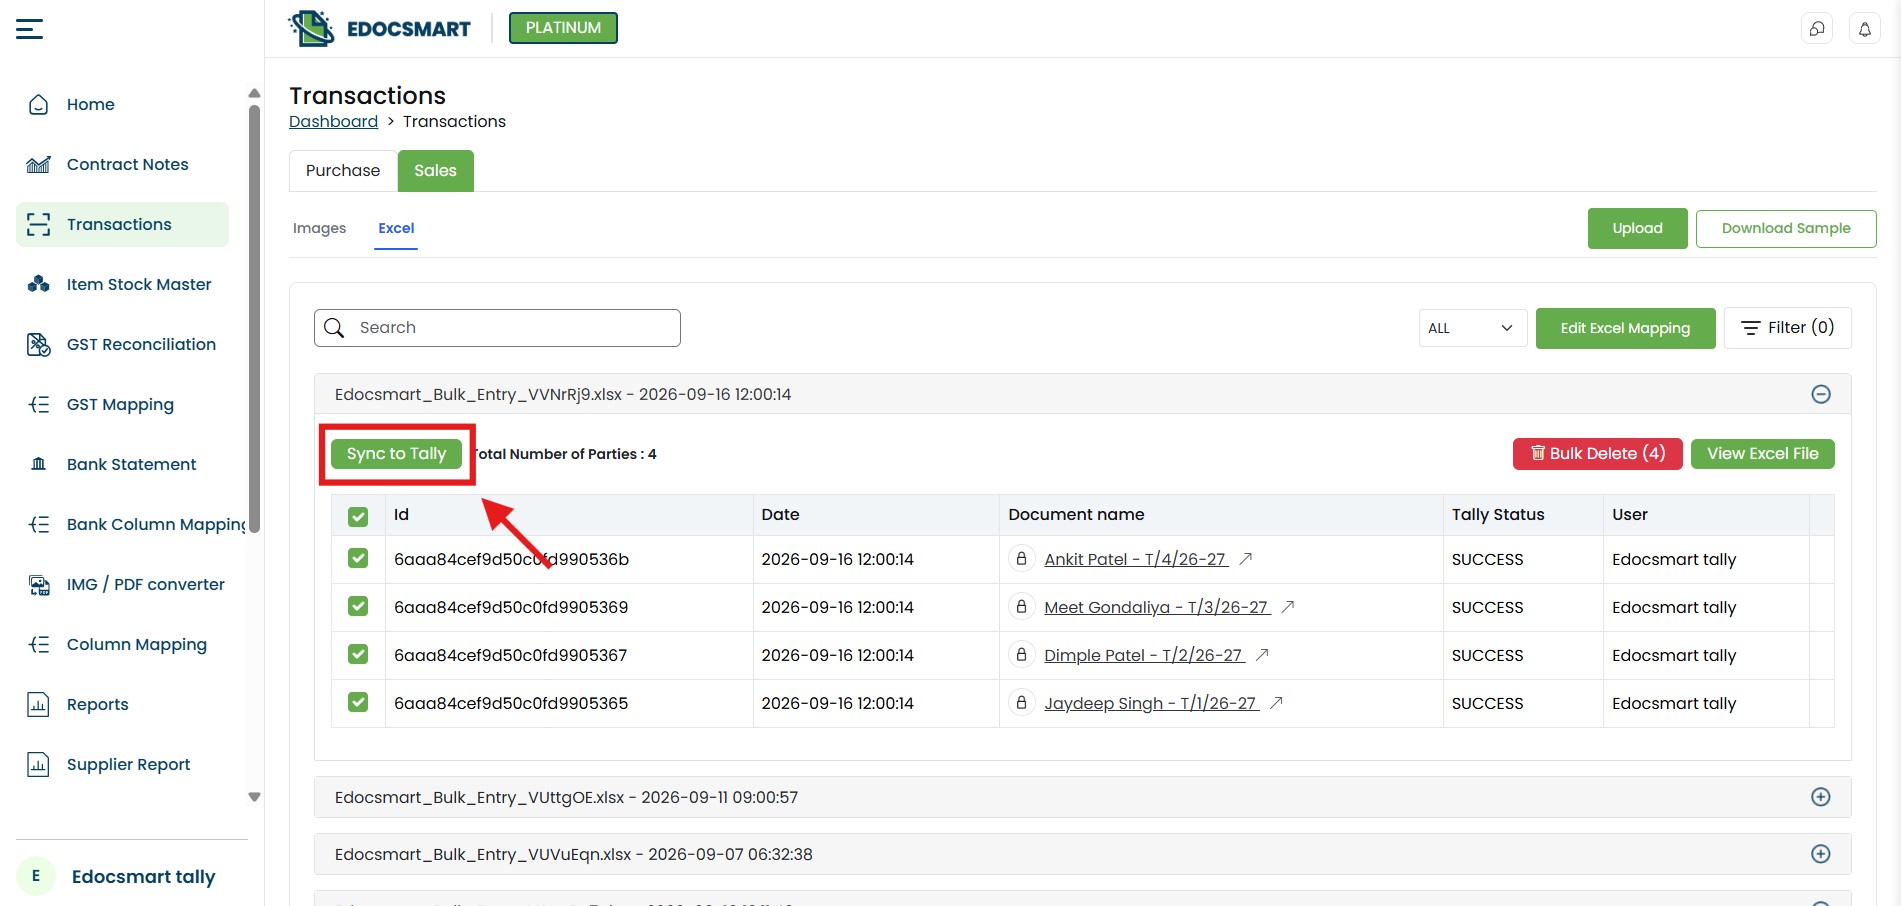 That component is the Edocsmart Connector.
Step 7: Edocsmart Connector Connects the Website with Local Tally
Tally generally runs locally on the user's computer or within the organization's environment.
Edocsmart, on the other hand, is accessed through the web.
Therefore, a secure communication layer is required between the Edocsmart platform and the locally running Tally application.
The Edocsmart Connector performs this role.
The workflow becomes:
When the user clicks the Sync to Tally button, the required requests are passed to the connector.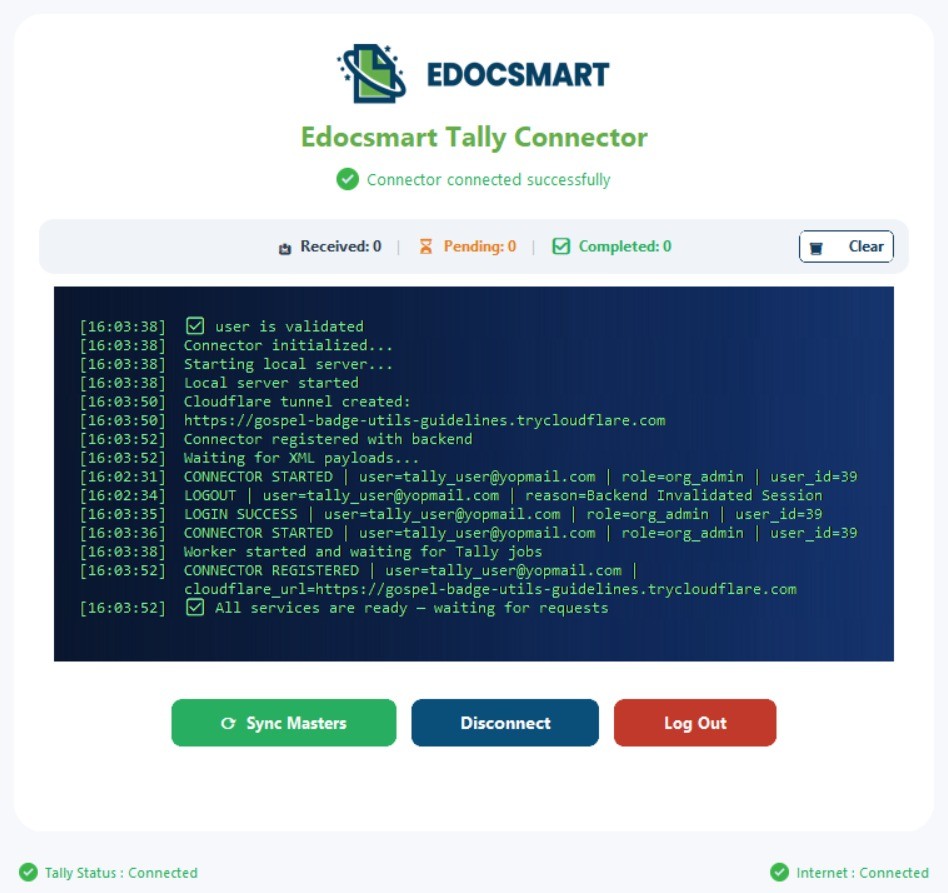 The connector then communicates with the locally available Tally system and transfers the required accounting data.
In simple terms, the connector acts as a bridge between Edocsmart and Tally.
Without requiring the user to manually export, copy, and recreate every transaction, the connector handles communication between both systems.
Step 8: Vouchers Are Automatically Created in Tally
Once the connector receives the information from Edocsmart, it sends the data to Tally.
Tally then receives the relevant transaction information and creates the required accounting records.
Depending on the Excel data, the process can include the creation or processing of:
Sales Vouchers
Excel Sales Entry to Tally: Sales transactions available in Excel can be converted into sales voucher entries in Tally. This keeps the sales-focused Excel data to Tally process aligned with the mapped customer, ledger, and item information.
ledgure
When required by the workflow and configuration, the necessary ledger information can also be handled during the transfer.
Stock Item
Product or inventory information available in Excel can be mapped with the corresponding stock item details required by Tally.
Automated Excel Import Tally: Instead of entering these records one by one, multiple voucher records can be processed through a single automated workflow. This is especially useful for repeated sales files where the mapping structure remains consistent.
Common Challenges While Importing Sales Excel into Tally
Once you understand the process, it is essential to know what might cause issues during the import process.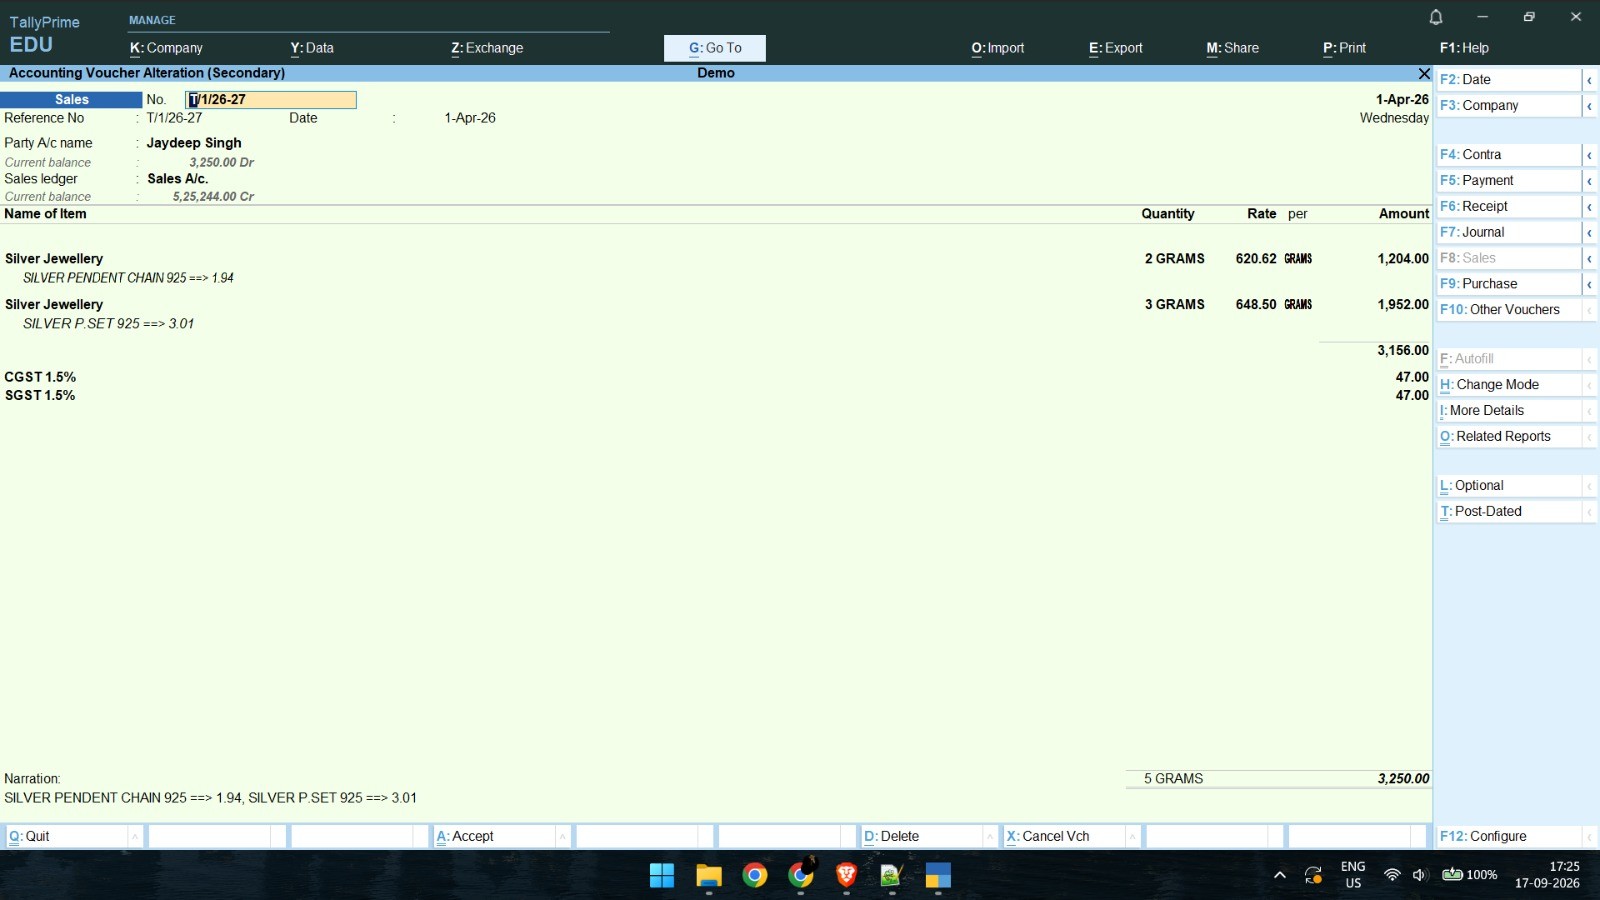 The result can be affected by any of the following: an incorrect ledger name, duplicate invoice numbers, missing GST information, varying date formats, or blank mandatory fields. Mapping or validation problems can also occur if there are multiple formats in the same column in the Excel file.
The spreadsheet can be checked before processing to minimize these problems.
Advantages of Importing Sales Excel into Tally
Using data from an Excel table for Bulk Sales Upload Tally can help minimize repetitive voucher entry and make handling bulk transactions easier. The same workflow can support bulk Excel data import Tally for high-volume sales records.
This offers several advantages, such as:
Faster processing of multiple sales transactions
Less repetitive manual data entry
Improved consistency between the data in Excel and Tally
Quicker verification before the final transfer
Reduced chances of missing transactions
Better management of bulk sales information
A review stage can also be possible with a structured workflow by using Edocsmart.
Practical Use Case
Assume that a distributor keeps 300 sales invoices in Excel per month. Every invoice includes the customer's name, invoice number, date, Goods and Services Tax (GST) amount, taxable amount, and total invoice amount.
If all these invoices are entered manually into Tally, each sales voucher would have to be created separately. Instead, the existing Excel file can be formatted and mapped with the required fields for the Import Sales Data Upload Tally process. This keeps the Excel sales entry to Tally workflow focused on mapping, review, and controlled synchronization.
Once this data is reviewed, the transactions can be processed in Tally without having to recreate all the sales entries manually.
Best Practices When Importing Sales Data
Before processing a complete sales Excel file, make sure the data is clean and properly organized.
Ensure all dates are in a standard format, review duplicate invoice numbers, ensure customer and ledger names are consistent, ensure GST rates are correct, and ensure that all required fields are not blank.
It is also a good idea to test a small number of transactions first. Once imported, check the customer ledger, sales ledger, GST amount, invoice total, and voucher details in Tally.
If the test records are accurate, the remaining transactions can be processed.
FAQS
Do We Have an Option to Import Multiple Sales Invoices from Excel to Tally?
Yes. Properly structured Excel documents may enable multiple sales invoices to be processed. The required information for the customer, invoice, ledger, GST, and amount should be captured in the spreadsheet.
What Should Be in a Sales Excel File?
A sales Excel file usually has these columns: Invoice Number, Date, Customer Name, GSTIN, Product Details, Quantity, Rate, Taxable Amount, Tax Values, and Final Invoice Amount.
Is It Possible to Import GST Sales Entries from Excel?
Yes. If the spreadsheet has the necessary tax information and the relevant tax fields have been added correctly, then the information can be processed in terms of Goods and Services Tax.
Why Should Excel Data Be Checked Before Import?
Checking the file helps identify the following errors before the transactions are processed in Tally: duplicate records, missing information, incorrect amounts, and formatting errors.
Is It Possible to Import Bulk Sales Data into Tally?
Yes. When the data is in a consistent format and structure in an Excel file, bulk sales data processing can be carried out. It is advisable to take a small sample of records before working with the full file.
Conclusion
Importing Sales Excel into Tally can prove beneficial for businesses that deal with large sales transactions and want to reduce repetitive accounting efforts. A structured Excel to Tally import tool can therefore help teams reuse prepared sales data while maintaining a verification step.
The most important thing is to ensure that the data in the Excel spreadsheet is organized properly, map the necessary fields correctly, review the data, and verify the final records in Tally. For companies that frequently need to work with sales data in Excel, adopting Edocsmart could streamline the process and provide a more systematic approach.