How to Upload Excel Data to Tally
Upload your existing Excel sales, purchase, ledger, and stock data, map the required fields, review the records, and sync verified transactions into Tally with Edocsmart.
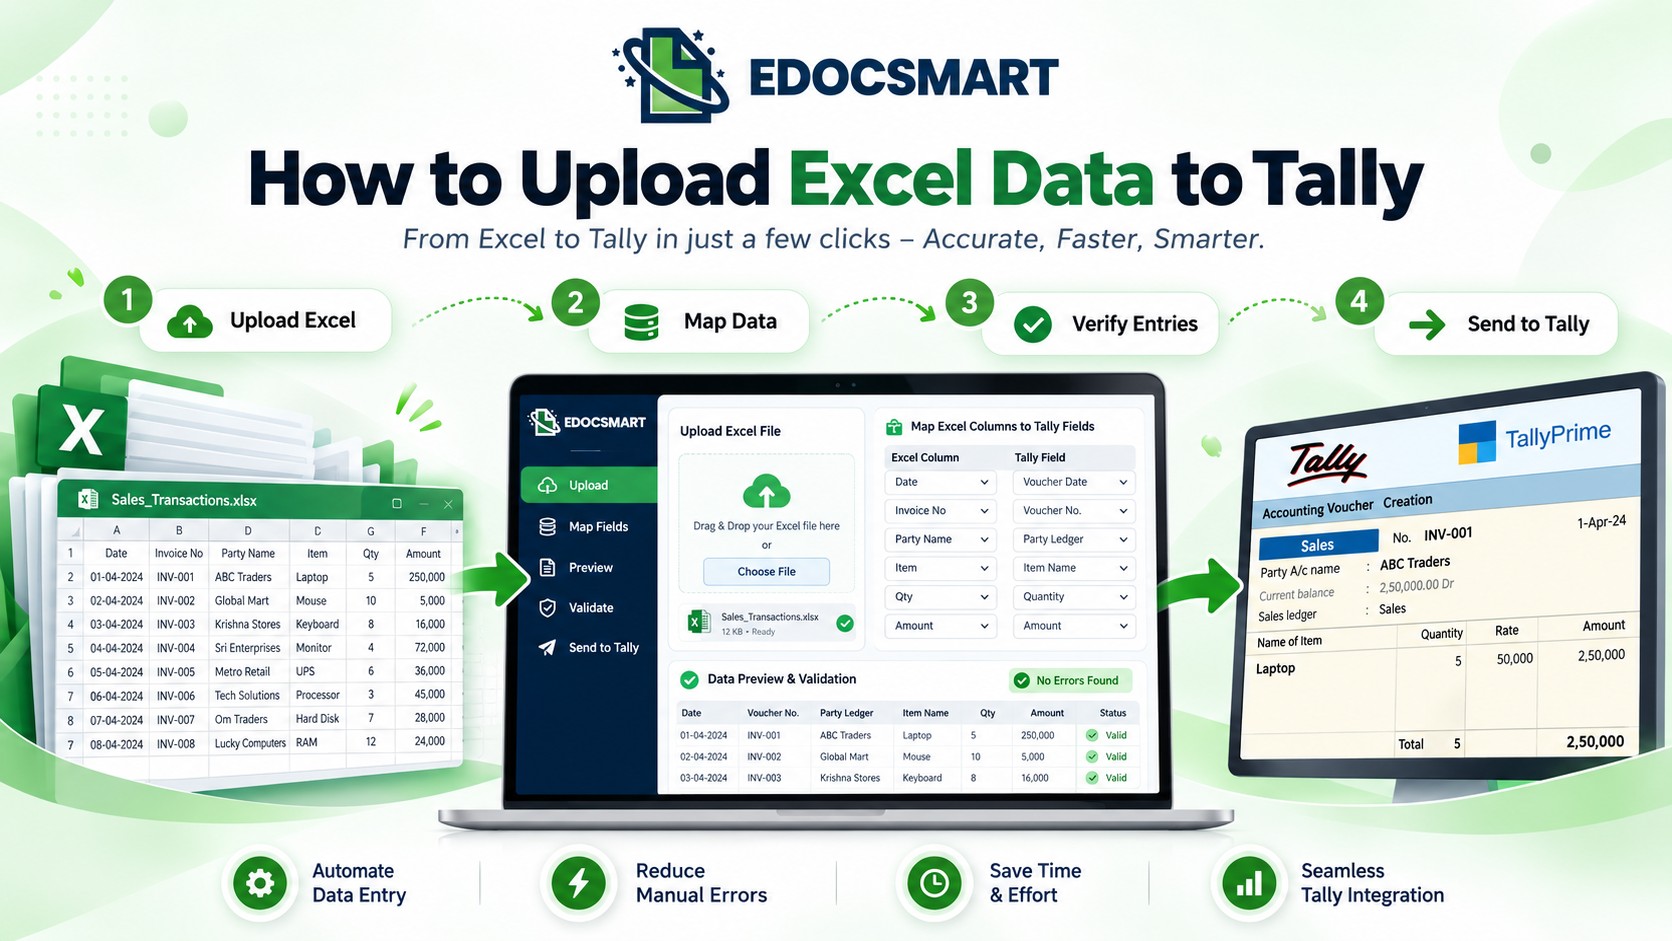
Many businesses keep sales and purchase information, invoices, ledgers, stocks, etc., in Excel. The challenge starts as soon as the same data needs to be entered manually in Tally, particularly if there are hundreds or thousands of transactions.
Edocsmart can help businesses streamline the process of getting Excel to Tally by taking the data that's already in their spreadsheets. The users can import an existing excel file, map the fields as per the necessary edocsmart fields, generate individual voucher documents, check the data and sync the approved data to tally.
Why Excel Import to Tally Can Be Difficult
A common challenge with the Excel Import to Tally is that each client can use a different Excel format. For instance, the file might include “Customer Name” and another one might have “Party Name.” Also, “Bill No.” can be substituted for “Voucher Number”.
Edocsmart deals with this issue with header mapping. The current columns in an Excel file can be matched with the needed ones without the necessity of converting the entire spreadsheet into a single format. This will help businesses that receive files from various clients, branches, or departments to import an Excel file to Tally.
How edocsmart Processes Excel Data
A map is made, then Edocsmart is used to process the Excel records and produce individual voucher documents. These can include sales vouchers, purchase vouchers, invoice records, ledger details and stock related transactions.
Before the synchronization, users can check the important information like voucher number, date, party name, stock item, quantity, rate, amount and tax information.
The overall process is:
Sign In → Upload Excel → Map Headers → Create Voucher Documents → Verify → Sync to Tally → Connector → Tally
Now, let's know how to upload excel data to Tally using edocsmart step by step.
To upload data from an excel to tally step by step.
Step 1: Sign In to edocsmart
The Excel to Tally process starts by signing in to the edocsmart platform.
Once the user logs in, they can access the Excel-to-Tally workflow from the dashboard.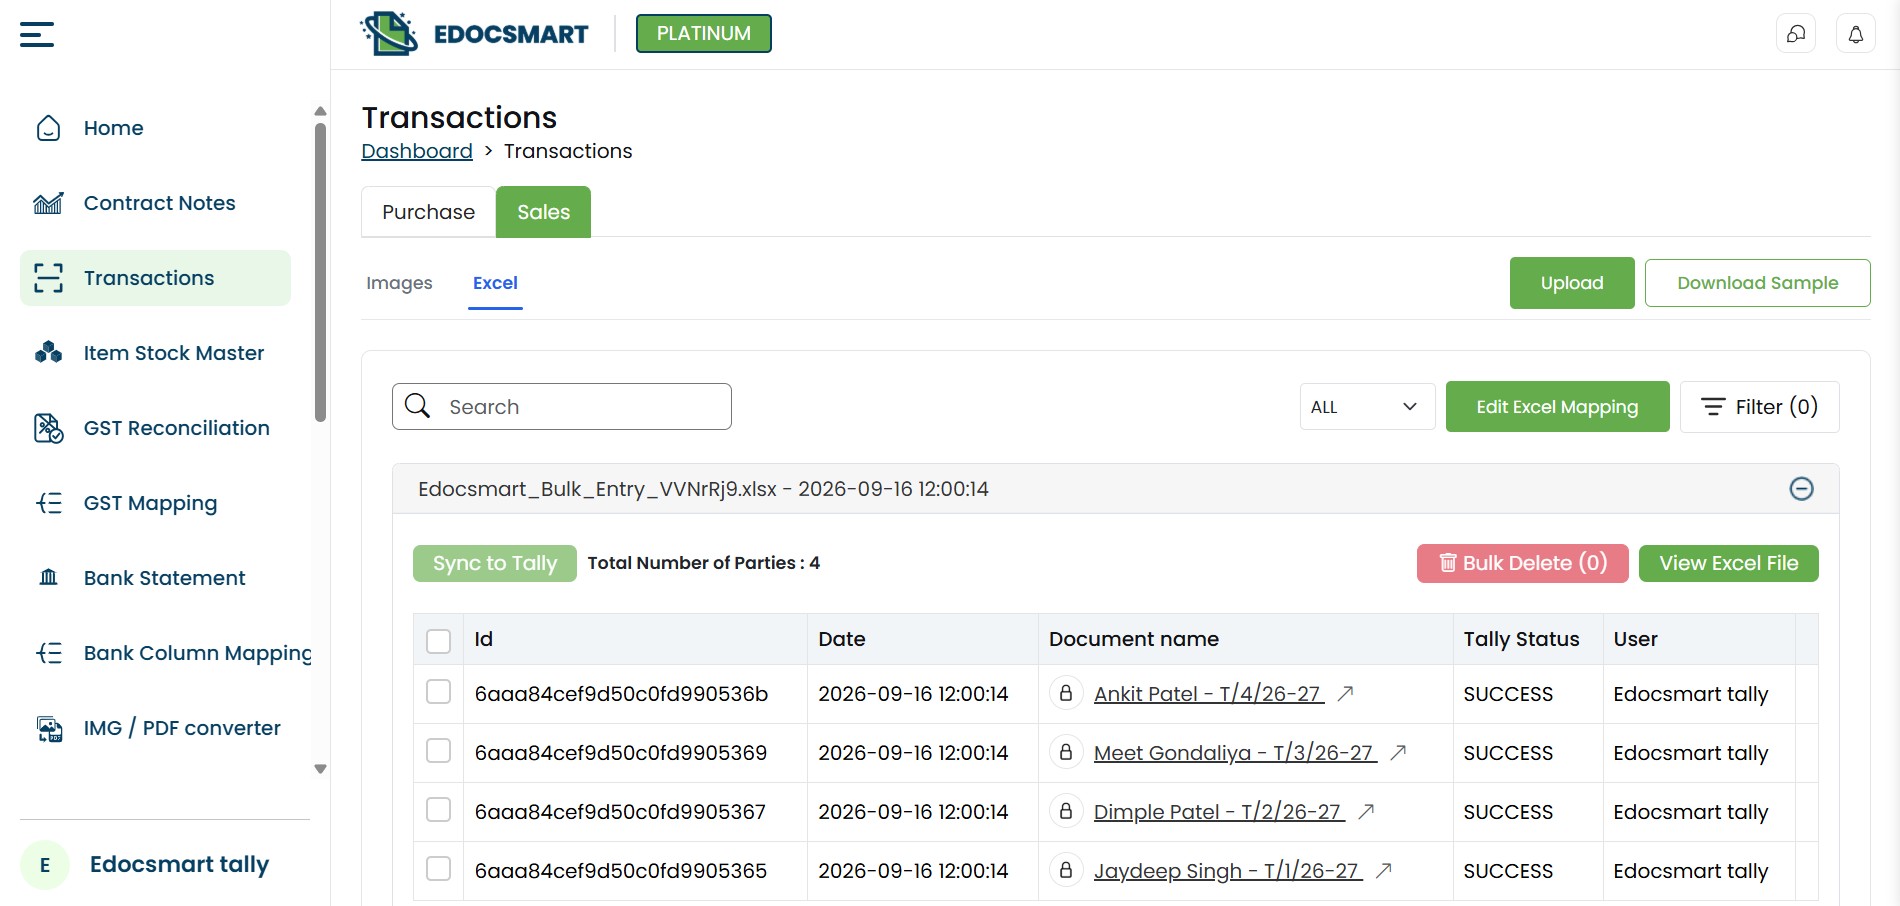
Step 2: Upload the Excel File
The next step is uploading the Excel file to edocsmart.
One of the major advantages of the workflow is that the client does not have to maintain one rigid Excel structure.
Different businesses may use Excel sheets with headers such as: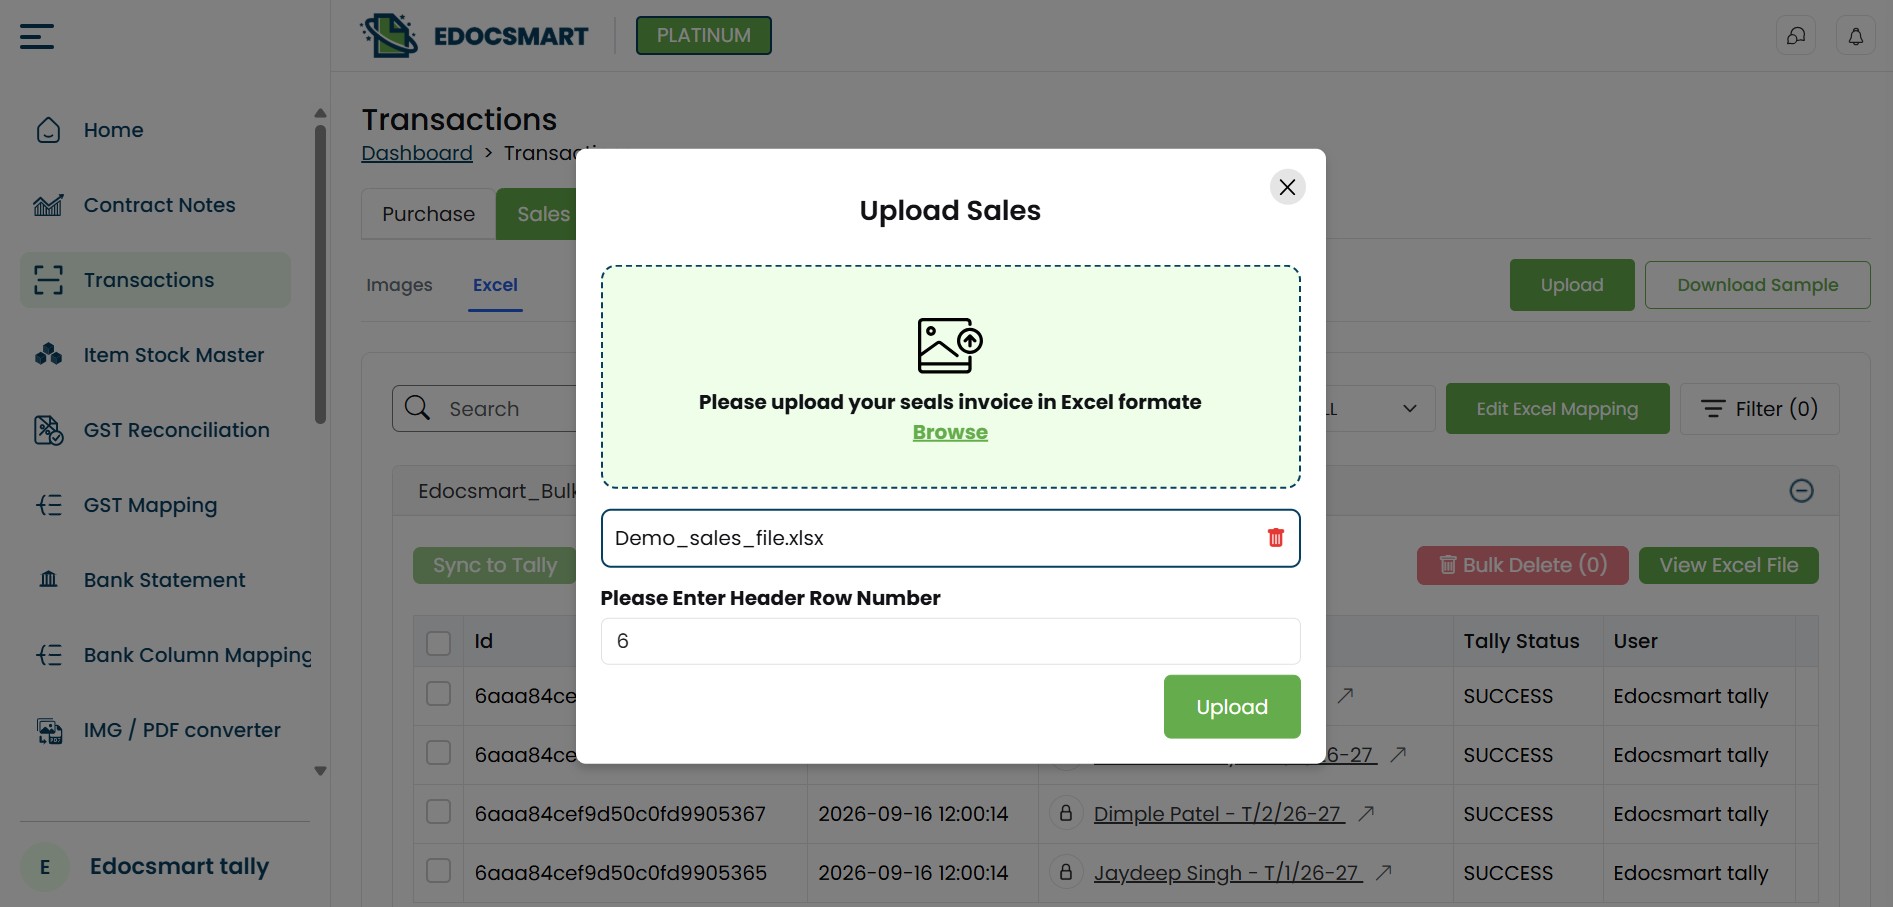 Another business may use completely different names for the same information.
Therefore, edocsmart uses a mapping process instead of forcing every client to redesign their existing Excel files.
Step 3: Map Excel Headers with edocsmart Headers
After the Excel file is uploaded, the user moves to the mapping stage.
edocsmart maintains a predefined set of standard or default fields required for accounting and Tally voucher creation.
The headers available inside the uploaded Excel file are mapped with the corresponding edocsmart fields.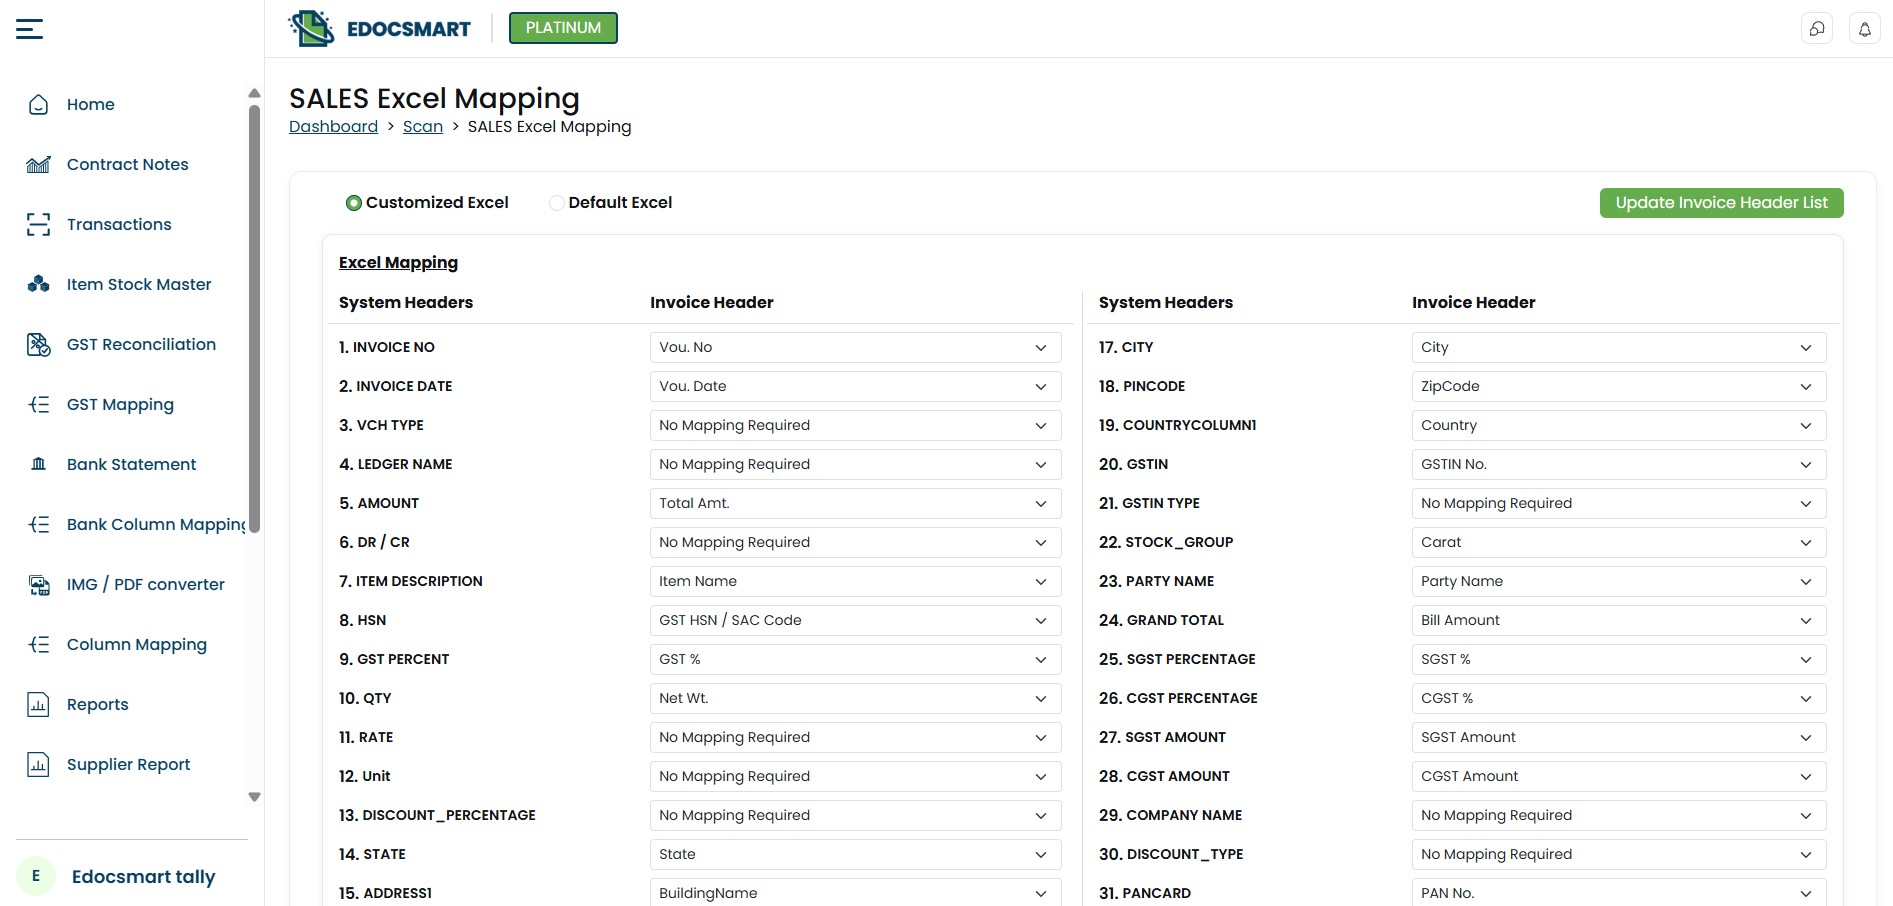
The user only needs to tell the system which Excel column represents which edocsmart field.
This mapping layer is important because different clients can maintain completely different Excel formats while edocsmart converts the information into one standardized internal structure.
Once all required columns are mapped correctly, the mapping process is completed.
Step 4: Edocsmart Creates Individual Voucher Documents
After mapping is completed, Edocsmart starts processing the Excel data.
Suppose an uploaded Excel file contains 500 voucher records.
Excel Voucher Import Tally: Instead of treating the entire Excel sheet as one document, edocsmart creates separate documents for the individual vouchers available in the file.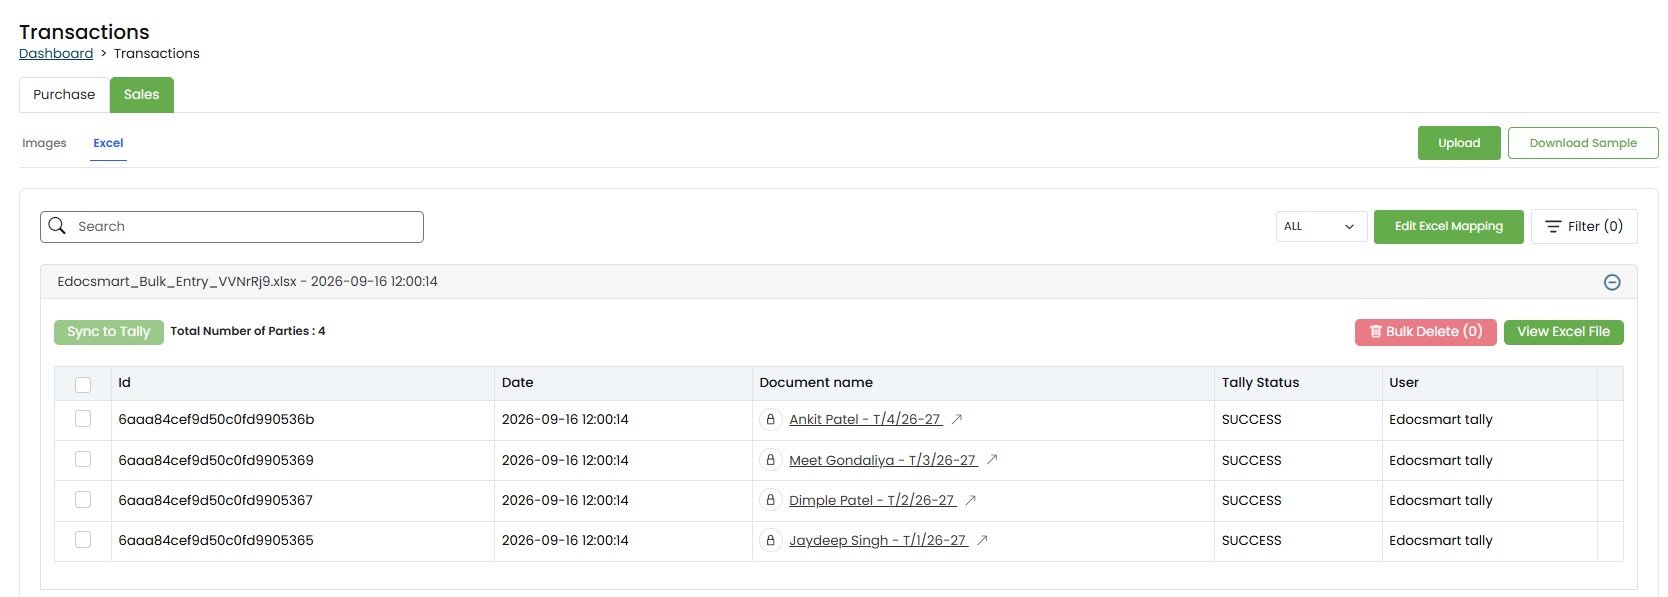 Depending on the uploaded data, these documents may represent different transaction types such as:
Purchase vouchers
Sales vouchers
Accounting vouchers
Inventory-related transactions
Ledger-related transactions
Creating separate documents makes the information easier to review, manage, verify, and eventually sync with Tally.
Step 5: Verify the Generated Documents
Once all voucher documents are generated, the user can review the information before sending it to Tally.
Because the information is being taken directly from the mapped Excel columns, there is no need to manually retype every transaction.
This significantly reduces the possibility of manual data-entry errors.
However, verification remains an important step.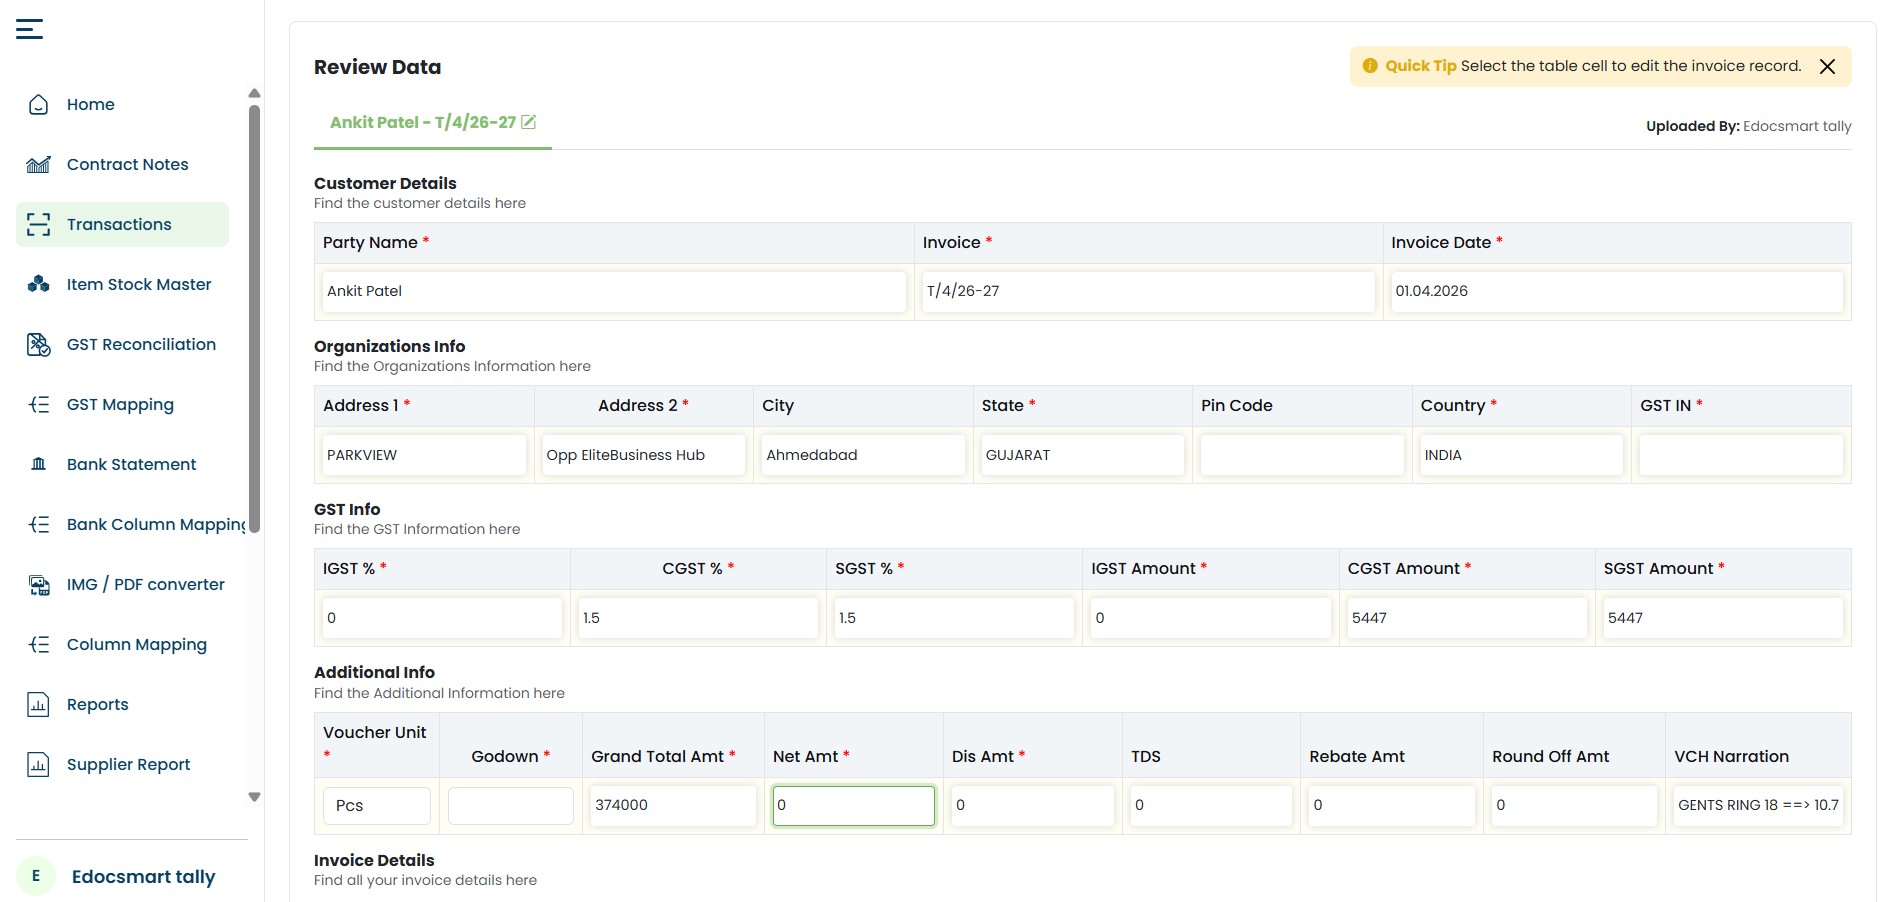
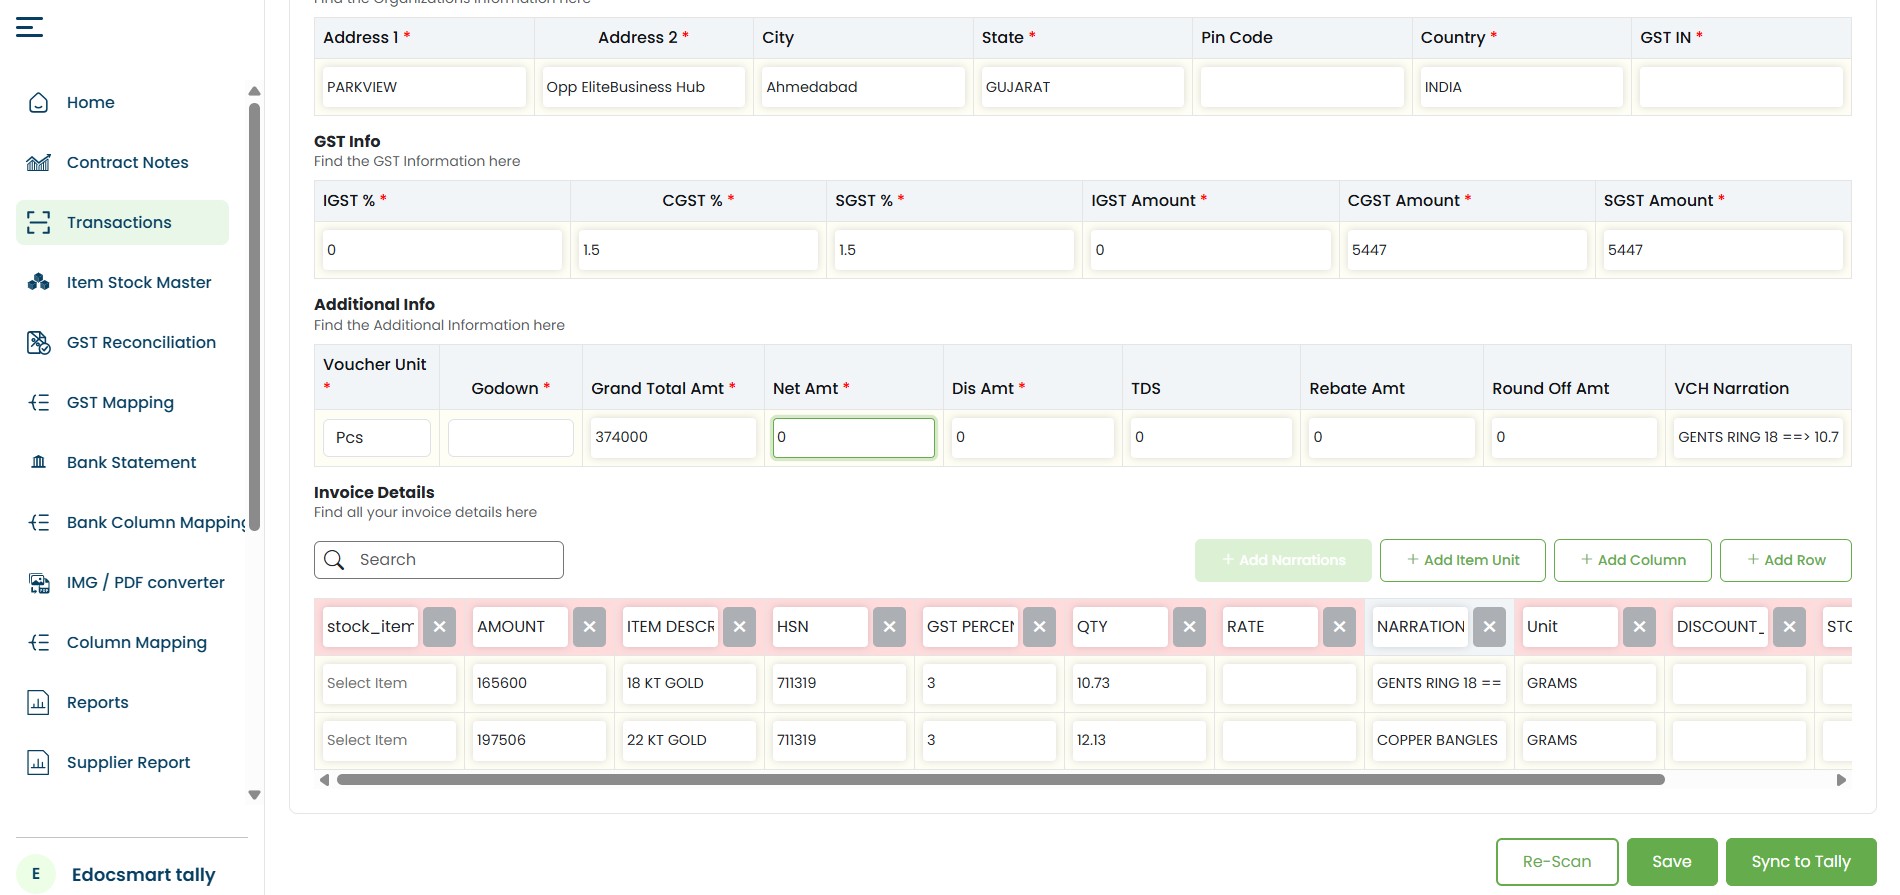 Once the user confirms that the generated documents contain the expected information, the data is ready to be transferred into Tally.
Step 6: Click “Sync to Tally”
After verification, edocsmart provides a Sync to Tally option.
This is where the actual transfer from the cloud-based edocsmart platform to the user's locally running Tally system begins.
The user simply clicks: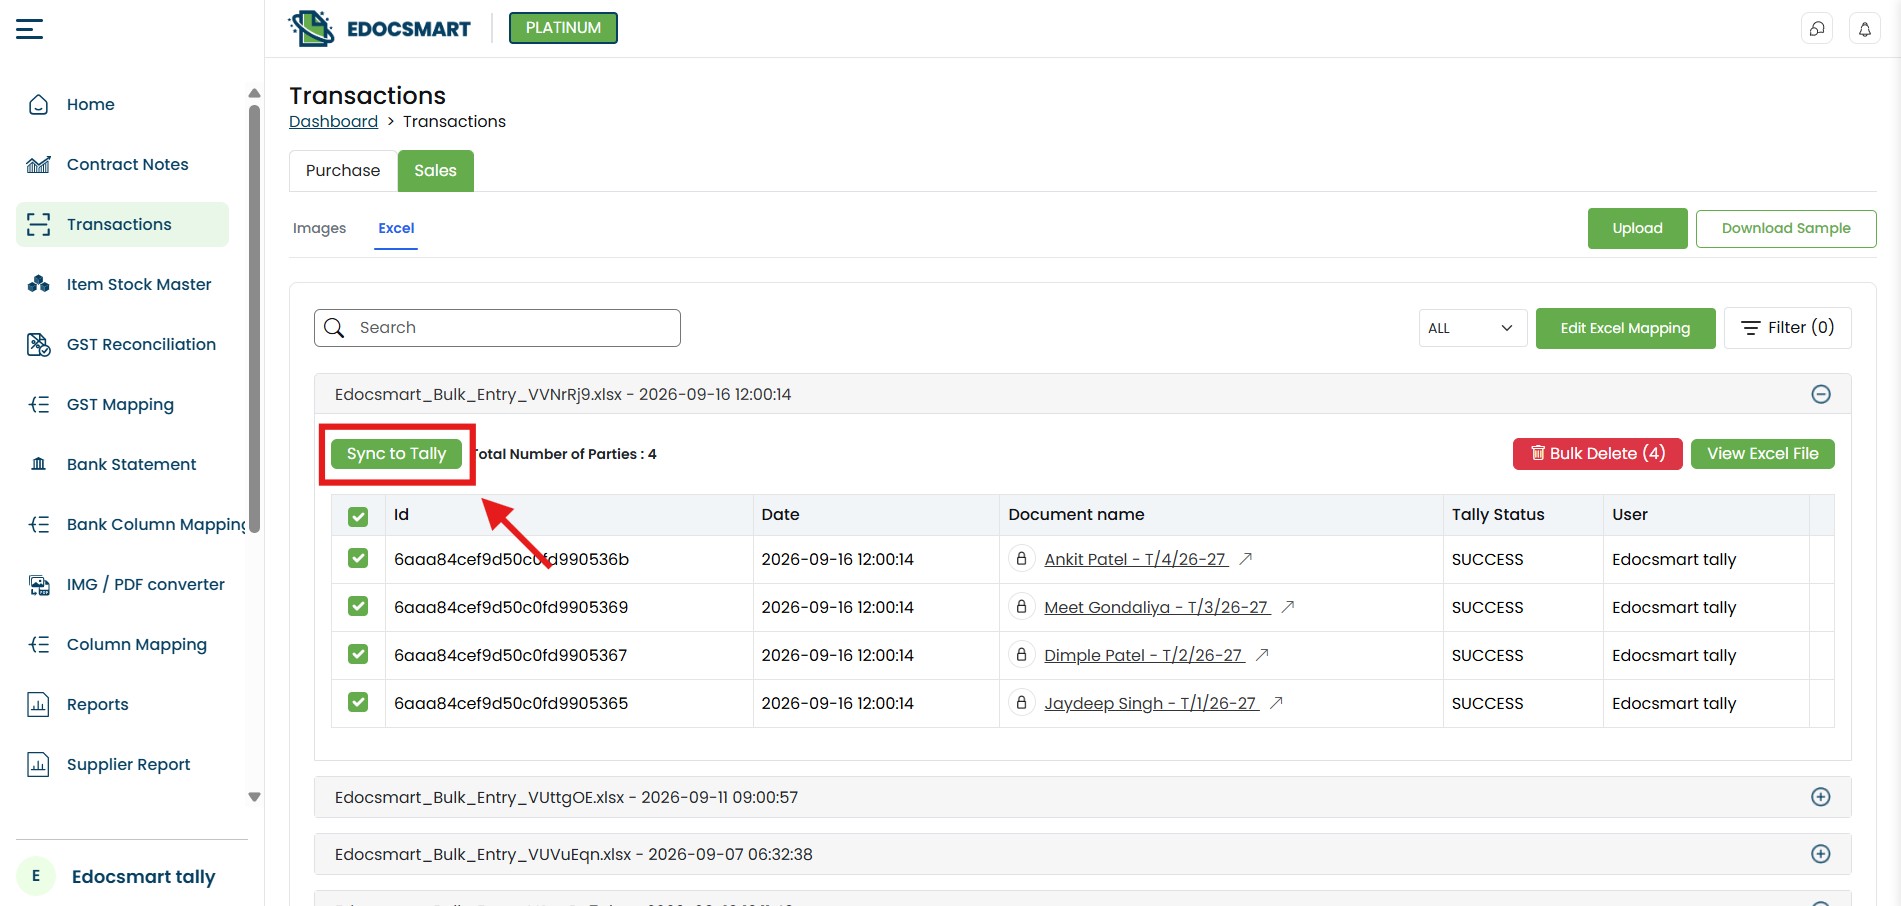 Instead of manually creating every voucher inside Tally, edocsmart prepares the required accounting information and sends it through its connector.
But there is an important component working between edocsmart and Tally.
That component is the edocsmart Connector.
Step 7: edocsmart Connector Connects the Website with Local Tally
Tally generally runs locally on the user's computer or within the organization's environment.
edocsmart, on the other hand, is accessed through the web.
Therefore, a secure communication layer is required between the edocsmart platform and the locally running Tally application.
The edocsmart Connector performs this role.
The workflow becomes: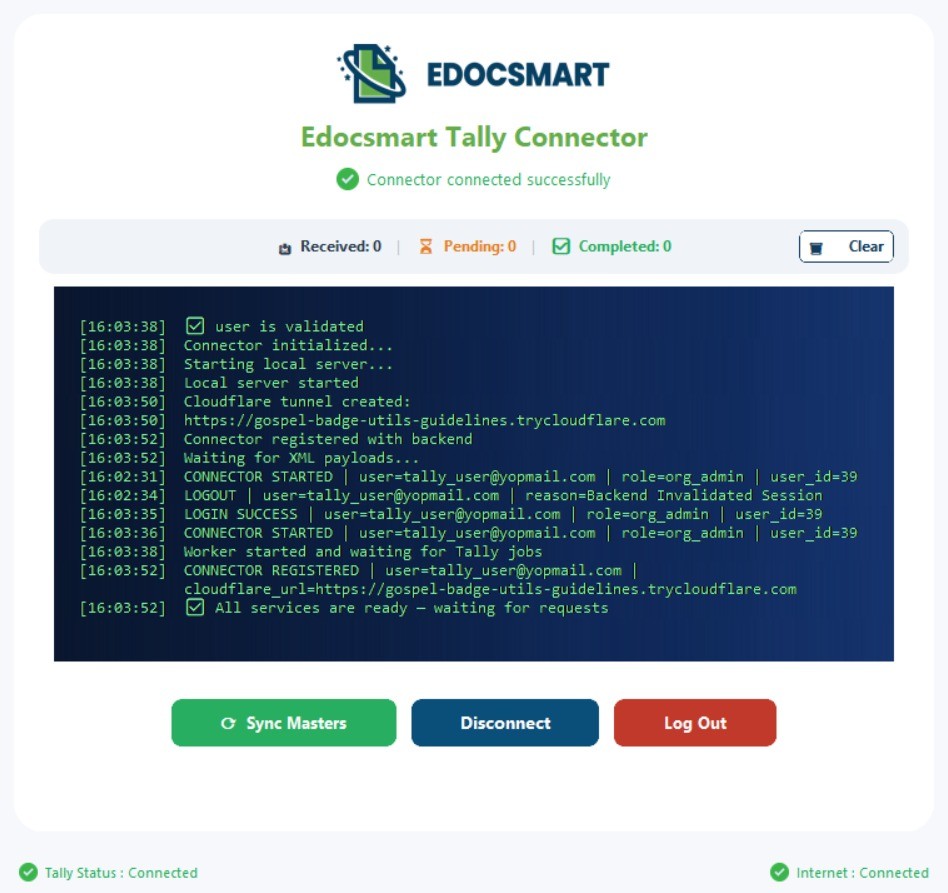
When the user clicks the Sync to Tally button, the required requests are passed to the connector.
The connector then communicates with the locally available Tally system and transfers the required accounting data.
In simple terms, the connector acts as a bridge between edocsmart and Tally.
Without requiring the user to manually export, copy, and recreate every transaction, the connector handles the communication between both systems.
Step 8: Vouchers Are Automatically Created in Tally
Once the connector receives the information from edocsmart, it sends the data to Tally.
Tally then receives the relevant transaction information and creates the required accounting records.
Depending on the Excel data, the process can include the creation or processing of:
Sales Vouchers
Excel Sales Entry to Tally: Sales transactions available in Excel can be converted into sales voucher entries in Tally.
Purchase Vouchers
Excel Purchase Entry to Tally: Purchase-related records can be transferred and created as purchase vouchers.
Ledgers
When required by the workflow and configuration, the necessary ledger information can also be handled during the transfer.
Stock Items
Product or inventory information available in Excel can be mapped with the corresponding stock item details required by Tally.
Automated Excel Import Tally: Instead of entering these records one by one, multiple voucher records can be processed through a single automated workflow.
What Happens After Sync to Tally?
When the Excel records have been uploaded, mapped and verified, users can then click on Sync to Tally.
Edocsmart operates in the web, while Tally typically operates in local system, hence the edocsmart Connector is used to bridge both.
The workflow becomes:
Edocsmart → Sync Request → Connector → Local Tally.
The connector receives the approved information from edocsmart and sends it to the locally running Tally application. This will save the user from having to manually recreate each transaction.
What kind of data can be sent to Tally from Excel?
The workflow may include the ability to support Excel Sales Entry to Tally, Purchase Entry to Tally, invoice records, ledger information, stock items, quantities, rates and other accounting information depending on the information provided in Excel.
This will be particularly helpful when using Bulk Excel Upload to Tally. In business, several vouchers can be processed in the same upload, mapping, verification and synchronization process, rather than having to process each one individually.
Why Edocsmart Makes Excel to Tally Import Easier
Edocsmart makes the Excel to Tally Import process flexible because businesses do not need to depend on one fixed Tally Invoice Format in Excel.
Overall, the process helps businesses move Excel Data to Tally in a more organized way while reducing repetitive manual entry and making bulk accounting data easier to manage.
The following are some of the benefits of uploading the data to Tally from Excel with edocsmart:
There are some practical benefits of using edocsmart for Excel to Tally Import for businesses and accounting teams.
• Supports multiple Excel formats: Users can map existing headers in their Excel files rather than create each file in a single format.
• Minimizes data rekey: Vouchers having data already keyed into Excel don't need to be rekeyed.
• Processes multiple transactions: Multiple sales, purchase, invoice and voucher records can be processed simultaneously.
• Generate individual Voucher documents: Each transaction generates a separate voucher document which can be reviewed individually before syncing to Tally.
• Allows data verification: Users can verify important accounting information prior to the final synchronization.
• Supports Sales and Purchase entries: The workflow can be used for Sales entry in Excel to Tally and Purchase entry in Excel to Tally.
• Directly interface with local Tally: Approved data from the web can be transferred to locally running Tally via Connect with local Tally: The edocsmart Connector.
These benefits render the workflow useful for companies that deal with significant amounts of accounting data frequently in Excel.
FAQS
How to upload Excel data to Tally using edocsmart?
Upload the Excel file, map the required headers, verify the generated voucher documents, and use Sync to Tally to send the approved data through the edocsmart Connector.
How to import Excel data to Tally when the Excel format is different?
Use header mapping in edocsmart to match the existing Excel columns with the required fields without converting every file into one fixed format.
How to upload bulk Excel data to Tally?
Upload the Excel file in edocsmart, complete the mapping and verification, and process multiple voucher records through the same synchronization workflow.
How to import sales entries from Excel to Tally?
Map the sales data in edocsmart, verify the generated sales voucher documents, and sync the approved entries to Tally.
How to import purchase entries from Excel to Tally?
Upload and map the purchase data, review the generated purchase voucher documents, and sync the verified records to Tally.
How to verify Excel data before syncing it to Tally?
Review the generated voucher documents and check details such as voucher number, date, party name, stock item, quantity, rate, amount, and tax information.
How does the edocsmart Connector send data to local Tally?
The connector acts as a bridge between the edocsmart web platform and the locally running Tally application, transferring the approved accounting data.
Conclusion
Overall, the process of uploading Excel data to Tally helps businesses organize their accounting information in a more structured way while reducing repetitive manual entry. Instead of entering sales, purchase, ledger, stock, GST, and other transaction details one by one, businesses can use their existing Excel files as the starting point for the accounting workflow.
With Edocsmart, Excel data can be uploaded, mapped with the required fields, reviewed, corrected if needed, and then synced with Tally. Bulk upload and reusable mapping also make it easier to manage larger volumes of accounting data without repeating the same setup every time.
This creates a smoother workflow:
Excel Upload → Mapping → Review → Verification → Sync to Tally
For businesses that regularly maintain accounting records in spreadsheets, this approach provides a practical way to manage bulk Excel data, reduce manual work, improve consistency, and keep better control over the information before it reaches Tally.