How to Import GST Invoice Data from Excel into Tally Prime
Learn how to import GST invoice data from Excel into Tally Prime using Edocsmart. Automate sales and purchase vouchers, map GST fields, and sync up to 100 entries to Tally
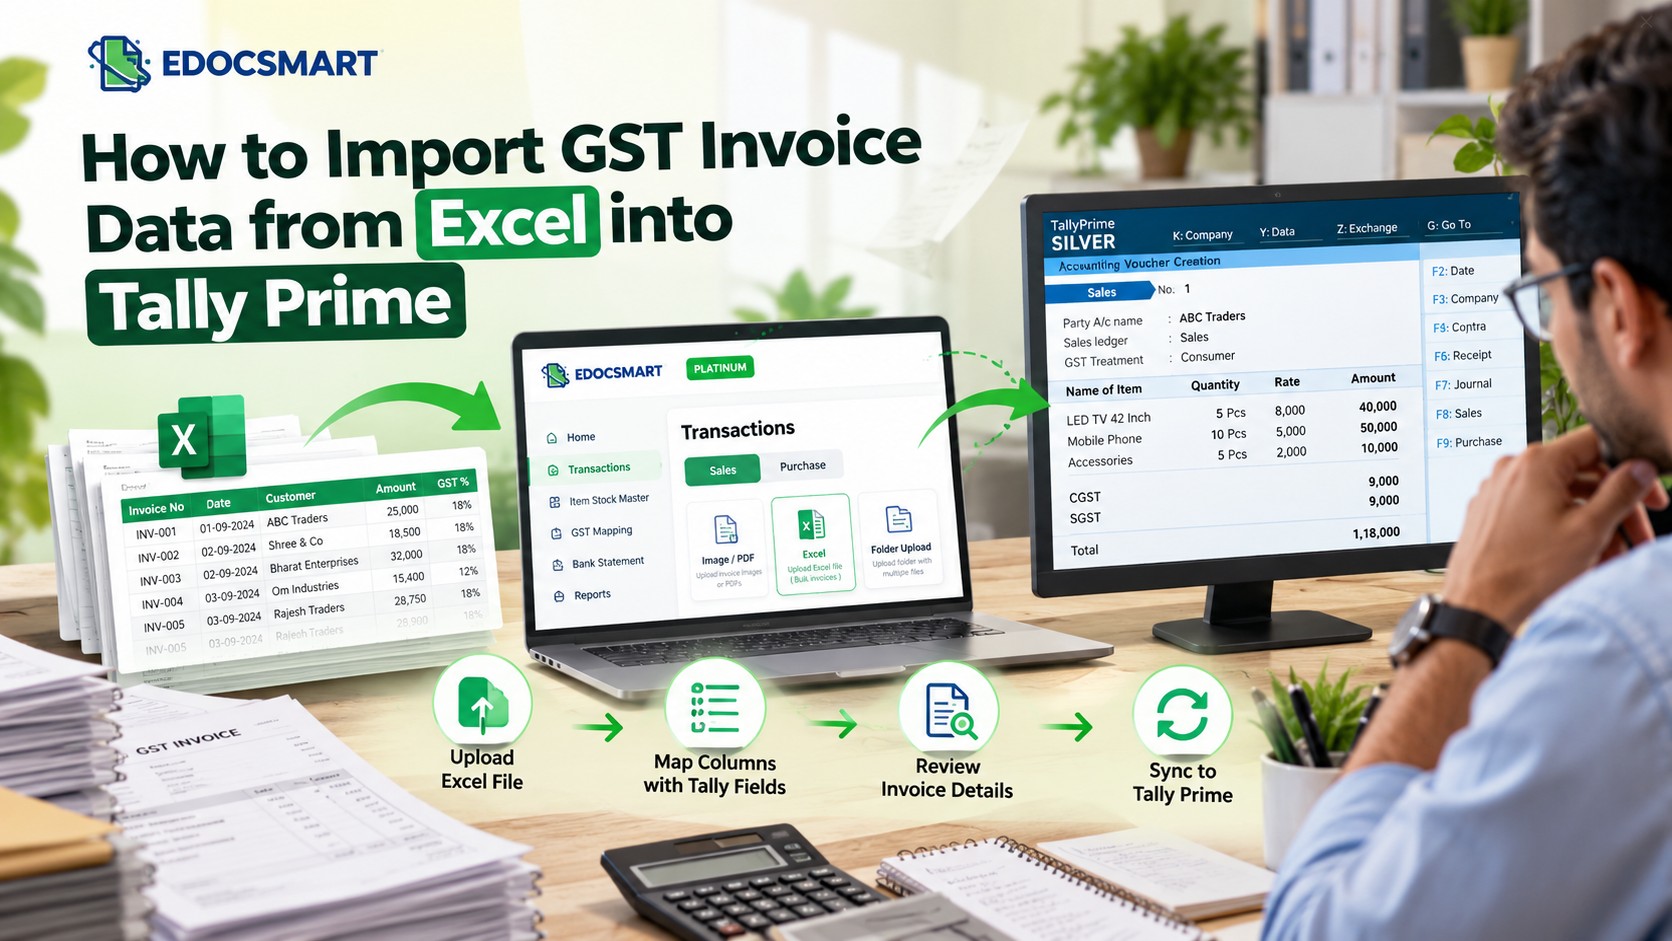
How a Hardworking Accountant Can Save Hours on GST Invoice Entry
Meet Rahul, a hardworking freelance accountant who manages the books of several small businesses. Every month, he receives Excel files containing sales invoices, purchase bills, GST amounts, taxable values, customer details, supplier information, and stock item descriptions from different clients.
His work does not end with checking the numbers. He must enter sales and purchase transactions into Tally Prime, verify GST calculations, match ledger names, select the correct stock items, and ensure that every voucher is recorded correctly.
For Rahul, even a relatively small batch of invoices can mean hours of repetitive data entry. When multiple clients send their files near a GST filing deadline, the workload becomes even more demanding.
The real problem is not accounting itself. It is the time spent transferring already available information from Excel into Tally Prime.
What if Rahul could upload his Excel file, configure the necessary field mappings once, review the generated invoices, and sync multiple entries directly to Tally Prime?
That is where Edocsmart can help. Its Excel-to-Tally workflow helps accountants and businesses automate the transfer of sales and purchase data into Tally, reduce repetitive entry, and manage invoice processing more efficiently.
In this guide, we will explain how to import GST invoice data from Excel into Tally Prime, covering both sales and purchase transactions step by step.
Why Import GST Invoice Data from Excel into Tally Prime?
Businesses frequently maintain invoice information in Excel because it is convenient for collecting, organizing, and sharing transaction data. However, manually entering every invoice into Tally can become time-consuming when transaction volumes increase.
Common challenges include:
- ·Repeatedly entering invoice numbers, dates, party names, taxable values, and GST amounts.
- ·Mapping Excel column headers to the appropriate accounting fields.
- ·Selecting the correct sales or purchase ledgers.
- ·Matching invoice stock item names with the inventory masters maintained in Tally.
- ·Checking whether the generated vouchers follow the required accounting configuration.
- ·Managing multiple clients, companies, or large batches of invoices.
An Excel-to-Tally import workflow helps bridge the gap between GST invoice spreadsheets and Tally Prime accounting vouchers, without re-entering every sales or purchase invoice manually.
With Excel-to-Tally, accountants can upload transaction data, configure mappings, review the generated documents, and sync eligible entries to Tally through the Edocsmart Tally Connector.
How Edocsmart Imports GST Invoice Data into Tally Prime
To import GST invoice data from Excel into Tally Prime, follow this structured Excel-to-Tally workflow:
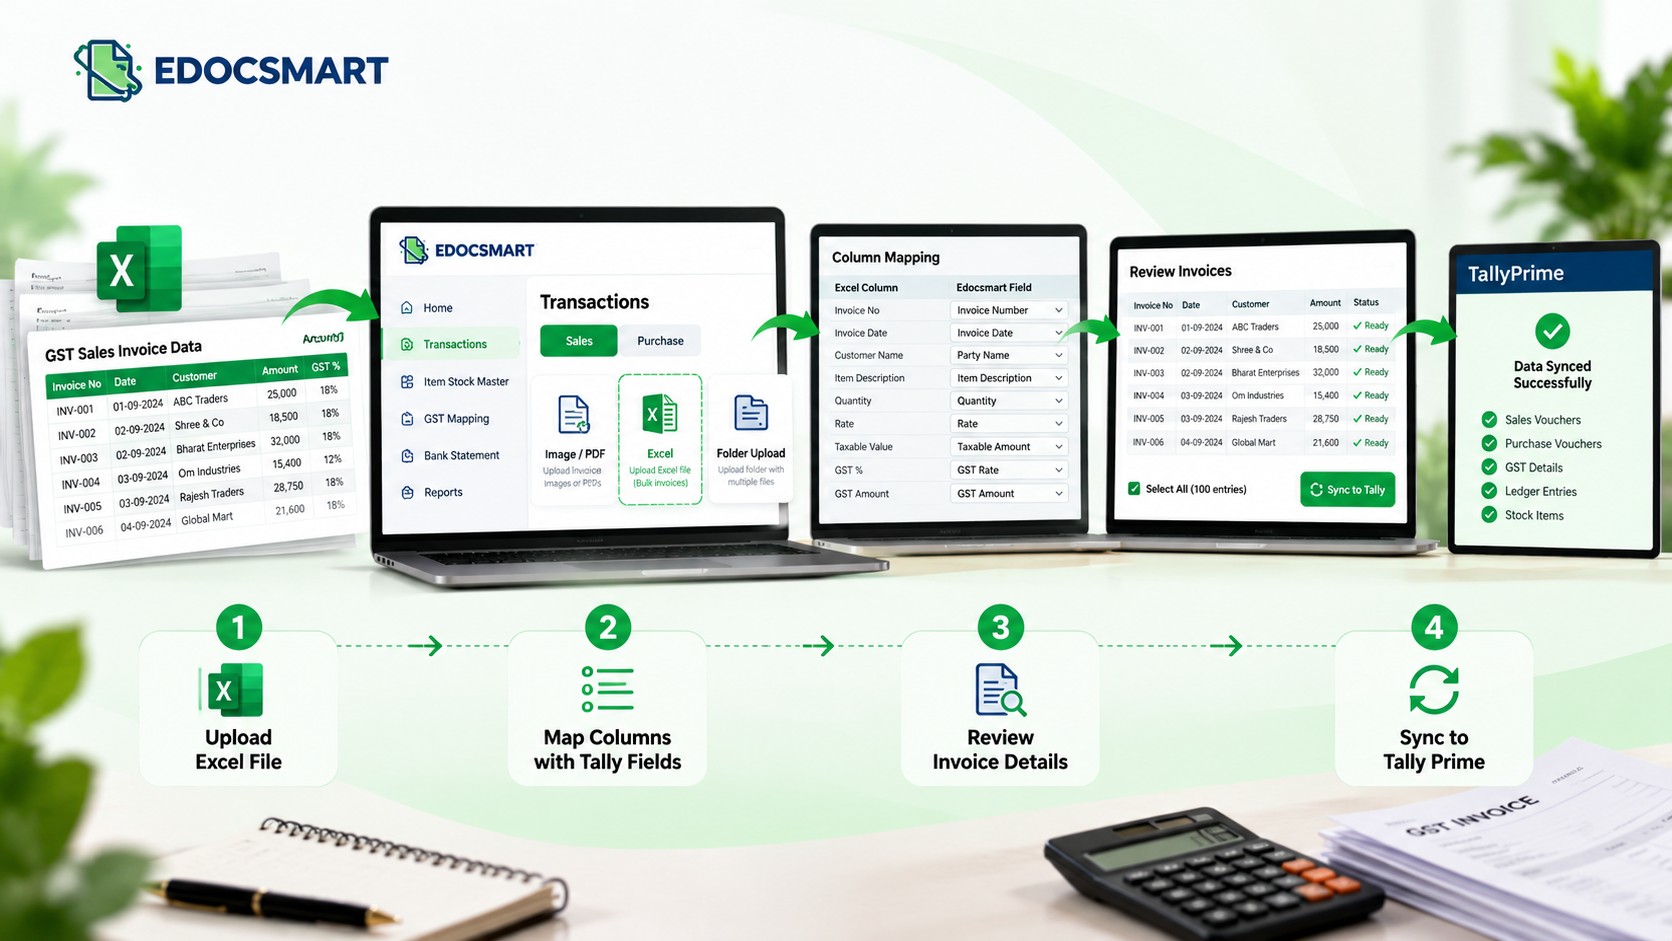
Excel File → Upload to Edocsmart → Map Headers → Generate Invoice Documents → Verify Entries → Sync Masters and Stock Items → Sync to Tally Prime
The workflow supports both sales and purchase transactions. The exact accounting fields and settings depend on the user's Excel structure and accounting requirements.
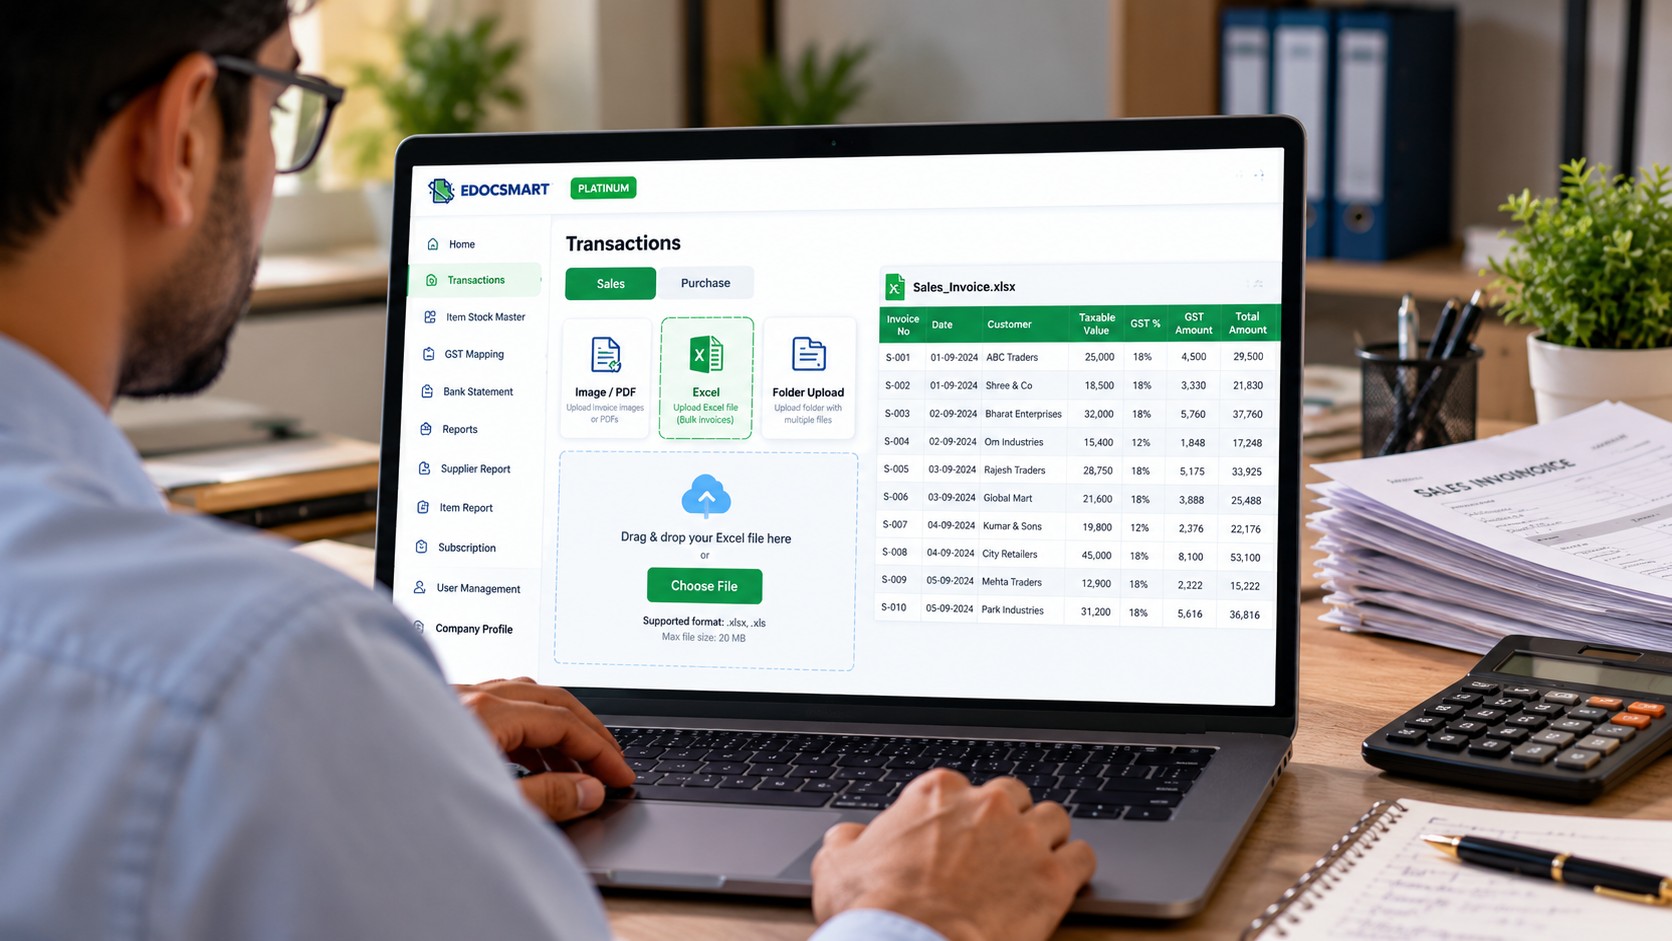
Step 1: Open the Sales Section in Edocsmart
Start by logging in to your Edocsmart account.
Navigate to the Transactions section and select Sales. At the bottom of the interface, click the Excel option to begin importing your sales transaction data.
Prepare an Excel file containing the required invoice information. Depending on your accounting workflow, this may include:
- ·Invoice number and invoice date
- ·Customer or party name
- ·Sales ledger
- ·Item description or stock item name
- ·Quantity, rate, and taxable value
- ·GST rate and applicable tax amounts
- ·Discounts, other charges, and invoice total
Your spreadsheet does not necessarily need to use the same column names as Edocsmart. The mapping process allows you to associate your existing Excel headers with the corresponding fields.
For example, an Excel column called Bill
No may need to map to the invoice number field, while GST Amount may need to map to the appropriate
tax field based on your configuration.
The important point is to ensure that the data is organized consistently and contains the information required by your accounting setup.
Step 2: Upload Your Excel File and Configure Header Mapping
After selecting Excel, upload your sales file and click Next.
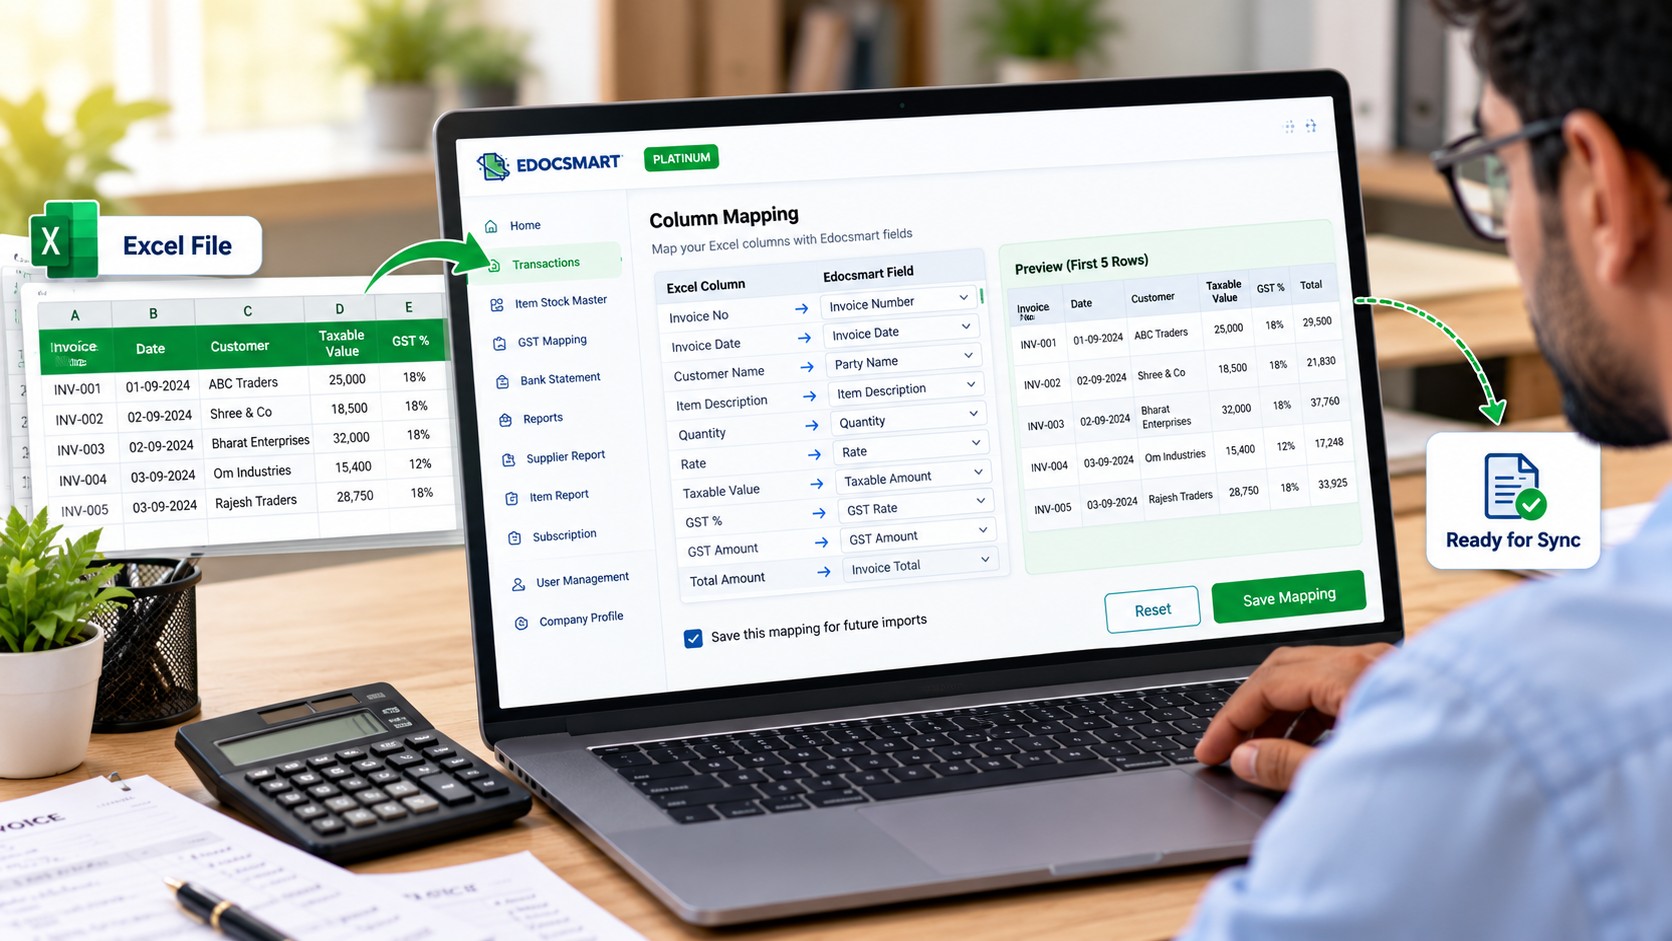
If this is your first time importing a particular spreadsheet structure, Edocsmart may require you to configure the Excel mapping.
This is an important step because Excel files from different businesses
often use different column names and formats. One client might use Customer Name, another might use Party, and a third might use Buyer Name for similar information.
In the mapping window, connect your Excel headers to the appropriate Edocsmart fields.
For example:
|
Excel header |
Corresponding field |
|
Bill No |
Invoice Number |
|
Bill Date |
Invoice Date |
|
Customer Name |
Party / Customer |
|
Taxable Amount |
Taxable Value |
|
GST Amount |
Applicable GST field |
|
Net Amount |
Invoice Total |
These are illustrative examples. Select the actual available fields and tax mappings that match your data and configuration.
Customize the mapping to match your accounting process
Different accountants follow different accounting practices. Depending on the options available in your Edocsmart configuration, you can choose the relevant settings for your workflow, including the required accounting fields and transaction treatment.
For example, a business may need particular sales ledger assignments, different tax treatments, or specific fields for additional charges.
If your existing Excel structure or accounting requirements need a different configuration, you can contact the Edocsmart team to discuss a customized accounting workflow.
The benefit: Once your spreadsheet structure and mappings have been configured appropriately, you can reuse the setup for subsequent imports with the same structure, reducing repetitive configuration work.
For a broader overview of the workflow, visit Excel-to-Tally solution.
Step 3: Generate Separate Invoice Documents Automatically
Once the mapping and required settings are configured, continue with the import process.
eDocs Smart uses the invoice number to separate the imported transaction data into individual documents according to the supported file structure and configuration.
For example, imagine that your Excel file contains 100 sales invoices. Instead of treating the entire spreadsheet as one invoice, the system can create separate invoice documents based on their respective invoice numbers.
Each document can then be reviewed individually before synchronization.
This is particularly useful for accountants handling multiple clients or processing large batches of transactions. It provides a structured way to inspect invoice-level information and identify issues before sending the entries to Tally Prime.
However, the quality of the generated documents depends on the accuracy of the source data and mapping configuration. Duplicate invoice numbers, inconsistent item descriptions, missing values, or incorrectly mapped fields should be checked during verification.
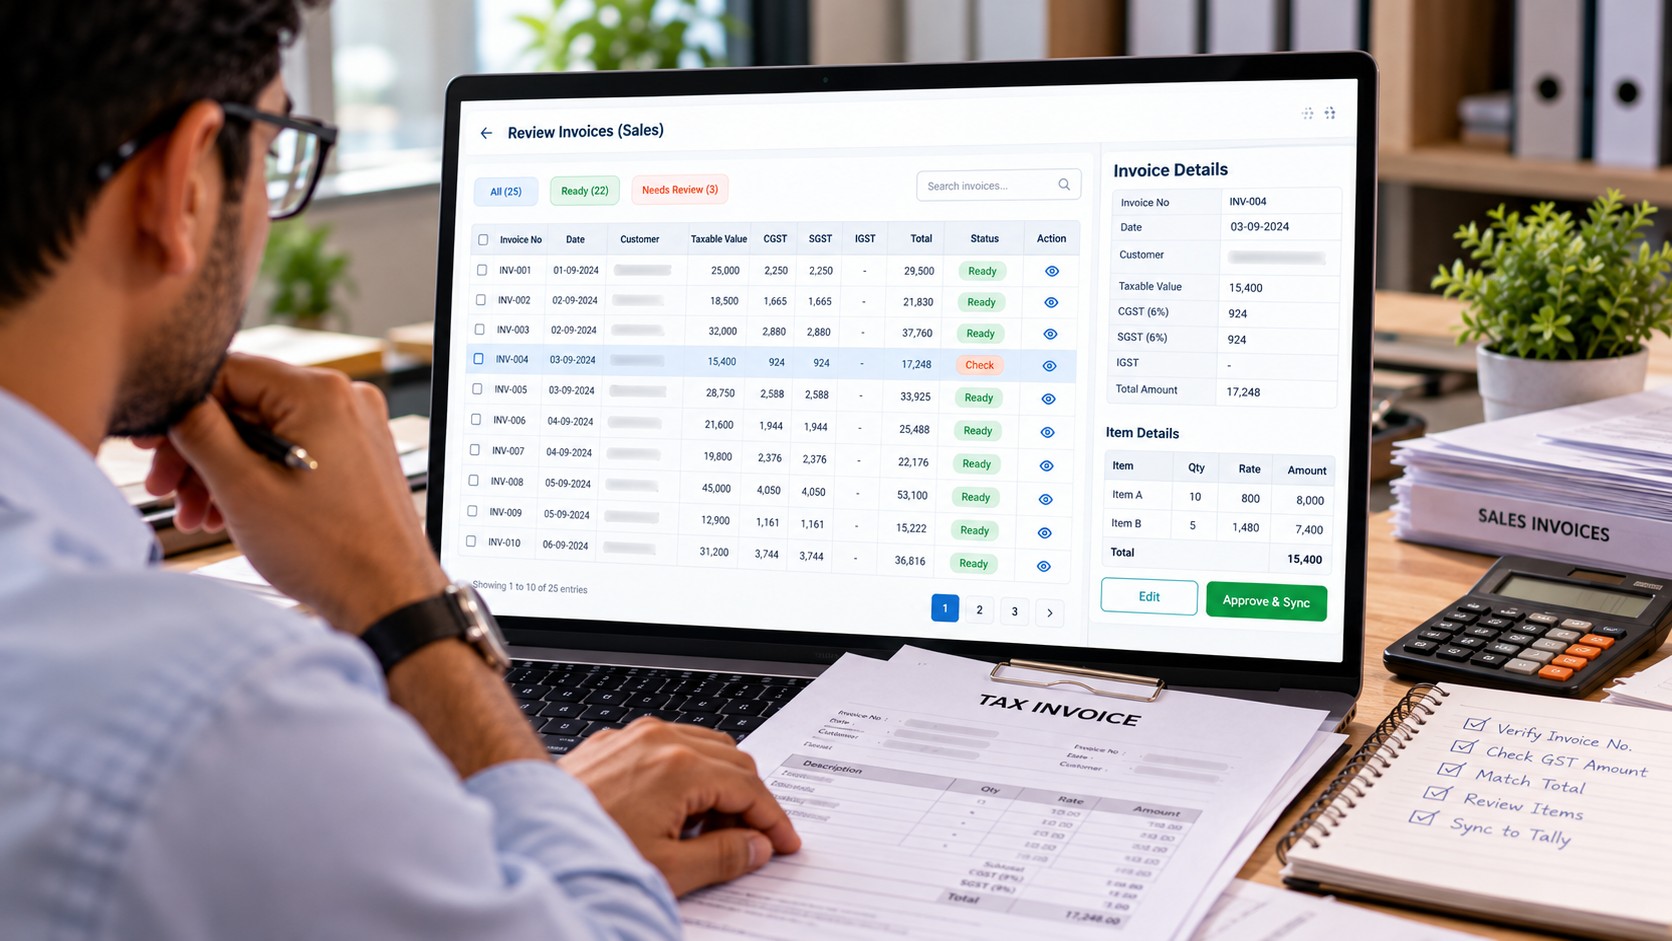
Step 4: Verify Every Invoice Before Synchronizing
Automation should reduce repetitive work without eliminating accounting checks.
After the documents have been generated, review them in Edocsmart to confirm that the imported information matches your Excel file and accounting requirements.
Pay particular attention to:
- ·Invoice numbers and dates
- ·Customer or party names
- ·Taxable values and applicable GST amounts
- ·Sales ledger assignments
- ·Stock item names and quantities, where applicable
- ·Discounts, additional charges, and invoice totals
- ·Any fields that were mapped or customized during setup
For GST-related transactions, also verify that the tax treatment matches the underlying invoice and the company's accounting configuration. Importing data does not, by itself, guarantee GST compliance or correct tax classification.
If a document requires correction, resolve the issue before syncing it to Tally.
This verification stage is valuable for freelance accountants because it provides an opportunity to review a client's complete batch systematically instead of discovering avoidable mistakes after voucher creation.
Step 5: Synchronize Accounting Masters with the Tally Connector
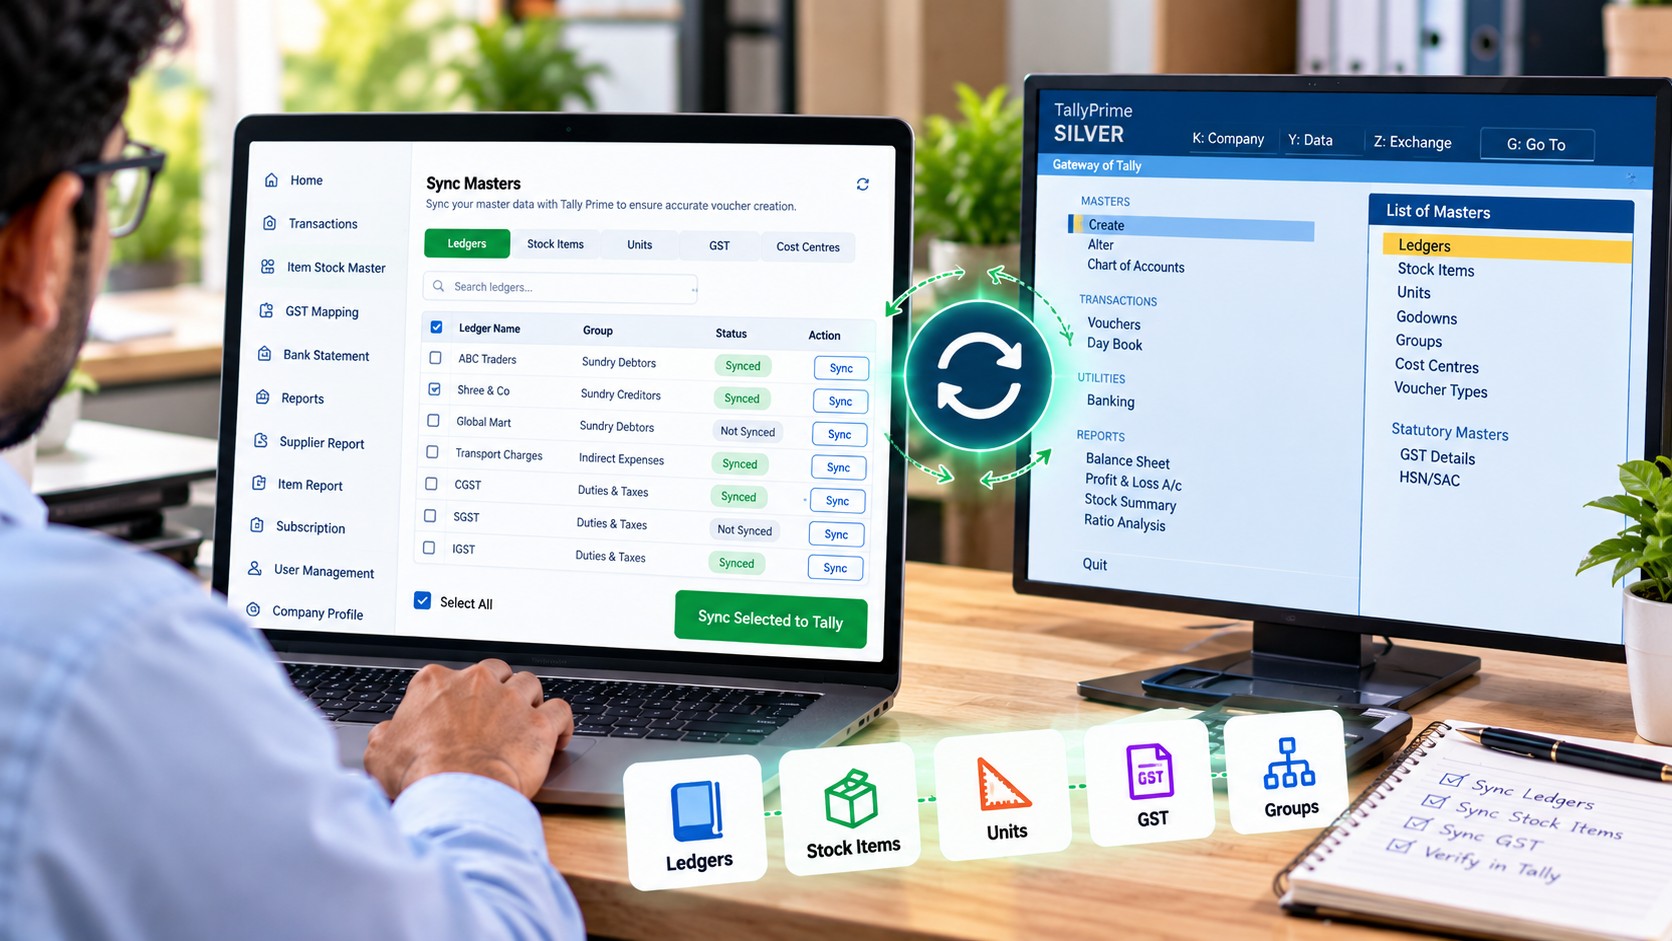
Before syncing invoice documents, make sure that the necessary accounting masters are available in Tally Prime and correctly mapped.
eDocs Smart provides a Sync Masters option through the relevant connector workflow. When used, it synchronizes supported basic masters from Tally with Edocsmart, helping the two systems work with corresponding accounting information.
Depending on the accounting configuration, these masters may include party ledgers, accounting ledgers, and other supported master records.
This step is useful when an accountant is setting up a new workflow or working with a company whose existing ledger names differ from the names used in the spreadsheet.
For example, your Excel file may refer to a customer as ABC Traders, while the corresponding
ledger in Tally may have a slightly different name. Reviewing the available
masters and establishing the correct relationship helps prevent incorrect
ledger selection during synchronization.
Why master synchronization matters
Without appropriate master mapping, an otherwise correctly imported invoice may still fail to synchronize or may require manual intervention.
Synchronizing the supported masters before processing invoices helps establish a consistent foundation for the remaining workflow.
Step 6: Map Stock Items to the Correct Tally Inventory Items
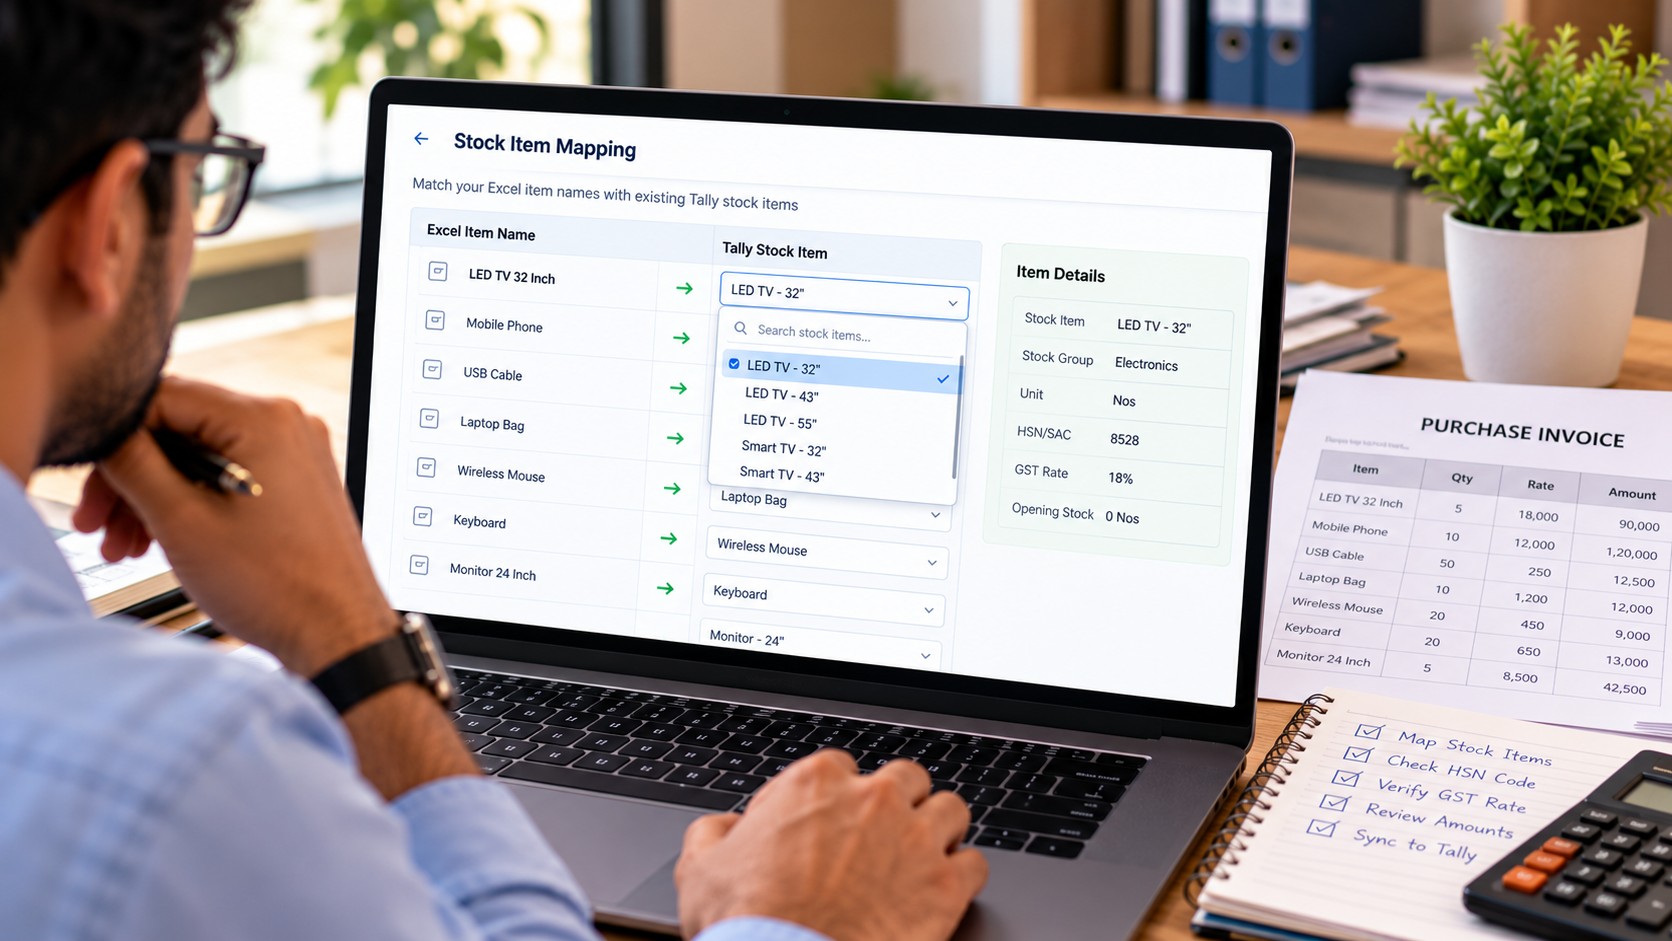
Stock item mapping is especially important for businesses that maintain inventory in Tally Prime.
Suppose a supplier's purchase invoice describes an item as Premium Copier Paper A4, but the
corresponding stock item in Tally is named A4
Paper Ream.
The two descriptions may refer to the same product, but the names are not identical. If the item is not mapped correctly, the accountant may need to intervene before the voucher can be recorded properly.
To address this type of situation, Edocsmart provides a stock-item selection workflow in which users can choose the appropriate item from the available list of Tally stock items.
Once the correct mapping is established and retained by the system, the same relationship can be reused for subsequent transactions, subject to the saved mapping and configuration.
For example:
|
Invoice item name |
Corresponding Tally stock item |
|
Premium Copier Paper A4 |
A4 Paper Ream |
|
Office Printer Cartridge |
HP Printer Cartridge |
|
Packing Box Large |
Large Packing Box |
These are illustrative examples, not actual product mappings.
How saved item mapping helps accountants
- ·Reduces repeated manual item selection.
- ·Helps align supplier descriptions with existing inventory masters.
- ·Supports a more consistent purchase and sales voucher workflow.
- ·Reduces avoidable mismatches when processing recurring invoices.
Before syncing, verify that the selected stock item is genuinely the same product and that its unit, quantity, rate, and applicable tax treatment are correct. Similar names alone are not sufficient to establish an accurate inventory mapping.
Step 7: Sync Up to 100 Entries to Tally Prime in One Go
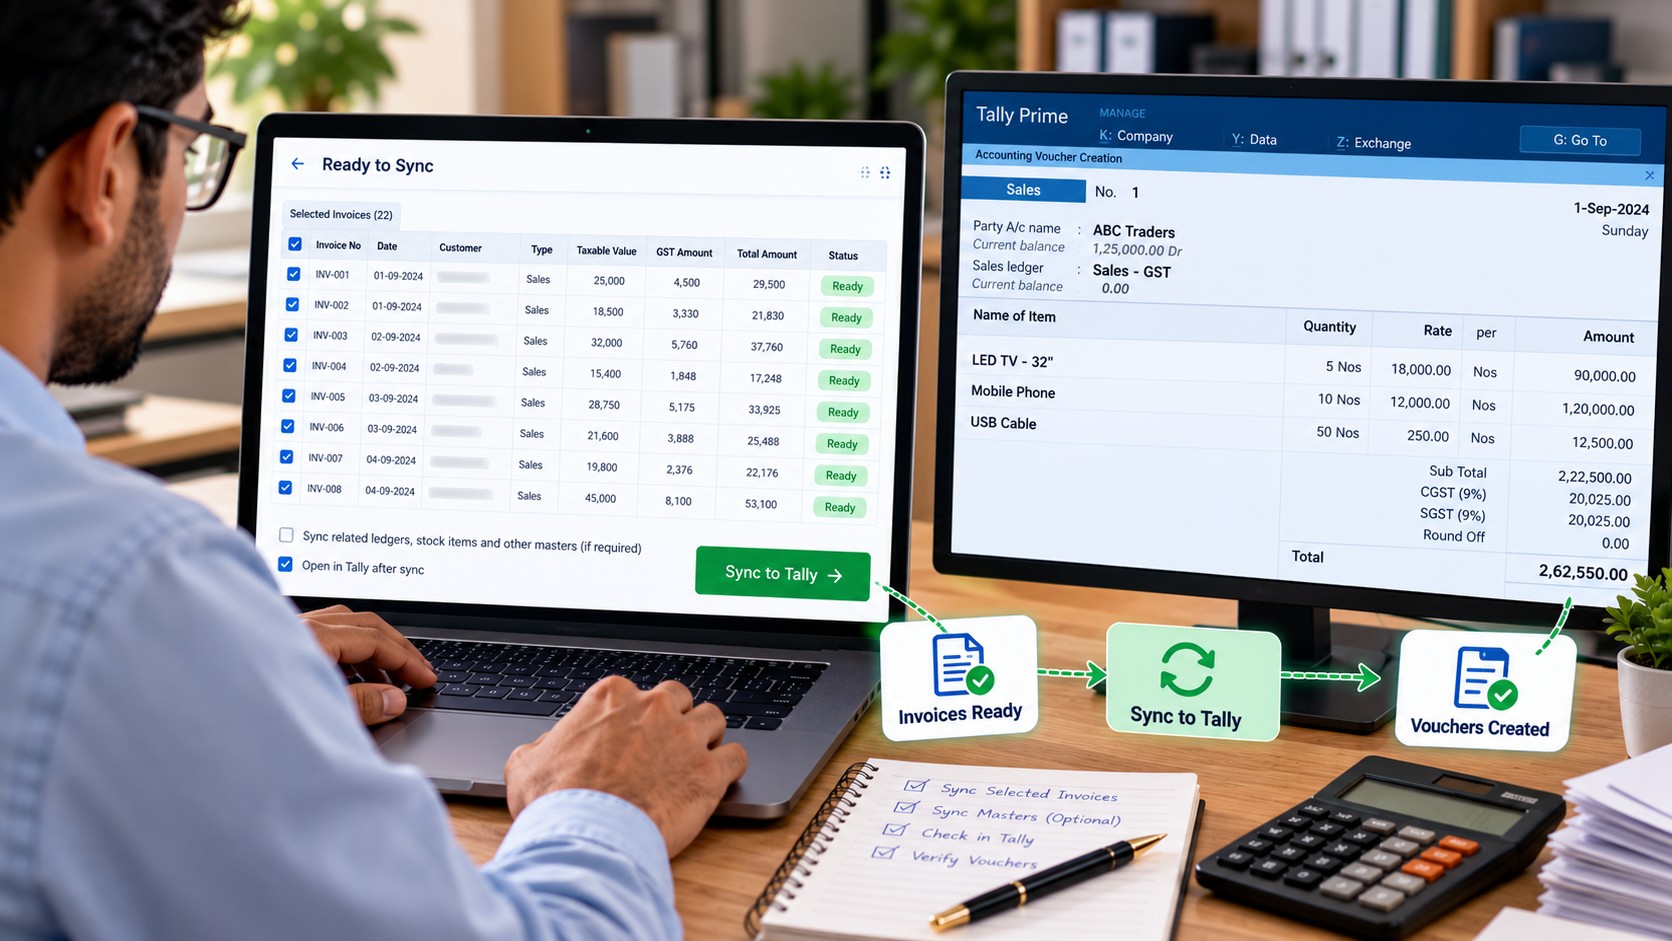
Once the invoices have been reviewed and the necessary master and stock item mappings are ready, you can move to the synchronization stage.
eDocs Smart provides a Sync to Tally option for sending the prepared entries through its Tally Connector.
To get started:
1.Download and install the Edocsmart Tally Connector using the appropriate instructions provided by Edocsmart.
2.Open the connector and log in using the same credentials associated with your Edocsmart account.
3.Ensure that Tally Prime is running and the correct company is open.
4.Confirm that the required masters and stock item mappings are available.
5.Return to Edocsmart and initiate Sync to Tally for the eligible documents.
The workflow supports synchronizing up to 100 entries in a single batch, subject to the applicable product configuration and synchronization requirements.
What happens after clicking Sync to Tally?
When synchronization starts, the Tally Connector begins processing the submitted entries. Its logs provide visibility into the synchronization activity, while the corresponding vouchers begin appearing in Tally Prime as they are successfully processed.
For the sales workflow, this means sales vouchers can be created in Tally. For the purchase workflow, the corresponding purchase vouchers can be created.
Monitor the connector logs and verify the resulting vouchers in Tally Prime. If any entry fails, investigate the reported issue rather than assuming that every submitted invoice was successfully recorded.
Common issues worth checking include incorrect ledger mappings, missing stock items, unavailable companies, incompatible voucher settings, and incomplete invoice data.
For more details on the solution, visit Excel-to-Tally
How to Import GST Purchase Invoice Data from Excel into Tally Prime
The same Excel-to-Tally import process can also be used to import GST purchase invoices from Excel into Tally Prime.
Instead of opening the Sales section, navigate to Transactions → Purchase and select Excel. Upload your purchase Excel file and click Next to proceed with the mapping workflow.
The overall process remains similar, but the accounting fields and voucher treatment should reflect the purchase transaction.
Purchase Excel import workflow
1. Upload the purchase Excel file. Include the supplier invoice number, invoice date, supplier name, purchase details, taxable values, GST amounts, and other required fields.
2. Map the Excel headers. Associate your spreadsheet columns with the corresponding Edocsmart fields. Configure the purchase-related settings according to your accounting requirements.
3. Generate separate purchase documents. The system uses invoice numbers to organize the imported data into individual documents according to the configured structure.
4. Verify the purchase invoices. Check supplier details, invoice references, item quantities, taxable amounts, tax treatment, and totals.
5. Sync masters and map stock items. Ensure that the supplier ledger, purchase ledger, inventory items, and other required masters are correctly matched.
6. Sync the entries to Tally. Use the Edocsmart Tally Connector to process the prepared entries and create the corresponding purchase vouchers.
Example: Processing purchase invoices from multiple suppliers
Imagine that a distributor receives purchase invoices from several suppliers every week. Each supplier sends an Excel file using different column names and item descriptions.
With a properly configured workflow, the accountant can map the relevant fields, generate separate invoice documents, review the records, and map supplier item descriptions to the appropriate Tally inventory masters.
After the checks are complete, eligible purchase entries can be synchronized in batches of up to 100 entries in one go.
This helps reduce repetitive voucher entry and gives the accountant a more organized way to process supplier invoices.
Important: Purchase and sales transactions are not interchangeable. Ensure that the correct transaction section, ledger assignments, voucher type, inventory treatment, and GST settings are selected for each workflow.
How Edocsmart Helps Freelance Accountants Manage Multiple Clients
For a freelance accountant like Rahul, the biggest advantage is not simply uploading a spreadsheet. It is establishing a repeatable process that can be used across recurring accounting work.
Instead of manually entering every invoice, he can organize his work into clear stages:
- ·Upload the client's Excel transaction file.
- ·Configure or reuse the appropriate header mapping.
- ·Generate separate invoice documents.
- ·Verify the imported records and tax details.
- ·Synchronize accounting masters and map stock items.
- ·Send eligible entries to Tally through the connector.
- ·Review the connector logs and confirm the vouchers in Tally Prime.
When the same spreadsheet structure is used repeatedly, a properly configured mapping can reduce the effort required for future imports. Saved stock item mappings can also help with recurring descriptions, provided the underlying items remain correct.
For accountants managing several businesses, this structured process can make transaction handling more manageable and leave more time for reconciliation, exception handling, reporting, and client communication.
If your business has a specialized purchase or sales workflow, additional fields, or specific accounting requirements, contact the Edocsmart team to discuss the available customization options.
To explore the workflow, visit Excel-to-Tally.
Best Practices Before Importing GST Invoice Data into Tally Prime
To keep your Excel-to-Tally process reliable, follow these practices:
Use a consistent Excel structure. Keep invoice numbers, dates, party names, quantities, and tax values organized in clearly defined columns.
Check your mappings. Incorrectly mapped fields can produce inaccurate invoice documents, even when the spreadsheet itself contains correct data.
Verify GST treatment. Confirm the applicable tax fields and accounting treatment against the original invoice and your business requirements.
Review stock item mappings. Match products carefully and check units, quantities, and rates.
Sync the required masters. Make sure the relevant ledgers and other supported masters are available and correctly associated.
Verify vouchers after synchronization. Review connector logs and the resulting entries in Tally Prime. Do not treat a batch submission as proof that every voucher was created successfully.
Test the workflow with a small batch. When using a new spreadsheet format or customized configuration, validate a few transactions before processing a larger batch.
These checks help preserve accounting accuracy while reducing manual effort.
Frequently Asked Questions (FAQs) – GST Invoice Excel to Tally Prime
How to import GST invoice data from Excel into Tally Prime?
Upload your GST invoice Excel file to Edocsmart, map the columns, and review the generated invoices. Connect the Edocsmart Tally Connector and sync the verified sales or purchase vouchers to Tally Prime.
Can I import GST sales invoices from Excel into Tally Prime?
Yes. Open Transactions → Sales → Excel in Edocsmart, upload your file, and configure the column mapping. Verify invoice values and GST details before syncing the sales entries through the Tally Connector.
How to import GST purchase invoices from Excel into Tally Prime?
Go to Transactions → Purchase → Excel, upload the purchase spreadsheet, and map supplier and GST fields. Review the invoice-wise documents and sync eligible purchase entries using the Edocsmart Tally Connector.
What GST details should be included in an Excel invoice file?
Include invoice number, date, party name, taxable amount, applicable GST rates and tax amounts, and invoice total. Add stock-item details and other accounting fields when required by your Tally configuration.
How does GST column mapping work in Edocsmart?
Edocsmart lets you match Excel headers with system fields such as Invoice Number, Party Name, Taxable Value, and GST Amount. Review the mapped fields carefully so invoice documents reflect the intended accounting information.
Can multiple GST invoices be imported into Tally Prime at once?
Yes. Edocsmart can generate separate invoice-wise documents from a structured Excel file and supports syncing up to 100 eligible entries per batch, subject to configuration. Verify the entries before synchronization.
Can Edocsmart map Excel item names to Tally stock items?
Yes. You can associate imported Excel item descriptions with the appropriate Tally stock items using the stock-item selection workflow. Saved mappings may be reused for recurring items, subject to configuration.
Does importing GST invoices automatically ensure GST compliance?
No. Excel-to-Tally automation reduces repetitive entry but does not replace tax checks. Verify GST rates, tax treatment, party details, and voucher totals against the source invoices before and after syncing.
Why are GST Excel entries not syncing to Tally Prime?
Check that the Tally Connector is connected and the correct company is open. Review missing ledgers, stock-item mappings, GST fields, voucher settings, and connector logs to identify the issue.
Conclusion: Simplify GST Invoice Excel-to-Tally Processing with Edocsmart
Importing GST invoice data from Excel into Tally Prime does not have to involve entering every transaction manually.
With Edocsmart, accountants can upload sales and purchase spreadsheets, map their Excel headers, generate separate invoice documents, review the imported information, synchronize supported masters, and map stock items before sending eligible entries to Tally Prime through the Edocsmart Tally Connector.
The ability to process up to 100 entries in a single batch can make the workflow particularly useful for accountants managing recurring invoice volumes and multiple clients.
For Rahul, the freelance accountant from our opening story, the objective is simple: spend less time on repetitive data entry and more time checking the books, resolving discrepancies, and delivering reliable accounting services.
If you regularly import GST invoice data into Tally Prime, explore Excel-to-Tally to learn more about the workflow.
Ready to simplify your Excel-to-Tally process? Visit the Edocsmart website, explore the Excel-to-Tally solution, and contact the team if you need a customized sales or purchase accounting workflow.